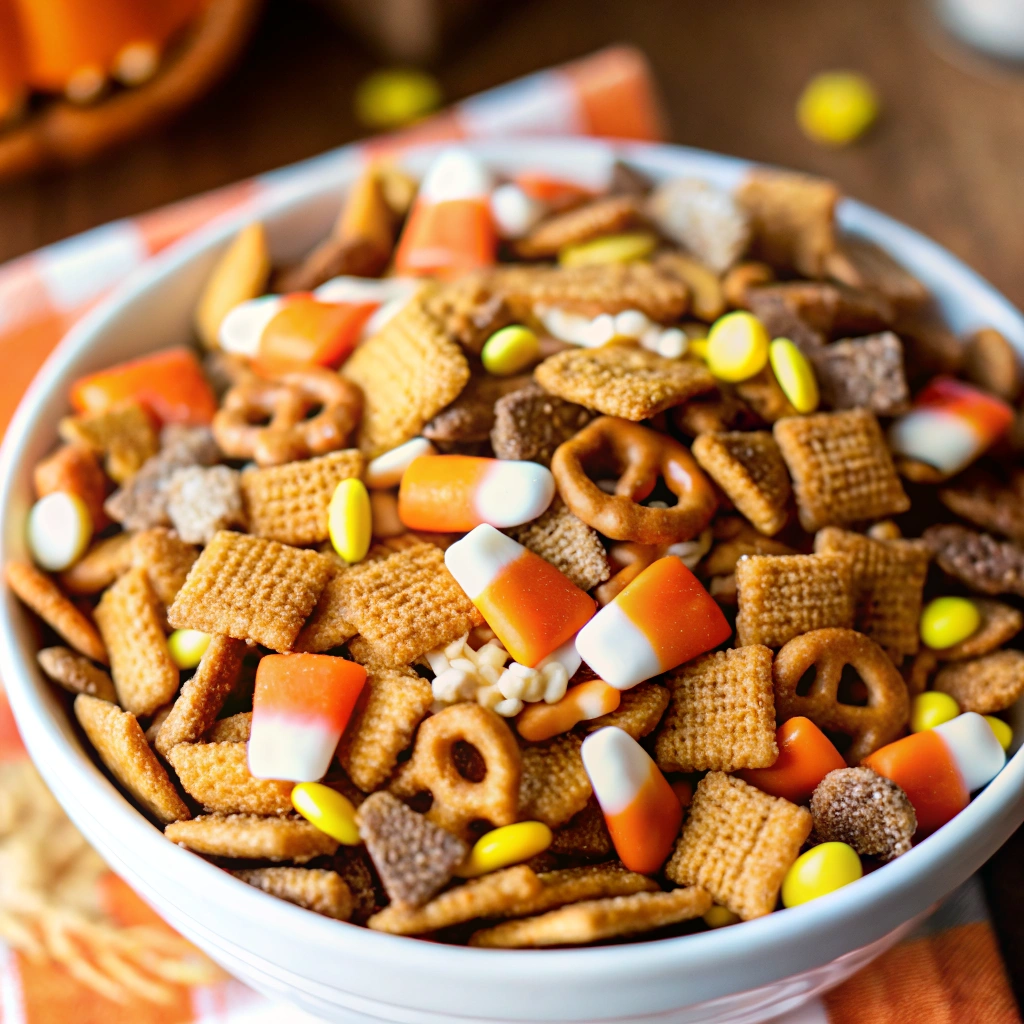
When the air turns crisp and the leaves start to change, there’s nothing better than a handful of truly satisfying Sweet and Salty Fall Snack Mix. This isn’t just a basic party mix; this recipe is a perfectly balanced, crunchy, and absolutely addicting blend of textures—from crispy pretzels and crunchy cereal to salty nuts—all coated in a warm, buttery glaze seasoned with classic fall spices.
This mix is the ultimate quick-prep recipe. It comes together in under 30 minutes and is baked low and slow to achieve a golden, caramelized crunch that holds up perfectly for storage. It’s the ideal companion for movie nights, tailgating, or setting out at a holiday gathering where it disappears almost instantly. The combination of cinnamon, nutmeg, and brown sugar with the savory base is what makes this the quintessential taste of autumn.
Get ready to skip the store-bought versions forever! This Sweet and Salty Fall Snack Mix is easy to customize with your favorite fall add-ins, making it your new go-to recipe for the season.

Why This Snack Mix Recipe Works Every Time
The magic of this recipe is in the precise balance of textures and flavors. Here’s why this method results in the perfect, non-sticky, caramelized crunch:
- The Flavor Foundation (Sweet, Salty, Spicy): We use a trifecta of flavors. The salt comes from the pretzels and nuts, the sweet comes from the brown sugar, and the spice comes from the secret blend of cinnamon and nutmeg. All three are necessary to make the mix truly “addicting.”
- Low-and-Slow Bake: The mix is tossed in a melted butter glaze and then baked at a low temperature (300∘F) for a short period. This allows the liquid in the glaze to evaporate completely, leaving behind a thin, crispy, and non-sticky caramelized sugar coating on every piece.
- The Bulk Base: We rely on large, sturdy base ingredients (Chex, pretzels, nuts) that can withstand the baking process without crumbling. This ensures every piece maintains its crunch.
- Even Coating is Key: The instructions emphasize coating the mix before the glaze cools and stirring frequently during the bake. This prevents clumping and guarantees that the sweet and salty glaze touches every single morsel.
Ingredients
This recipe is versatile, but we recommend sticking to the base mix of cereal, pretzels, and nuts for the best results.
For the Snack Mix Base
- 4 cups Corn Chex cereal
- 4 cups Rice Chex cereal
- 2 cups mini pretzel twists or sticks
- 1 cup mixed nuts (pecans, walnuts, and sliced almonds are great)
- 1 cup bite-sized bagel chips or cheese crackers (e.g., Cheez-Its)
- 1/2 cup popped popcorn (optional, for extra bulk)
For the Sweet & Spiced Glaze
- 1/2 cup (1 stick) unsalted butter
- 1/2 cup packed light brown sugar
- 2 tablespoons honey or maple syrup
- 1 teaspoon ground cinnamon
- 1/2 teaspoon ground nutmeg
- 1/4 teaspoon ground allspice (optional, for deep flavor)
- 1 teaspoon vanilla extract
- 1/2 teaspoon Kosher salt (plus flaky salt for finishing)
Step-by-Step Instructions: Mix, Glaze, and Bake
The key to this recipe is the even distribution of the glaze and the specific low-temperature baking method.
Part 1: Preparing the Base and Glaze (10 Minutes)
- Prep Oven and Pan: Preheat your oven to 300∘F (150∘C). Line a large, rimmed baking sheet (or two smaller ones) with parchment paper or a silicone baking mat for easy cleanup.
- Combine Base Mix: In a very large bowl, gently toss together the Corn Chex, Rice Chex, pretzels, nuts, bagel chips, and popcorn (if using). Set aside.
- Melt Butter Glaze: In a small saucepan over medium heat, melt the butter. Add the brown sugar, honey (or maple syrup), cinnamon, nutmeg, allspice, and 1/2 teaspoon of Kosher salt.
- Simmer: Bring the mixture to a gentle simmer, stirring frequently, until the brown sugar is completely dissolved (about 2–3 minutes). Remove immediately from heat and stir in the vanilla extract.
Part 2: Coating and Baking (20 Minutes Active)
- Coat the Mix: Pour the warm butter glaze over the snack mix ingredients in the large bowl. Using a large rubber spatula or spoon, gently fold and stir the mixture until everything is evenly coated. Work quickly before the glaze cools.
- Spread on Pan: Spread the coated snack mix in an even layer across the prepared baking sheet(s).
- Bake and Stir: Bake the mix for a total of 20 minutes, stirring every 5 minutes. Stirring is essential to ensure every piece gets caramelized and prevents the bottom layer from burning.
- Cool Completely: Remove the mix from the oven and immediately sprinkle with a pinch of flaky sea salt (optional, but highly recommended for a salty finish). Crucially, allow the mix to cool completely on the baking sheet. The mix will look soft and slightly glossy when hot, but it will harden and become perfectly crispy as it cools.
- Break Apart and Store: Once fully cooled (about 30 minutes), break up any clumps and store the mix in an airtight container.
Pro Tips for the Best Fall Snack Mix
Follow these tips to guarantee a perfect, non-sticky, evenly coated, and ultra-crunchy snack mix.
- The Size of the Bowl Matters: Use the largest mixing bowl you have. When you pour the glaze over the mix, you need plenty of room to fold and stir gently without crushing the delicate Chex pieces.
- Don’t Over-Bake, But Don’t Under-Bake: Under-baking will result in a sticky mix because the water hasn’t fully evaporated from the butter. The 300∘F temperature is low enough to prevent burning while being high enough to crisp the coating. Always bake for the full 20 minutes, stirring frequently.
- The Flaky Salt Finish: Adding a pinch of flaky sea salt (like Maldon) the moment the mix comes out of the oven is a game-changer. It elevates the “salty” side of the equation, contrasting beautifully with the warm brown sugar glaze.
- Use Fresh Spices: Since the spices are the main flavor component, make sure your ground cinnamon, nutmeg, and allspice aren’t stale. Stale spices will result in a flat, uninspired flavor.
- Preventing Burnt Nuts: If you are using very delicate nuts, such as pecans or pine nuts, you can reserve them and stir them in only for the last 5 minutes of baking.
Serving Suggestions and Creative Variations
This Sweet and Salty Fall Snack Mix is fantastic as is, but it’s also a perfect base for creative customization.
Serving Ideas
- Party Bowl: Serve the mix in a large, festive bowl with a small scoop.
- Game Day Fun: It’s the perfect easy-to-grab snack for watching football or a movie marathon.
- Homemade Gifts: Package the cooled mix in mason jars or cellophane bags tied with a festive ribbon for a beautiful and easy hostess gift.
- Topping: Sprinkle a handful over a scoop of vanilla ice cream for a crunchy, spiced topping.
Creative Fall Add-Ins (Add AFTER Baking and Cooling)
Do not bake these items, as they will melt, burn, or become hard. Stir them in only after the mix has cooled and hardened.
- Candy: Add 1/2 cup of festive-colored M&Ms (yellow, orange, brown), candy corn, or small Reese’s Pieces for color and extra sweetness.
- Dried Fruit: Stir in 1/2 cup of dried cranberries (craisins), dried cherries, or small chopped apricots for a chewy, tart contrast.
- Marshmallows: Add 1/2 cup of mini marshmallows for a soft, chewy texture.
- Spice Boost: For an extra kick, dissolve 1/2 teaspoon of cayenne pepper into the melted butter glaze (Part 1, Step 3) for a sweet and spicy kick.
- White Chocolate Drizzle: Once the mix is completely cool, melt 1/4 cup of white chocolate chips and drizzle it over the top of the mix. Allow the chocolate to set completely before breaking and storing.
Frequently Asked Questions
- How long does this snack mix stay fresh? When stored in an airtight container at room temperature, this Sweet and Salty Fall Snack Mix will stay perfectly fresh and crunchy for up to 2 weeks. It is a fantastic make-ahead recipe.
- Can I make this in the microwave? Yes, you can. Follow the instructions for making the glaze on the stovetop. Once the glaze is ready, pour it over the mix and toss well. Microwave on high power for 60 seconds, stir well, then microwave for two more 60-second intervals, stirring between each. After the third round, spread it on the baking sheet to cool completely. The oven method gives a more consistent crisp, but the microwave is faster.
- Can I use generic brand cereal? Absolutely. Any square-shaped crispy corn or rice cereal will work just fine.
- Why did my mix turn out sticky? Stickiness is caused by the sugar glaze not fully drying out. The solution is almost always more baking time. If you took it out of the oven and it cooled sticky, simply spread it back out on the baking sheet and bake it for an additional 5–10 minutes at 300∘F, stirring once, and then let it cool completely again.
- Can I substitute the butter? You can substitute the butter with margarine or coconut oil, but both will slightly alter the final flavor and texture. Butter is highly recommended for the best flavor and authentic richness.
This Sweet and Salty Fall Snack Mix is your answer to effortless, crowd-pleasing seasonal snacking. Enjoy every crunchy bite!
Don’t forget to Pin this recipe for later and share your favorite customizable add-in idea in the comments below!

Sweet and Salty Fall Snack Mix
Equipment
- large mixing bowl
- wooden spoon or spatula
- airtight container
Ingredients
- 4 cups mini pretzels
- 2 cups candy corn
- 2 cups salted peanuts
- 2 cups fall-colored chocolate candies (like M&Ms)
- 1 cup pumpkin spice cereal or Chex mix (optional)
Instructions
- In a large bowl, combine pretzels, candy corn, peanuts, chocolate candies, and cereal (if using).
- Toss until evenly mixed.
- Serve immediately or store in an airtight container for later.