
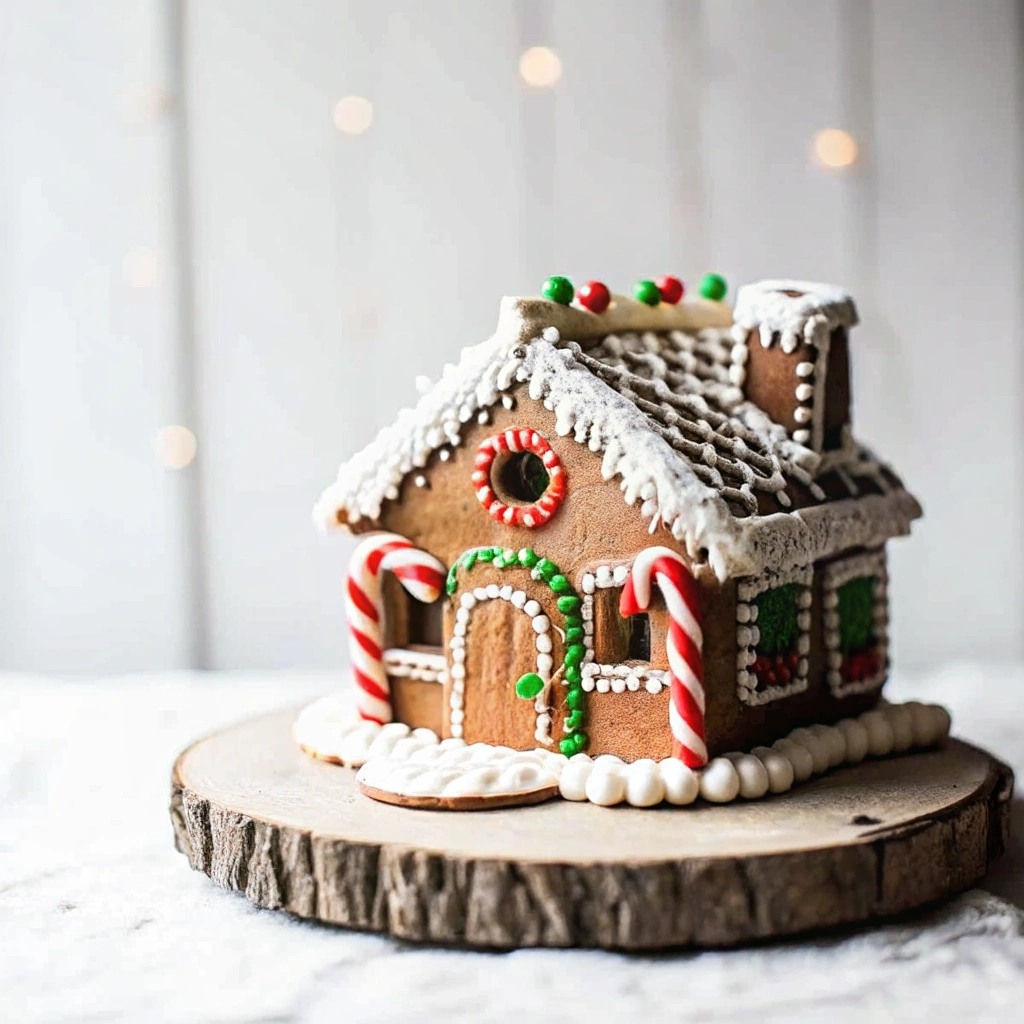
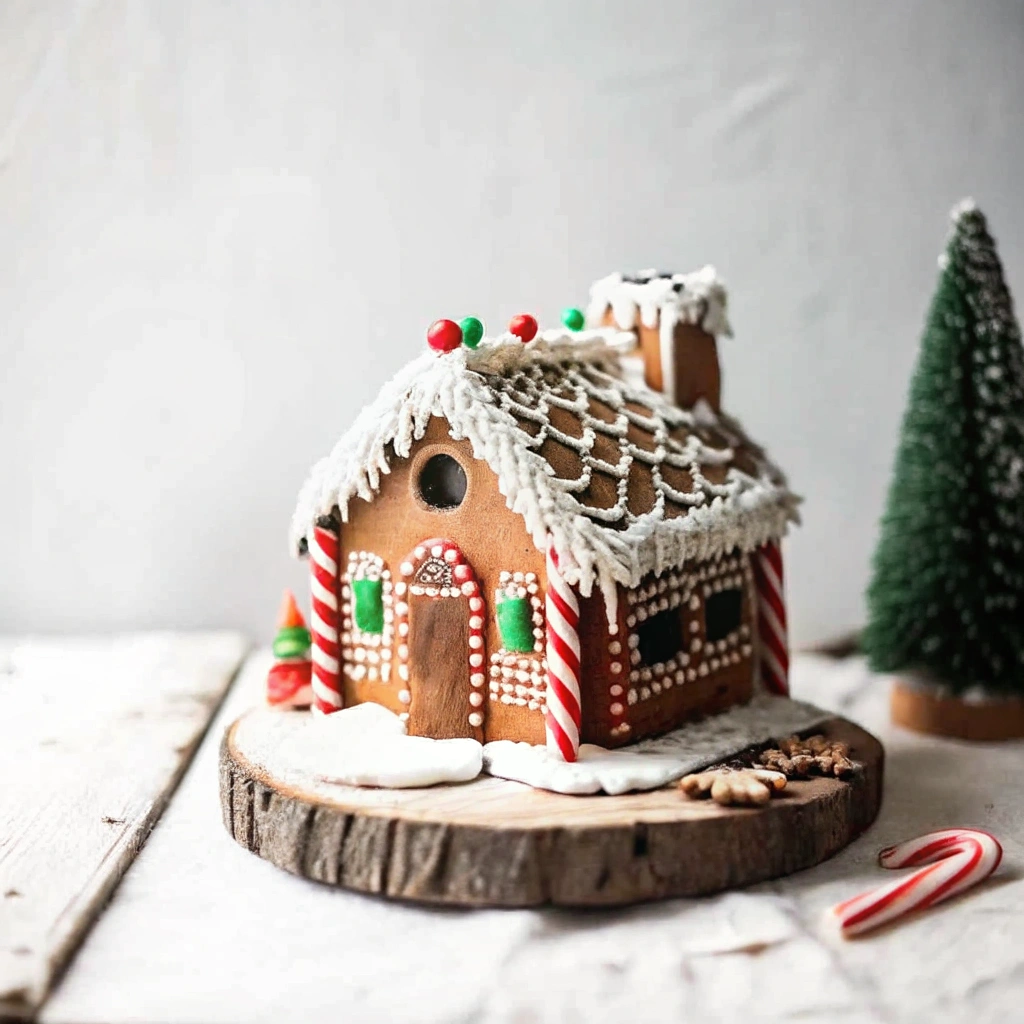
Building a Gingerbread House is one of the most beloved and festive holiday traditions. However, nothing is more frustrating than watching your architectural masterpiece slump, spread, or collapse! This recipe is your ultimate guide to a sturdy, perfectly spiced, and beautiful Gingerbread House that will last all season long.
We use a special non-spreading gingerbread dough that holds its crisp, sharp edges during baking, ensuring your walls fit together perfectly. The secret weapon is our Royal Icing Glue, made with meringue powder, which sets rock-hard—it truly is edible cement! This recipe provides all the necessary measurements, a simple step-by-step process for making your house, and crucial troubleshooting tips to ensure structural success, even for beginner builders.
Beyond the perfect structure, this gingerbread is deeply flavored with molasses, ginger, and cinnamon, giving your home that unforgettable holiday aroma. Get ready to master the ultimate holiday craft—these Gingerbread Houses are guaranteed to be your family’s favorite new tradition!
Why This Gingerbread House Recipe Is Architecturally Sound
The biggest difference between a failed structure and a sturdy masterpiece is the dough and the icing. Our recipe ensures structural integrity through these key techniques:
- Structural Dough (Low Leavening): This recipe intentionally uses a very small amount of baking soda. Too much baking soda (a common ingredient in cookies) causes the dough to spread and rise, warping the shape of your walls and roof. Our dough remains flat, dense, and rigid, making it ideal for building.
- High Molasses Content: We use a generous amount of molasses, which provides the dark color and deep, classic gingerbread flavor. Crucially, the molasses helps keep the dough pliable for rolling, but its high sugar content ensures the baked pieces dry out and become firm like boards when cooled.
- Royal Icing is the Glue: We do not use thin icing or melted candy. Royal icing, made with meringue powder, sets up harder than any other edible adhesive. It hardens quickly and creates a permanent, stable bond necessary to hold the house structure together against gravity.
- Precision and Sanding: Baking can cause minor imperfections. We include a step for sanding the baked pieces. This simple trick ensures all edges are perfectly flat and straight, allowing for seamless, sturdy joints.
Ingredients
This recipe is divided into three parts: the structural dough, the powerful royal icing glue, and the decorations.
Part 1: Sturdy Gingerbread Dough
- 31/2 cups all-purpose flour, plus more for dusting
- 1 teaspoon baking soda
- 1 teaspoon salt
- 2 tablespoons ground ginger
- 2 teaspoons ground cinnamon
- 1/2 teaspoon ground cloves
- 1/2 cup (1 stick) unsalted butter, softened
- 1/2 cup packed dark brown sugar
- 1 large egg, at room temperature
- 3/4 cup dark molasses
- 2 tablespoons water or milk
Part 2: Royal Icing Glue
- 3 large egg whites or 4 tablespoons meringue powder (recommended for safety and stability)
- 1/2 cup cold water (if using meringue powder)
- 4 cups (about 1 lb) confectioners’ sugar (powdered sugar), sifted
- 1 teaspoon vanilla extract
- 1/4 teaspoon cream of tartar (optional, helps stiffen the icing)
Part 3: Decoration (Choose Your Favorites!)
- Assorted hard candies, gumdrops, peppermints
- Pretzel sticks (for fencing)
- Shredded coconut (for snow)
- Marshmallows or mini cookies
- Food coloring gels (for colored icing)
- Powdered sugar (for dusting snow)
Step-by-Step Instructions: Dough, Baking, and Assembly
This is a baking and building project. Follow the steps exactly, paying close attention to the chilling and drying times.
Part 1: Making the Gingerbread Dough (20 Minutes Prep + 2 Hours Chill)
- Combine Dry Ingredients: In a large bowl, whisk together the flour, baking soda, salt, ginger, cinnamon, and cloves. Set aside.
- Cream Wet Ingredients: In a separate large bowl or stand mixer, cream the softened butter and brown sugar until light and fluffy (about 3 minutes).
- Add Egg and Molasses: Beat in the egg, followed by the molasses and water/milk. Mix until just combined.
- Form Dough: Gradually add the dry ingredients to the wet mixture, mixing on low speed until a thick, uniform dough forms. It should be slightly stiff.
- Chill (Crucial): Divide the dough into two disks, wrap each tightly in plastic wrap, and refrigerate for at least 2 hours, or up to 2 days. Chilling prevents spreading during baking.
Part 2: Cutting and Baking the Walls (30 Minutes Prep + 15 Minutes Bake)
- Prepare Templates: You will need paper templates for your house pieces (2 roof pieces, 2 side walls, 2 front/back walls with peaked tops). Use online stencils or cut your own from cardstock.
- Roll Dough: Preheat your oven to 350∘F (175∘C). Working with one disk of cold dough at a time, roll it out directly onto a piece of parchment paper to a thickness of about 1/4 inch (6 mm).
- Cut Pieces: Place your paper templates onto the rolled dough and use a sharp knife to cut around them carefully. Remove the scraps. Tip: You can re-roll scraps only once or twice before the dough becomes tough.
- Bake: Slide the parchment paper with the cut pieces onto a baking sheet. Bake for 12–15 minutes until the edges are firm and slightly darker brown. The baking time will depend on the size of your pieces.
- Cool: Remove from the oven. Immediately place the paper templates back onto the baked pieces and use a knife to trim any slightly spread edges while the pieces are still hot. Let cool completely on the baking sheet for at least 30 minutes until fully firm before touching.
Part 3: Mixing the Royal Icing Glue (10 Minutes)
- Combine Powder and Water: If using meringue powder, whisk the 4 tablespoons of meringue powder with 1/2 cup of cold water until frothy (about 1 minute).
- Add Sugar: Gradually add the sifted confectioners’ sugar to the mixture, starting on low speed and increasing to medium-high. Add the vanilla and cream of tartar (if using).
- Whip to Stiff Peaks: Beat the icing on medium-high speed for 5–7 minutes. The icing is ready when it is thick, bright white, holds stiff peaks, and when you lift the beaters, the peak holds its shape without curling over. This is the structural consistency.
- Store: Place the icing into a piping bag fitted with a medium round tip. Cover the bowl with a damp cloth while working, as royal icing dries very quickly.
Part 4: Assembly and Decoration (Time Varies)
- Find Support: Arrange cans, jars, or small boxes on your work surface to act as temporary supports for the walls.
- Glue the Walls: Pipe a thick line of royal icing along the bottom and side edges of one front wall piece. Press it against a side wall piece. Secure with your cans/supports. Repeat until all four walls are standing and glued together. Allow the walls to dry for at least 1-2 hours before adding the roof.
- Attach the Roof: Once the walls are secure, pipe a thick, generous line of icing along the top peak of the walls. Carefully place one roof piece on top, pressing gently. Pipe icing along the top seam of the roof and the joining seam to reinforce. Allow the entire structure to dry completely for at least 4 hours, or ideally overnight, before decorating.
- Decorate: Once the structure is completely dry, you can thin the remaining icing slightly with a few drops of water for a flooding or piping consistency (for details and windows). Use thick icing to attach candies. Use powdered sugar to create a snowy effect around the base.
Pro Tips for Structural Success (No Collapses!)
Building a Gingerbread House requires patience and precision. Use these professional secrets to guarantee a house that stays standing.
- Sanding the Edges (The Carpenter’s Secret): After the pieces are fully cooled, but before assembly, use a coarse metal grater or a rasp (or even a sharp knife) to gently sand the edges that will meet. This shaves off any unevenness caused by baking, ensuring the seams are perfectly straight and flush for a strong bond.
- Don’t Substitute Meringue Powder: While some recipes use raw egg whites, meringue powder is highly recommended. It is pasteurized (safer), and produces a more consistent, more stable, and faster-drying royal icing that sets harder than any egg white version.
- The Window Trick: If you want “stained glass” windows, crush clear hard candies and sprinkle them into the cut-out windows of your dough pieces immediately before baking. The candy will melt, cool, and solidify into glass panes.
- Piping Tip Size: Use a medium-sized round tip (like a Wilton #5) for assembly. A tiny tip won’t dispense enough glue for stability, and a massive tip will make a mess. For decoration, use a smaller tip (#2 or #3).
- If the Dough is Sticky: If your dough feels too sticky to roll out, it’s likely too warm. Wrap it back up and chill it for another 30 minutes. If that doesn’t work, knead in an extra tablespoon of flour until it’s firm and non-sticky. Never rush the chill time.
Decorating, Storing, and Gifting
Once the house is built and the icing is dry, the fun part begins!
Decoration Themes
- Classic Candy Cottage: Use primarily colorful hard candies, gumdrops, and peppermint sticks. Use white icing for simple outlines and snow effects.
- Natural Woodland: Use shredded wheat cereal for the roof (thatch), pretzel sticks for a fence, and sliced almonds for shingles. Decorate with chocolate rocks and green icing pine trees.
- Winter Wonderland: Use only white icing for intricate piping designs. Coat the house and base liberally with powdered sugar. Use clear rock candy or crystalline sugar sprinkles for an icy effect.
- Edible Shingles: For a textured roof, use sliced almonds, mini chocolate wafers, or overlapping cereal pieces (like Cheerios) attached with small dabs of icing.
Storage and Longevity
- Dough Storage: The unbaked gingerbread dough can be stored in the refrigerator for up to 2 days or frozen, tightly wrapped, for up to 3 months. Thaw overnight in the refrigerator before using.
- Baked Pieces: Baked, un-assembled pieces can be stored at room temperature in an airtight container for up to 2 weeks. Ensure they are completely cool before storing.
- Assembled House: A properly assembled gingerbread house (with royal icing) will last for many weeks at room temperature in a dry area. Because the dough is baked to be hard and dry, it will last longer than a typical cookie. Keep it away from high humidity, as moisture will cause the royal icing to soften and the structure to collapse. Do not refrigerate.
Frequently Asked Questions
- Why did my gingerbread dough spread and lose its shape? The dough was likely too warm. If the butter in the dough is warm, it melts quickly in the oven and causes the dough to spread. Always ensure the dough is fully chilled before rolling, and bake it on cold sheets. Also, ensure you used the correct amount of baking soda (1 teaspoon max).
- My royal icing is too runny—it won’t hold the walls! Your icing needs more confectioners’ sugar. The consistency for assembly must be incredibly thick—the stiff peak stage. Slowly mix in another 1/4 to 1/2 cup of sifted confectioners’ sugar until the icing holds a rigid, pointy peak when you lift the mixer.
- My house collapsed after assembly. What went wrong? This is usually due to one of three reasons:
- The icing wasn’t thick enough: See the tip above—it must be stiff glue.
- You didn’t let the walls dry: The wall pieces must be allowed to dry for 1–2 hours with supports (cans/jars) before the heavy roof pieces are added. Rushing this step is the most common cause of collapse.
- Uneven pieces: You skipped the sanding step! If the edges aren’t flush, the icing bond is weak.
- Can I use eggs instead of meringue powder for the icing? Yes, you can substitute the meringue powder and water with 3 large raw egg whites. However, raw egg whites carry a slight risk of salmonella, and the meringue powder creates a more reliably stiff and fast-drying icing. If using egg whites, ensure they are at room temperature and beat them for a full 8-10 minutes.
- What is the best way to cut out the pieces? Use sharp templates cut from cardstock or heavy paper. Place the template on the dough and cut before baking. Do not use cookie cutters unless they are specifically designed for house building, as their edges tend to be too rounded. Trimming the pieces immediately after baking while they are hot is key to final structural perfection.
Enjoy this rewarding and delicious holiday project! This Gingerbread House is guaranteed to be the centerpiece of your holiday decor.
Don’t forget to Pin this sturdy Gingerbread House recipe for a fun holiday project and share a photo of your decorated masterpiece in the comments below!
Gingerbread House Recipe
Ingredients
Equipment
Method
- In a large bowl, whisk together flour, baking soda, salt, and spices. Set aside.
- In another bowl, beat butter and brown sugar until light and fluffy. Add molasses, egg, and vanilla; mix until combined.
- Gradually mix dry ingredients into wet until dough forms. Divide dough into two discs, wrap, and chill for 1 hour.
- Preheat oven to 350°F (175°C). Roll dough on a floured surface to 1/4-inch thickness. Cut house template shapes using a pattern or cutters.
- Transfer pieces to parchment-lined baking sheets and bake for 12–15 minutes or until edges are firm. Cool completely before assembling.
- Prepare royal icing. Use as ‘glue’ to attach walls and roof pieces, allowing each section to set before continuing.
- Decorate with candies, icing details, and sprinkles. Allow to dry completely before displaying or serving.