This post contains affiliate links, which means I may earn a small commission if you make a purchase through these links at no extra cost to you. I only recommend products I genuinely love and use in my own kitchen. Thank you for supporting this blog!
It’s just not Christmas without the warm, spicy scent of Classic Gingerbread Cookies baking in the oven! This is the only recipe you’ll need this holiday season.
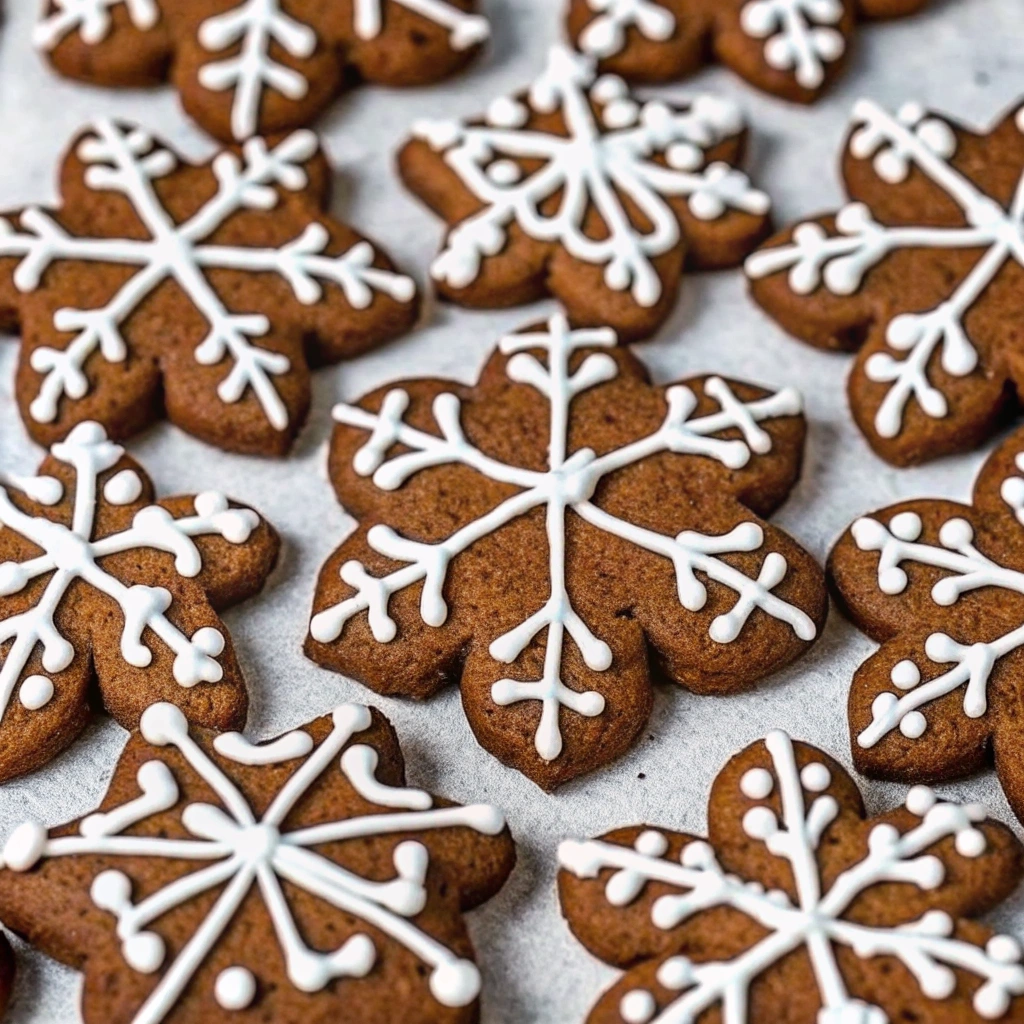
Picture this: you bite into a gingerbread cookie that’s soft and chewy in the center with slightly crisp edges that give way to the most perfectly spiced, molasses-rich flavor. That’s exactly what you’re going to get with this recipe! These Classic Gingerbread Cookies aren’t dry or rock-hard like so many others—they’re tender, flavorful, and absolutely irresistible.
This foolproof recipe is easy to make, the dough is a dream to roll out, and the cookies hold their shape perfectly, making them as fun to decorate as they are to eat. Whether you’re planning a cookie decorating party with the kids, filling up your holiday gift boxes, or simply want to fill your home with the most wonderful Christmas aroma, this is the gingerbread cookie recipe that will become your new tradition.
Why You’ll Love This Classic Gingerbread Cookies Recipe
Let me tell you why this recipe has become an absolute favorite in kitchens everywhere!
The flavor is absolutely perfect. We’re talking rich, deep molasses paired with just the right amount of warm ginger, cinnamon, and cloves. The spice blend is aromatic and cozy without being overpowering—you’ll taste every warm note without any single spice taking over. It’s that classic gingerbread flavor you remember from childhood, dialed in to perfection.
The texture is what dreams are made of. These cookies are soft and chewy—never rock-hard or dry! They have a tender crumb that makes them absolutely delightful to eat, while still being sturdy enough to handle. The edges get just slightly crisp while the center stays perfectly soft.
They hold their shape beautifully! No more watching your carefully cut gingerbread men turn into unrecognizable ginger-blobs in the oven. This recipe has been tested and perfected to ensure your cookies maintain their shape from the moment you cut them until they come out of the oven. Your gingerbread people will actually look like people, your stars will have perfect points, and your Christmas trees will stay festive and tree-shaped.
They’re incredibly sturdy and perfect for decorating. These cookies can handle royal icing, sprinkles, candies, and all your creative decorating ideas. They’re also strong enough to package up beautifully as gifts without crumbling, making them ideal for holiday cookie exchanges and care packages.
The Secret to Soft, Chewy Gingerbread (It’s All in the Molasses!)
The magic behind truly exceptional Classic Gingerbread Cookies lies in understanding your ingredients and how they work together.
Molasses is your best friend here. This is the ingredient that gives gingerbread its signature deep, rich flavor and contributes to that gorgeous soft texture. You’ll want to use dark molasses (sometimes called “robust” molasses) for this recipe. It has the perfect balance of sweetness and that characteristic slightly bitter, complex molasses flavor. Avoid blackstrap molasses for these cookies—it’s too bitter and intense, and will overpower all those lovely warm spices.
The spice blend matters. Ground ginger is the star, of course, but it’s the supporting cast of cinnamon, cloves, and a touch of nutmeg that creates that iconic gingerbread warmth. Freshly ground spices will give you the most vibrant flavor, but good quality store-bought ground spices work beautifully too.
Brown sugar adds moisture and chewiness. The molasses content in brown sugar doubles down on that tender texture while adding extra depth of flavor.
Don’t overbake! This is the #1 tip for keeping your gingerbread cookies soft and chewy. You want to pull them from the oven when they look puffed and matte on top, but still feel slightly soft to the touch. They’ll firm up as they cool on the baking sheet. If you wait until they feel completely firm in the oven, they’ll end up hard and dry. Trust the process and pull them a minute or two earlier than you think you should!
How to Make Perfect Gingerbread Cookie Dough (Step-by-Step)
Making Classic Gingerbread Cookies from scratch is easier than you might think! Here’s how to create dough that’s an absolute pleasure to work with.
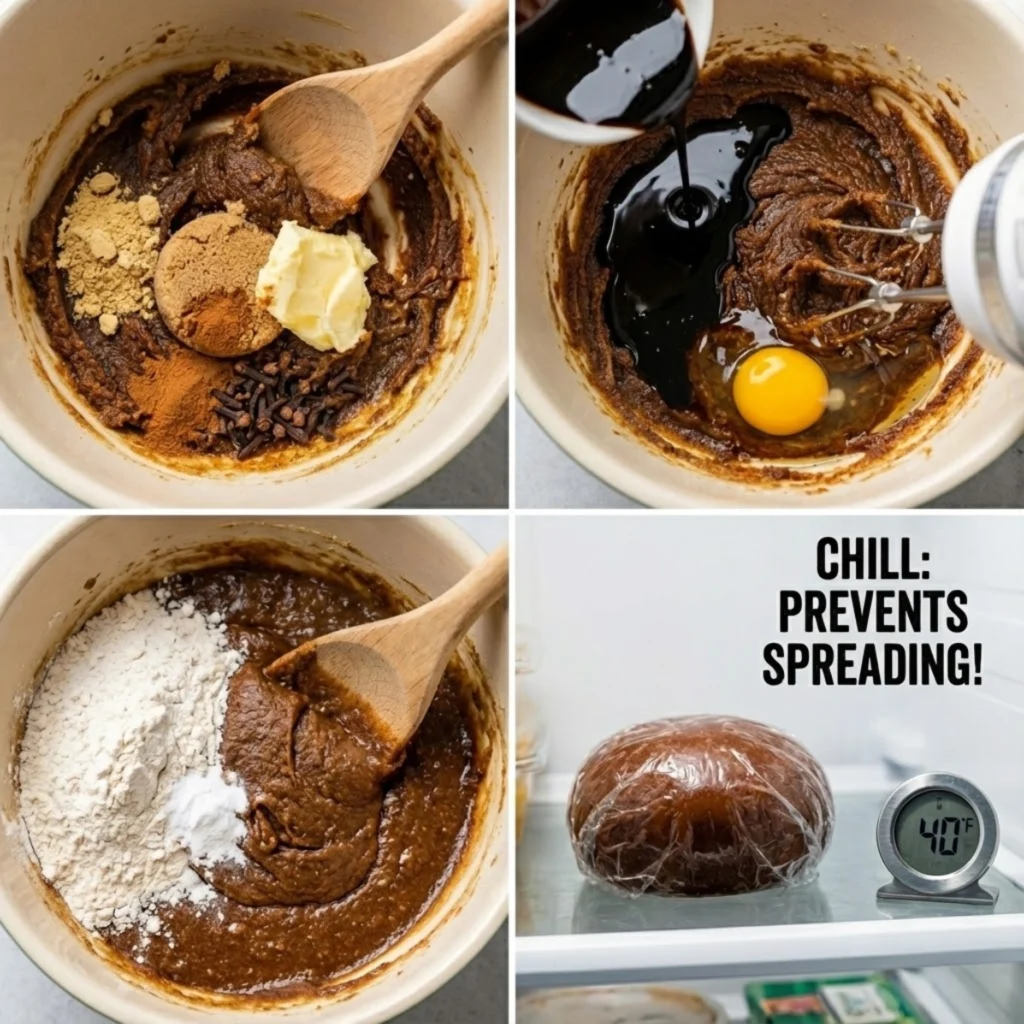
Step 1: Cream the butter, sugar, and spices. Start by beating softened butter with brown sugar and all your ground spices (ginger, cinnamon, cloves, and a pinch of nutmeg). Creaming them together at this stage actually helps “bloom” the spices, intensifying their flavors and ensuring they’re evenly distributed throughout your dough. Beat until the mixture is light and fluffy—this takes about 2-3 minutes with an electric mixer.
Step 2: Add the molasses and egg. Pour in your dark molasses and crack in one egg, then beat until everything is completely combined and smooth. The mixture might look a bit curdled at first, but keep mixing and it will come together beautifully. This is where that gorgeous gingerbread color starts to develop!
Step 3: Mix in the dry ingredients. In a separate bowl, whisk together your flour, baking soda, and salt. Then gradually add this to your wet ingredients, mixing on low speed until just combined. Don’t overmix once the flour is added—you want tender cookies, not tough ones! The dough will be quite soft and sticky at this stage, which is exactly what you want.
Step 4: Chill the dough. This step is absolutely mandatory—not optional! Divide your dough into two discs, wrap each tightly in plastic wrap, and refrigerate for at least 2 hours (or up to 3 days). Chilling does two crucial things: it prevents the cookies from spreading in the oven (keeping those perfect shapes intact), and it makes the dough firm enough to roll out easily without sticking to everything. Cold dough is happy dough!
Rolling, Cutting, and Baking Your Cookies
Now comes the fun part—transforming that chilled dough into beautiful cookies!
Rolling out the dough: Remove one disc from the refrigerator (keep the other chilled until you’re ready for it). Let it sit at room temperature for about 5 minutes to soften just slightly—you want it workable but still cold. Lightly flour your work surface and your rolling pin. Roll the dough to about ¼-inch thickness for cookies that are sturdy enough for decorating but still tender. If the dough gets too warm and starts sticking, pop it back in the fridge for 10 minutes.
Cutting your cookies: Dip your cookie cutters in flour before each cut to prevent sticking. If you don’t have cookie cutters yet, I absolutely love this 18-piece Christmas cookie cutter set—it has all the classic shapes like gingerbread men, snowflakes, trees, stars, hearts, and angels that are perfect for holiday baking! Cut your shapes as close together as possible to minimize scraps. Here’s a pro tip: after cutting, chill the cut cookies on the baking sheet for 10-15 minutes before baking. This extra chill ensures they maintain their shape perfectly!

Getting cookies onto the baking sheet: Use a thin metal spatula to carefully transfer your cut cookies to a parchment-lined baking sheet. Space them about 1 inch apart—they won’t spread much, so you can fit quite a few on each sheet. Work gently to avoid stretching the dough, which can distort your shapes.
Baking to perfection: Bake at 350°F for 8-10 minutes, depending on size. Small cookies might only need 7-8 minutes, while larger ones might need the full 10 minutes. Look for cookies that appear puffed and have a matte finish on top. The edges might look just barely set, and the center might seem slightly underdone—that’s perfect! They’ll continue cooking on the hot pan after you remove them from the oven. Let them cool on the baking sheet for 5 minutes before transferring to a wire rack.

Our Favorite Easy Royal Icing for Decorating
Want to decorate your Classic Gingerbread Cookies like a pro? This no-fail royal icing recipe is the secret!
The basic recipe is beautifully simple: combine 4 cups powdered sugar with 3 tablespoons meringue powder and 5-6 tablespoons of water. Beat with an electric mixer on medium-high speed for about 7 minutes until the icing is thick, glossy, and holds stiff peaks. This creates your base icing, which you’ll then adjust to two different consistencies.
Outline consistency (stiff icing): This is your base icing as-is, thick enough to hold its shape. Use this consistency to pipe outlines around the edges of your cookies and for details like buttons, faces, or text. Transfer some into a piping bag fitted with a small round tip (or use a zip-top bag with a tiny corner snipped off).
Flood consistency (runny icing): For filling in large areas and creating that smooth, professional finish, you need a thinner icing. Take some of your base icing and add water one teaspoon at a time, stirring gently, until it reaches the consistency of thick glue or honey. When you drizzle it from a spoon, it should smooth out and settle within about 10 seconds. This is your “flood” icing—use it to fill in the outlined areas on your cookies.
Coloring your icing: Divide your icing into separate bowls and add gel food coloring (not liquid, which can thin the icing too much) to create your color palette. Classic gingerbread decorating looks beautiful with white, red, green, and maybe some black for details.
Let decorated cookies dry completely at room temperature for at least 4-6 hours (or overnight) before stacking or packaging. The icing will harden to a beautiful, smooth finish that won’t smudge.
Frequently Asked Questions
Do I really have to chill the gingerbread dough?
Yes, absolutely! I know it’s tempting to skip this step when you’re excited to start baking, but chilling is essential for Classic Gingerbread Cookies that hold their shape. Cold dough spreads less in the oven, which means your carefully cut shapes will stay exactly as you intended. Chilling also makes the dough much easier to roll out without it sticking to your counter, rolling pin, or cookie cutters. For best results, chill for at least 2 hours, but overnight is even better! The dough can be refrigerated for up to 3 days or frozen for up to 3 months.
Can I make this dough ahead of time?
Absolutely, and I actually encourage it! Gingerbread dough is perfect for make-ahead baking. You can refrigerate the wrapped dough discs for up to 3 days before rolling and baking. For longer storage, freeze the dough for up to 3 months—just wrap it tightly in plastic wrap, then place in a freezer bag. When you’re ready to use frozen dough, transfer it to the refrigerator to thaw overnight, then let it sit at room temperature for about 10 minutes before rolling. You can also freeze baked (but undecorated) cookies for up to 2 months in an airtight container.
My gingerbread cookies came out hard. Why?
The most common reason for hard gingerbread cookies is overbaking. Remember, these cookies should look slightly underdone when you pull them from the oven—puffed, with a matte surface, but still soft to the touch. They firm up considerably as they cool. If your cookies are consistently coming out hard, try reducing your baking time by 1-2 minutes. Also, make sure you’re measuring your flour correctly (spoon it into the measuring cup and level off—don’t pack it). Too much flour can lead to dry, hard cookies. Finally, store your baked cookies in an airtight container with a slice of bread—the cookies will absorb moisture from the bread and stay soft!
Make This Your New Holiday Tradition!
These Classic Gingerbread Cookies are a holiday tradition for a reason. They’re a joy to make, a joy to decorate, and even more of a joy to eat! From the moment you cream that butter and sugar with those warm spices, to the incredible aroma that fills your kitchen while they bake, to that first bite of perfectly spiced, soft and chewy cookie—every step is pure holiday magic.
Whether you’re decorating them with intricate royal icing designs, keeping it simple with sprinkles, or eating them plain straight from the cooling rack (no judgment here!), these cookies are going to become your go-to gingerbread recipe year after year.
Turn on the Christmas music, grab your cookie cutters, and make some memories! Let me know how your decorating goes in the comments below—I love seeing your creative designs! And don’t forget to save this classic recipe to your “Christmas Cookies” board on Pinterest so you’ll have it ready whenever the holiday baking mood strikes. Happy baking, friends! 🎄✨

The CLASSIC Gingerbread Snowflake Cookies
Equipment
- stand mixer or electric mixer
- Rolling Pin
- cookie cutters
- piping bag
Ingredients
- 3 1/4 cups all-purpose flour (390g)
- 3/4 tsp baking soda (4.5g)
- 1 tbsp ground ginger (5g)
- 1 tbsp ground cinnamon (8g)
- 1/2 tsp ground cloves (1g)
- 1/2 tsp ground nutmeg (1g)
- 1/8 tsp ground black pepper (0.25g)
- 1/4 tsp salt (1.5g)
- 3/4 cup unsalted butter, room temperature (170g)
- 1/2 cup dark brown sugar (107g)
- 1 large egg, room temperature
- 1/2 cup molasses (170g)
- 1 cup confectioners’ sugar (113g)
- 1 1/2 tbsp milk (21g)
- 1/8 tsp vanilla extract (0.5g)
Instructions
- Combine flour, baking soda, spices, and salt in a large bowl and set aside.
- Beat butter and brown sugar on medium-high speed for 2 minutes until light and fluffy.
- Add egg and molasses and beat until combined.
- Gradually add dry ingredients and mix on low speed until a thick dough forms.
- Divide dough into three balls, flatten, wrap, and chill for at least 1 hour or overnight.
- Preheat oven to 350°F. Roll dough to 1/8-inch thickness and cut using snowflake cookie cutters.
- Bake 8–10 minutes until slightly crisp but not darkened. Cool on baking sheet before transferring to a rack.
- Whisk icing ingredients until smooth and slowly pourable.
- Pipe icing onto fully cooled cookies using a piping bag or squeeze bottle.