
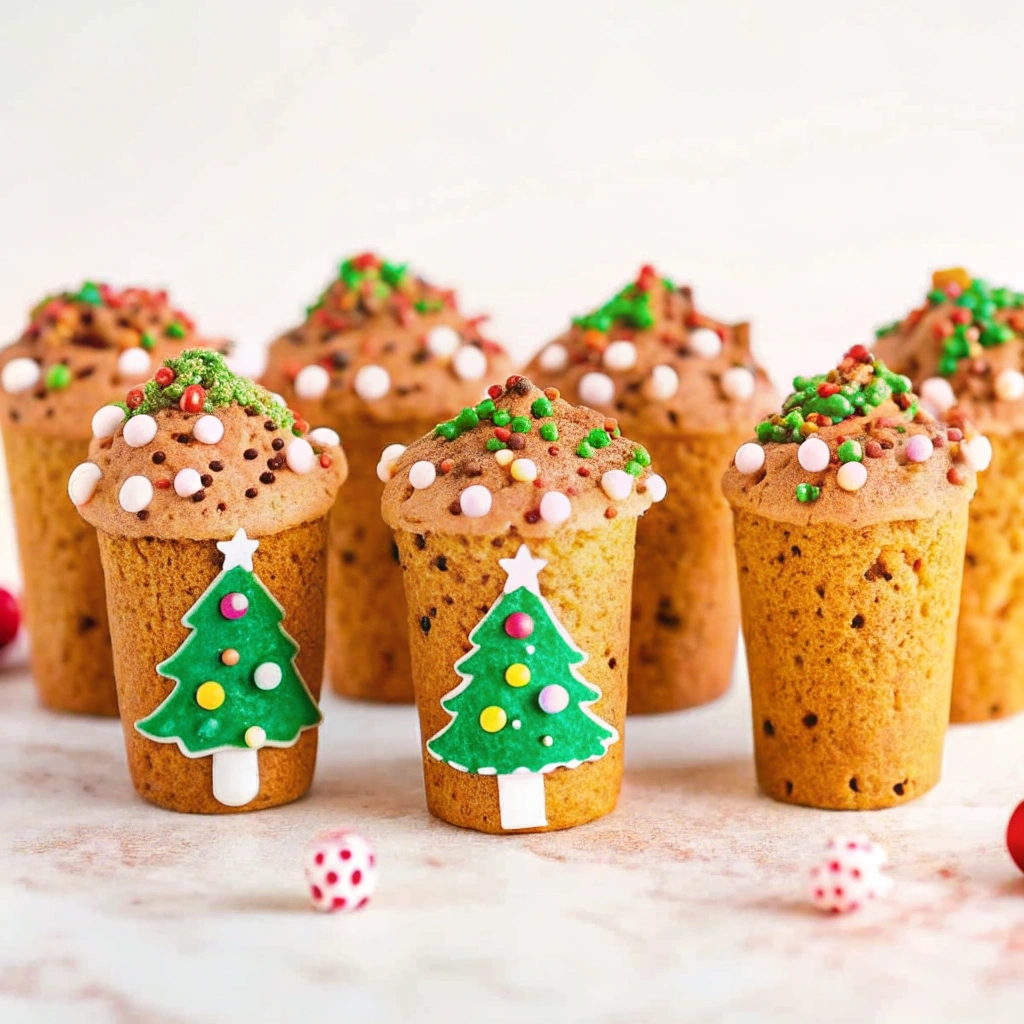
The most memorable Christmas dessert is always the one that sparks conversation and brings an element of playful fun to the table. While a slice of pie is nice nothing captures the imagination quite like a treat that is completely edible—including the serving vessel.
For years I searched for that perfect SHOW-STOPPING recipe something unique that would elevate a simple chocolate chip cookie into a holiday spectacle. I wanted a treat that was sturdy enough to hold liquid yet still tender enough to be truly delicious.
This Christmas Cookie Shot Glasses recipe is the definitive answer—an impressive and highly customizable edible creation.
This recipe uses a specific high-flour dough formulated for crispness and shape retention. The dough is baked in a special mold then lined internally with melted chocolate wafers. This chocolate layer is crucial as it seals the cookie preventing leaks and allowing you to fill the shot glass with anything from milk to mousse or even a festive holiday liquor.
This recipe is a must-pin for anyone searching Christmas Cookies or Christmas Cookies Decorated because it delivers the ULTIMATE presentation and is a guaranteed holiday party dessert success. If you are looking for the BEST edible holiday gift this simple method is your guaranteed winner.
Why You’ll Love These Christmas Cookie Shot Glasses
This recipe is a massive holiday success because it transforms a classic cookie into a unique Christmas dessert that is perfect for any adult or family gathering.
- The ULTIMATE Edible Holiday Gift These shot glasses are a SHOW-STOPPING concept. They are completely edible from the cookie base to the decorative sprinkles. Filled with a simple vanilla mousse or even a splash of Bailey’s Irish Cream they make the ULTIMATE edible holiday gift or a stunning contribution to a holiday party dessert table.
- Sturdy No-Spread Dough The key to this success is the unique dough formula which uses significantly more flour and less leavening than a standard chocolate chip cookie. This results in a sturdy crunchy cookie that holds the shot glass shape perfectly and does not spread in the oven.
- Fully Customizable Fillings The possibilities are endless once the chocolate lining is in place. You can fill them with cold milk for kids chocolate mousse white chocolate pudding or holiday-themed liqueurs for adults. They are truly the BEST interactive Christmas dessert.
- Excellent Make-Ahead Potential The baked and chocolate-lined Christmas Cookie Shot Glasses can be made several days in advance and stored in the refrigerator or frozen. This allows you to tackle the intricate baking and decorating early leaving only the quick step of filling the glasses before your event.
Ingredients and Instructions The Sturdy Cookie Shell
The key to the SHOW-STOPPING Christmas Cookie Shot Glasses is using the correct cookie mold and the specialized dough formula that prevents spreading.
| Component | Quantity | Notes |
| All-Purpose Flour | 4 cups | Significantly more than standard recipe |
| Light Brown Sugar | 1 cup | Do not substitute dark brown sugar |
| Granulated Sugar | 3/4 cup | |
| Unsalted Butter | 1 cup | Room temperature |
| Large Eggs | 2 | Room temperature |
| Pure Vanilla Extract | 2 teaspoons | |
| Mini Chocolate Chips | 3/4 cup | Mini size is necessary for thin walls |
| Salt | 1 teaspoon | |
| Baking Soda | 1/4 teaspoon | |
| Melting Chocolate Wafers | 10 ounces | Ghirardelli or high-quality wafers for lining |
| Holiday Sprinkles | As needed | For decorating the rim |
| Icing Decorations | 12 | Candy canes stars etc. for front |
- Make Sturdy Dough In a stand mixer cream the butter and sugars until fluffy. Beat in the vanilla and eggs. In a separate bowl whisk the flour baking soda and salt. Gradually add the dry ingredients to the wet mixture on low speed until a VERY thick dough forms. Fold in the mini chocolate chips. Chill the dough for at least 2 hours.
- Mold the Dough Preheat oven to 350°F. Press small discs of dough into the bottom of the cookie shot mold then press dough up the sides of the mold ensuring a uniform 1/4 inch thickness. Insert the cylinder to press down evenly then gently twist and remove it.
- Bake and Trim Bake with the inserts for 21-23 minutes. Immediately after removing from the oven quickly use a sharp knife to trim away any excess dough puffed up over the top of the mold. This creates a straight edge.
- Cool and Remove Allow to cool in the mold for 5 minutes then remove the metal inserts. Cool completely on a wire rack before attempting to remove the cookie glasses.
- Line with Chocolate Melt the melting chocolate wafers. Using a small pastry brush liberally coat the entire inside of the cookie glasses with a smooth layer of chocolate. This seals the cookie.
- Decorate Dip the rim of the glass into the melted chocolate letting the excess drip off. Immediately add holiday sprinkles to the rim. Use a small dab of melted chocolate to affix a holiday icing decoration to the front of the glass.
- Fill and Serve Once the chocolate is set fill the glasses with your chosen holiday party dessert (milk mousse or liqueur) and serve.
Step by Step Mastering the Cookie Mold
The challenge with these Christmas Cookie Shot Glasses is getting the cookie walls to be uniformly thick sturdy and sealed—the three pillars of the SHOW-STOPPING edible glass. My early attempts sometimes cracked; I learned precise dough thickness is essential.
Here is the detailed human-written guide to mastering this spectacular unique Christmas dessert:
- Precise Dough Thickness The walls and base of the cookie shot must be about 1/4 inch thick throughout. Thinner walls will crack or crumble; thicker walls will be hard and doughy. Use small rolled discs of dough and press them in firmly and evenly to eliminate air pockets.
- Bake with Inserts Do not remove the metal inserts before baking! The inserts are necessary to support the high walls of the cookie dough and prevent them from collapsing while the dough bakes and sets.
- The Quick Trim Hack The moment the cookies exit the oven they are still soft. You must quickly use a sharp knife to trim the excess dough from the top of the mold. Waiting even a minute can make the cookie too hard to trim cleanly resulting in jagged edges.
- Use Mini Chips Only Mini chocolate chips are mandatory for this recipe. Regular-sized chocolate chips are too large and will create large gaps or thin spots in the cookie walls making them structurally weak and prone to leaks—defeating the entire purpose of the edible holiday gift.
- Generous Chocolate Lining Use a generous amount of melted melting chocolate wafers to line the inside using a small pastry brush. Ensure there are absolutely no gaps or pinholes especially where the base meets the wall. This chocolate lining is the waterproof barrier that keeps the liquid in place until serving.
Variations Serving and Storage Tips
This core Christmas Cookie Shot Glasses recipe is the ULTIMATE template for a fun interactive holiday party dessert.
Delicious Variations to Try
- Peppermint Twist Add 1/2 teaspoon of peppermint extract to the cookie dough and use crushed candy canes instead of sprinkles on the rim.
- Red Velvet Shots Substitute 1/4 cup of the flour with cocoa powder and add a few drops of red food coloring to the dough for a festive red velvet cookie shell.
- Spiced Eggnog Filling Fill the lined glasses with a thick homemade eggnog pudding or eggnog mousse for a CLASSIC Christmas dessert filling.
- Baileys Treat Fill the lined glasses with a small shot of Baileys Irish Cream or Kahlua for an adult SHOW-STOPPING treat.
Serving Suggestions
These unique Christmas dessert glasses are best served fresh:
- Presentation Arrange them on a tiered serving tray with a sign indicating the various fillings (e.g. “Milk Shots for Kids” “Mousse Shots” “Irish Cream Shots”).
- Gifting Place one lined and decorated shot glass in a small clear cellophane bag tied with a festive ribbon. Include a tag recommending a filling.
- Timing Fill the glasses just before serving to ensure the cookie stays crisp and the filling is cold.
Storage and Recipe Notes
| Item | Details |
| Lined Cookie Shells | Store in an airtight container in the refrigerator for 2 days or freeze for up to 3 months |
| Unlined Shells | Store at room temperature up to 5 days line just before filling |
| Dough Chill Time | At least 2 hours is mandatory for easy molding |
| Filling Timing | Fill immediately before serving (within 1 hour) |
Conclusion Your Most SHOW-STOPPING Christmas Cookie
The Christmas Cookie Shot Glasses recipe is the perfect blend of technical baking and interactive fun. It’s the ULTIMATE holiday party dessert solution that guarantees a SHOW-STOPPING edible holiday gift and unique Christmas dessert every time.
By mastering this sturdy dough and the chocolate lining technique you ensure your holiday is filled with creative Christmas Cookies and unforgettable moments.
Pin this unique Christmas dessert today and enjoy the BEST SHOW-STOPPING Cookie Shot Glasses

The UNIQUE Christmas Cookie Shot Glasses
Equipment
- Cookie shot glass mold Metal molds with removable inserts ensure stability.
- stand mixer For creaming butter and sugar.
- pastry brush Used for chocolate lining.
- Baking tray and wire rack For cooling and decorating.
Ingredients
- 4 cups all-purpose flour
- 1 cup light brown sugar, packed
- 3/4 cup granulated sugar
- 1 cup unsalted butter, room temperature
- 2 large eggs, room temperature
- 2 teaspoons pure vanilla extract
- 3/4 cup mini chocolate chips
- 1 teaspoon salt
- 1/4 teaspoon baking soda
- 10 ounces melting chocolate wafers, for lining and rims
- holiday sprinkles, for decoration
- 12 icing decorations (stars, candy canes, etc.)
Instructions
- In a stand mixer, cream the butter and both sugars until light and fluffy. Beat in vanilla and eggs until smooth. In a separate bowl, whisk together the flour, baking soda, and salt. Gradually add to the wet mixture until a very thick dough forms. Fold in the mini chocolate chips, then chill for at least 2 hours.
- Preheat oven to 350°F (175°C). Press small discs of dough into the bottom of each cookie shot mold, then press dough evenly up the sides to 1/4 inch thickness. Insert the mold’s cylinder, press gently, and twist to release.
- Bake with inserts for 21–23 minutes. Immediately after baking, trim excess dough from the top for a clean edge. Allow to cool for 5 minutes, then remove inserts and cool completely.
- Melt the chocolate wafers until smooth. Using a pastry brush, coat the inside of each cookie shot glass completely with melted chocolate to seal it. Check for gaps and coat generously.
- Dip the rims into melted chocolate and immediately add holiday sprinkles. Attach icing decorations to the fronts using a dab of melted chocolate.
- Once the chocolate lining is fully set, fill the cookie glasses with milk, mousse, pudding, or holiday liqueur. Serve immediately for the best texture.