

It’s time to stop the search. This is the one—the perfect recipe for thick, buttery, Soft Sugar Cookies that actually hold their cookie-cutter shape!
Picture biting into a soft, pillowy cookie that’s tender and chewy with just the right amount of give. These aren’t those thin, crispy, crumbly sugar cookies that shatter when you bite them—these are the real deal. They’re thick and substantial, with a rich, buttery flavor that makes them absolutely delicious even before you add any frosting. The texture is dreamy: soft enough to sink your teeth into, but sturdy enough to decorate beautifully without falling apart. Each bite melts in your mouth with that perfect balance of sweetness and butter.
Best of all? This is a no-chill dough, meaning you can roll, cut, and bake immediately! No waiting around for hours while your dough firms up in the refrigerator. When the cookie-decorating mood strikes (or when you need treats fast for tomorrow’s party), you can go from mixing bowl to decorated cookies in under an hour. It’s the perfect fast and festive baking project that delivers professional-looking results every single time.
Why This is Our Go-To Recipe for Soft Sugar Cookies
After testing countless sugar cookie recipes, this one has earned its permanent spot in my recipe box. Here’s why!
NO CHILLING REQUIRED—this is a total game-changer. Most sugar cookie recipes demand that you chill the dough for 2-4 hours (or overnight!) before rolling and cutting. Not this one! This Soft Sugar Cookies recipe is ready to roll the moment you finish mixing. This isn’t just convenient—it’s revolutionary for busy bakers, impatient kids who want to decorate NOW, or anyone who decides at 7pm that they need cookies for tomorrow. The dough handles beautifully at room temperature without being sticky or spreading during baking.
They stay perfectly soft and thick for days. There’s nothing more disappointing than baking beautiful sugar cookies only to have them turn hard and crunchy by the next day. These cookies maintain their tender, soft texture for up to a week when stored properly. They’re thick and pillowy, with that bakery-style appearance that makes them look professionally made. When you bite into one three days after baking, it still tastes fresh and feels wonderfully soft.
They absolutely do not spread in the oven. This is the holy grail of cut-out cookies! Your carefully cut snowflakes, Christmas trees, and stars will look exactly the same coming out of the oven as they did going in. No melted blobs, no lost details, no disappointment. The sharp edges stay sharp, intricate designs stay intact, and your cookies look exactly like the cookie cutter you used. This makes them perfect for decorated holiday cookies where presentation matters.
The flavor is rich and buttery, never bland. So many sugar cookie recipes taste like sweet cardboard—not these! Thanks to a generous amount of real butter and a touch of vanilla (or almond extract if you prefer), these Soft Sugar Cookies have incredible flavor that shines through even under layers of frosting. They’re delicious enough to eat plain, which means they’re absolutely phenomenal when decorated.
The Secret to Cookies That Are Both Soft and Hold Their Shape
This seems impossible, right? Soft cookies usually spread, and cookies that hold their shape are usually crispy. Here’s how we achieve both!
The flour-to-butter ratio is absolutely key. This recipe uses a specific proportion of ingredients that creates structure without sacrificing tenderness. There’s enough flour to give the cookies body and prevent spreading, but not so much that they become dry or cakey. The butter content is perfectly calibrated to create that rich, tender texture without making the dough too soft to handle. This precise balance is what makes these Soft Sugar Cookies so special—getting this ratio right took a lot of testing, but the results speak for themselves!
Using baking powder instead of baking soda makes all the difference. Here’s a little baking science: baking soda encourages cookies to spread outward as they bake, while baking powder helps them rise upward. By using only baking powder in this recipe, we get that beautiful lift and thickness without the horizontal spread. The cookies puff up slightly as they bake, creating that pillowy, soft texture, but they maintain their original shape perfectly. This is one of the most important secrets to cut-out cookies that actually work!
Not over-mixing the dough is crucial. Once you add your flour mixture to the wet ingredients, mix just until everything comes together and you no longer see streaks of flour—then stop! Over-mixing develops gluten in the flour, which creates a tougher, chewier texture and can actually cause cookies to spread more during baking. It also makes the dough harder to work with. Gentle mixing keeps your cookies tender and ensures they maintain that melt-in-your-mouth quality. Think of it as folding the ingredients together rather than vigorously beating them.
How to Make Soft Sugar Cookies (Step-by-Step)
Let me walk you through this simple process that delivers perfect results every time!
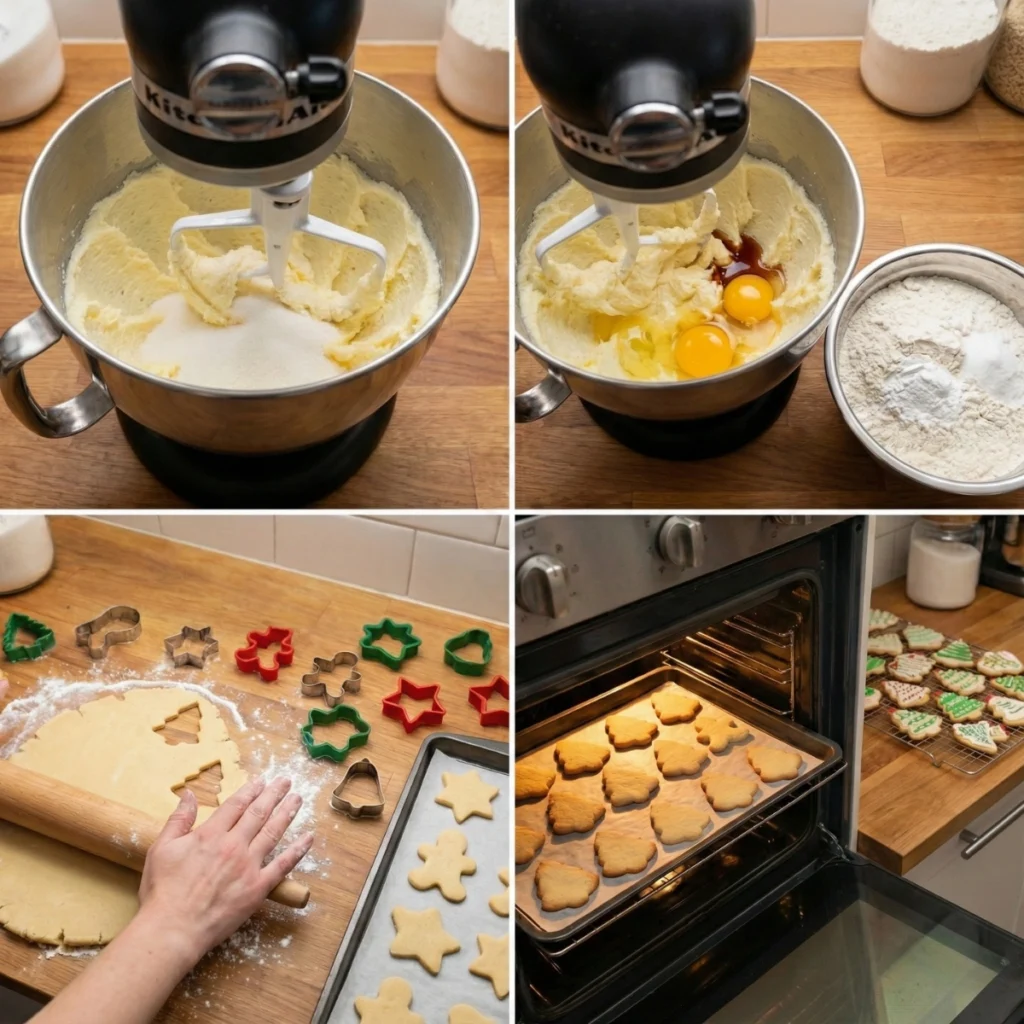
Step 1: Creaming Butter & Sugar
Start by beating your softened butter and sugar together until the mixture is light, fluffy, and pale in color—this usually takes about 3-4 minutes with an electric mixer. This step is more important than you might think! Properly creamed butter and sugar incorporates air into your dough, which contributes to that soft, tender texture. The mixture should look almost white and have increased in volume. Don’t rush this step—those extra minutes of creaming make a noticeable difference in your final cookies.
Step 2: Adding Eggs & Vanilla
Beat in your eggs one at a time, making sure each one is fully incorporated before adding the next. Then add your vanilla extract (or almond extract for a more sophisticated flavor profile—it’s amazing in sugar cookies!). The dough should look smooth and creamy at this point. If it looks slightly curdled, don’t worry—it will come together once you add the dry ingredients. Room temperature eggs incorporate more easily and create a smoother dough.
Step 3: Mixing the Dry Ingredients
In a separate bowl, whisk together your flour, baking powder, and salt. This distributes the leavening evenly throughout the flour. Now add this dry mixture to your wet ingredients in two or three additions, mixing on low speed just until combined after each addition. Remember: stop mixing as soon as you no longer see dry flour! The dough will be soft but not sticky, and it should come together into a cohesive ball.
Step 4: Rolling & Cutting
Here’s where the no-chill magic happens! Lightly flour your work surface and rolling pin, then roll out your dough to about ¼-inch thickness for nice, thick Soft Sugar Cookies. Don’t go thinner than this or your cookies will be too delicate. Cut out your shapes with cookie cutters, dipping the cutters in flour between cuts to prevent sticking. Use a thin spatula to transfer the cut cookies to your parchment-lined baking sheets, leaving about 2 inches between them (though remember, these won’t spread much!). Re-roll scraps and repeat until all the dough is used.
Step 5: Baking (The “Don’t Overbake” Rule!)
Bake at 350°F for 8-10 minutes, watching carefully. Here’s the crucial part: these cookies are done when the edges are just barely starting to turn the slightest bit golden, but the centers still look pale and slightly underdone. They might even look a tiny bit puffy or soft in the middle—that’s perfect! They will continue to firm up as they cool on the baking sheet. If you bake them until they’re golden all over, they’ll be too crispy. Remove them from the oven when they look just about right, let them sit on the baking sheet for 5 minutes, then transfer to a wire rack to cool completely before decorating.
Our Favorite Easy Buttercream Frosting (That Tastes Amazing!)
While royal icing is beautiful, this simple buttercream is absolutely delicious and perfect for family baking!
This buttercream frosting is a wonderful alternative to royal icing, especially if you’re decorating with kids or prefer a softer, more “homemade” look. Unlike royal icing which dries rock-hard and has that distinctive sweet-but-chalky taste, buttercream stays soft and creamy with an incredible buttery flavor that actually enhances your Soft Sugar Cookies rather than just covering them up.
The simple recipe: Beat together softened butter (about ½ cup), 3-4 cups of powdered sugar (depending on how thick you want it), 1 teaspoon vanilla extract, and 2-4 tablespoons of milk or heavy cream. Start with less liquid and add more gradually until you reach your desired consistency—thicker for piping detailed designs, thinner for spreading or dipping. The result is a silky, smooth, incredibly delicious frosting that pipes beautifully and tastes like actual butter and vanilla, not just pure sugar.
Why we love it: It’s faster to make than royal icing, more forgiving if you make mistakes (you can just scrape it off and start over!), and kids absolutely love the taste. It also stays soft, which means your decorated cookies are actually pleasant to eat rather than requiring you to gnaw through a hard candy shell. The colors are beautifully vibrant when you add gel food coloring, and you can easily flavor it with different extracts—almond, peppermint, or lemon all work wonderfully!
Looking for another cookie with a simple topping? These Red Velvet Crinkle Cookies have a gorgeous powdered sugar coating and are always a hit!
Your Top Tips for Decorating Holiday Cookies
Let’s make your cookies look as amazing as they taste!
Always let cookies cool completely before frosting. I know it’s tempting to start decorating immediately, but warm cookies will melt your frosting and create a messy disaster. Give them at least 30 minutes to cool to room temperature. If you’re impatient like me, you can speed this up by placing them in the refrigerator for 10-15 minutes. The cookies should feel completely cool to the touch before you add any frosting.
Gel food coloring is your best friend. Liquid food coloring can make your frosting too thin and the colors aren’t nearly as vibrant. Gel or paste food colorings give you brilliant, intense colors without changing the consistency of your frosting. Start with a tiny amount (use a toothpick to add it) and mix thoroughly—you can always add more, but you can’t take it away! A little goes a long way with gel colors.
Get creative with your toppings! Beyond just frosting, there are so many fun ways to decorate these Soft Sugar Cookies. Sprinkles are classic and come in every color and shape imaginable. Sanding sugar (coarse decorating sugar) adds beautiful sparkle and comes in gorgeous colors. Edible glitter makes cookies look magical. Crushed candy canes add festive crunch. Dragées (those shiny metallic balls) look elegant. You can also use small candies, chocolate chips, or even draw details with edible markers once the frosting dries!
Storage for decorated cookies requires care. If you’re using buttercream frosting, store your cookies in a single layer in an airtight container, or place parchment paper between layers to prevent the frosting from smudging. Keep them at room temperature for up to 5 days. If you’ve used royal icing and it’s completely dry and hard, you can stack the cookies more freely. For long-term storage, freeze unfrosted cookies and decorate them fresh when you’re ready to serve—this gives you the best texture and appearance!

FAQs
Why did my sugar cookies spread?
If your Soft Sugar Cookies spread despite this being a no-spread recipe, a few things could have gone wrong. First, check your measurements—too much butter or not enough flour will cause spreading. Always measure flour by spooning it into the measuring cup and leveling it off, never by scooping directly from the bag (which packs it down and gives you less flour). Second, make sure your butter was softened but not melted—if it’s too warm, the cookies will spread. Third, double-check that you used baking powder and not baking soda. Finally, make sure your oven is fully preheated before baking. If you’re still having issues, try chilling your cut-out cookies for 15 minutes before baking.
Why did my cookies get hard?
Hard sugar cookies are usually the result of overbaking. Remember, these cookies should come out of the oven when they’re still pale in the center and just barely starting to color at the edges. They might look slightly underdone, but they’ll firm up perfectly as they cool. Even an extra minute or two can take them from soft to crunchy.
Another cause of hard cookies is too much flour—make sure you’re measuring correctly. Also, store your cookies in an airtight container immediately after they’ve cooled; exposure to air will make them stale and hard. If your cookies have already gotten hard, try placing a slice of bread in the container with them overnight—they’ll absorb moisture from the bread and soften up!
Can I use this dough with royal icing?
Absolutely! While this recipe includes our favorite buttercream frosting, these Soft Sugar Cookies work beautifully with royal icing too. The cookies hold their shape perfectly and provide a sturdy, flat surface for detailed royal icing designs. Just make sure your cookies are completely cool before applying royal icing, and allow plenty of time for the icing to dry completely (usually 6-8 hours or overnight). The combination of soft, buttery cookies with crisp royal icing decoration is really lovely!
Can I make the dough ahead of time, even if it’s “no-chill”?
es! Just because you don’t have to chill the dough doesn’t mean you can’t. If you want to make the dough ahead of time, wrap it tightly in plastic wrap and refrigerate for up to 3 days, or freeze for up to 3 months. When you’re ready to use it, let refrigerated dough sit at room temperature for about 15-20 minutes until it’s soft enough to roll easily (but not too soft). Frozen dough should thaw in the refrigerator overnight, then come to room temperature before rolling. Making the dough ahead can actually make it even easier to work with and is perfect for spreading out your holiday baking!
Conclusion
This foolproof recipe will give you the most beautiful and delicious Soft Sugar Cookies for your holiday platter, without the fuss of chilling! After years of testing different sugar cookie recipes, dealing with spreading disasters, rock-hard cookies, and bland flavors, I can confidently say this is the one that solves all those problems. These cookies deliver on every front: they’re incredibly soft and tender, they hold their shape perfectly for decorating, they taste amazing, and they’re ready to bake immediately.
Whether you’re decorating with the kids using simple buttercream and sprinkles, creating elaborate royal icing masterpieces, or just want a reliable recipe that works every single time, these Soft Sugar Cookies are your answer. The no-chill aspect makes them perfect for spontaneous baking sessions, last-minute cookie needs, or when you just don’t have hours to wait around for dough to firm up. And that texture—pillowy soft, thick, and buttery—is exactly what sugar cookies should be.
The best part? Once you master this recipe, you’ll never need to search for another sugar cookie recipe again. This is truly the only one you’ll ever need!
Grab your favorite cookie cutters and have fun decorating! I’d love to see what shapes you make and how you decorate them—leave a comment below with your favorite cookie cutter shapes or frosting flavor combinations. And be sure to save this to your “Christmas Baking” board on Pinterest so you can find it easily every holiday season!
Happy baking, and enjoy every soft, buttery bite!
Soft Sugar Cookies
Ingredients
Equipment
Method
- In a large mixing bowl, cream together sugar and shortening on medium speed until light and fluffy, about 2 minutes.
- Add the egg, vanilla, and almond extracts, mixing until fully incorporated.
- Pour in the buttermilk and mix on low speed until just combined.
- In a separate bowl, whisk together flour, baking powder, baking soda, and salt.
- Gradually add the dry ingredients to the wet mixture, about 1/3 at a time, mixing until a soft dough forms.
- Divide dough in half, shape into discs, wrap in plastic wrap, and chill for at least 1 hour.
- Preheat oven to 350°F and line two baking sheets with silicone mats.
- Lightly flour the countertop and roll one dough disc to 1/4-inch thickness.
- Use cookie cutters to cut shapes and transfer to baking sheets, repeating with all dough.
- Bake for 9 to 11 minutes until edges are set but not browned.
- Cool on the baking sheet for 5 minutes, then transfer to a wire rack to cool completely.
- In a stand mixer, whisk egg whites and almond extract for 10–15 seconds until frothy.
- With mixer on low, add powdered sugar 1 cup at a time until incorporated.
- Increase speed to medium and beat until smooth, glossy, and thick enough to hold soft peaks.
- Divide icing into bowls, tint with gel coloring if desired, and decorate cooled cookies.