When the temperature climbs and the last thing you want to do is turn on the oven, there is one dessert that has been solving that problem for generations across American kitchens – and it has never once gone out of style.
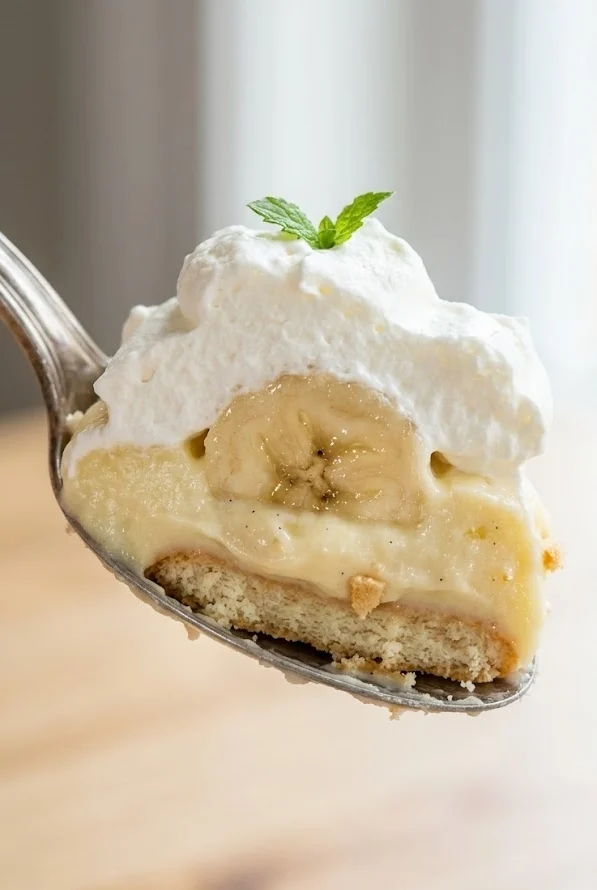
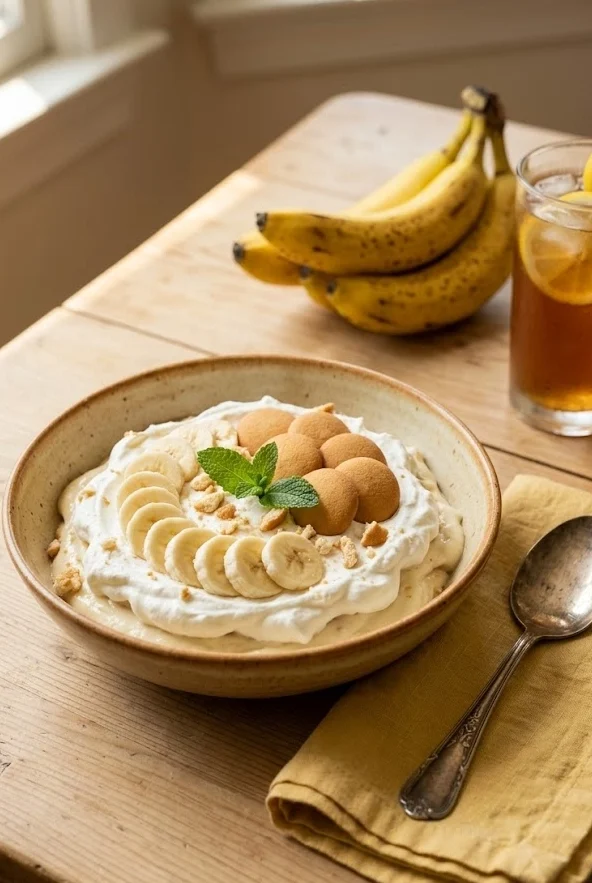
No-Bake Banana Pudding is the kind of summer dessert that earns a permanent place in your recipe rotation after the very first time you make it. Creamy vanilla pudding layered with fresh banana slices, soft vanilla wafers, and clouds of homemade whipped cream – it is simple, cold, generous, and deeply satisfying in a way that few summer desserts can match.
This version skips the oven entirely and leans into the best possible ingredients – real cream, fresh bananas, and a from-scratch pudding base that puts the boxed version to shame. The result is something that looks humble in a trifle dish but tastes like the best thing on the table.
If you have been looking for summer desserts no bake recipes that genuinely deliver on flavor and crowd appeal, this is the one to start with.
Why You’ll Love This No-Bake Banana Pudding
This recipe sits at the top of the summer desserts cold category for good reason. It is served straight from the refrigerator, which means it actually gets better as it chills – the wafers soften into the pudding, the flavors meld together, and every layer becomes more cohesive and delicious the longer it sits.
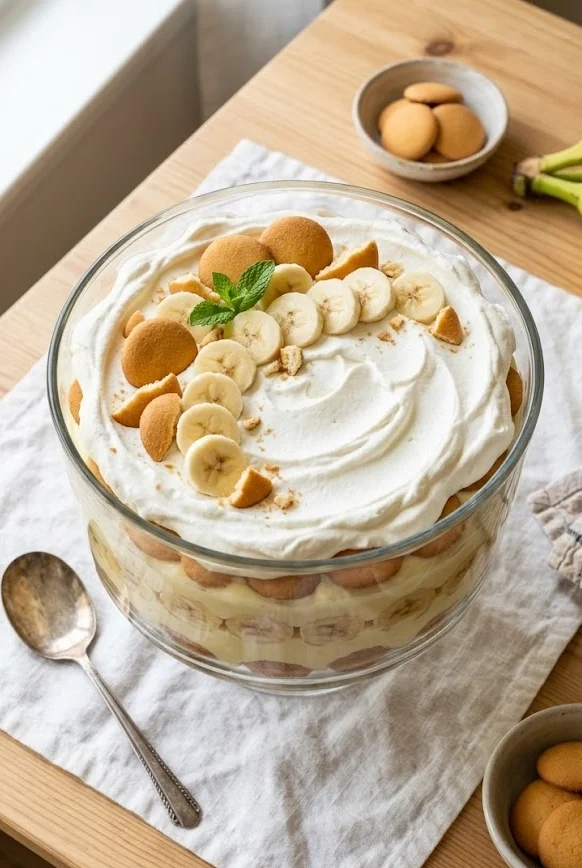
It is also one of the most reliable summer desserts for a crowd you will find anywhere. A standard trifle dish or 9×13 inch pan version easily serves 12 to 16 people, requires no individual plating, and can be made entirely the day before your event. That kind of advance-prep flexibility is invaluable when you are hosting a summer party.
Kids adore it without exception. The familiar flavors, the creamy texture, and the soft layers make this one of the most universally loved summer desserts for kids at any gathering. Adults who grew up eating banana pudding feel the pull of nostalgia with every single bite, and adults who are trying it for the first time immediately understand why it has endured for so long.
Common Mistakes (And How to Avoid Them)
Using overripe bananas is a mistake that seems counterintuitive since overripe bananas are wonderful in baking. For pudding, however, you want bananas that are ripe but still firm – yellow with just a few small spots. Overripe bananas turn mushy and brown too quickly once sliced, compromising both the texture and the appearance of your dessert.
Not chilling long enough is the most common reason this dessert disappoints. The minimum resting time is four hours, but overnight is genuinely the better option. The wafers need time to absorb moisture from the pudding and transform from crunchy cookies into those soft, almost cake-like layers that define great banana pudding.
Whipping the cream too far in advance without stabilizing it leads to a weeping, deflated topping by the time you serve. Either whip the cream just before assembling, or stabilize it with a small amount of cream cheese or powdered sugar so it holds its structure in the refrigerator for up to 24 hours.
Skipping the vanilla wafer bottom layer and starting with pudding means your dessert has no structural base and will be difficult to serve cleanly. Always begin with a layer of wafers on the bottom of your dish – they absorb the pudding from below and create a solid, scoopable foundation.
Key Ingredients
Fresh ripe bananas are the soul of this recipe. Their natural sweetness perfumes every layer of the pudding as it chills, and their soft texture blends beautifully with the creamy pudding base. Choose bananas that are fully yellow with minimal spots for the best flavor and the longest visual freshness once sliced.
Vanilla wafers are the classic choice for banana pudding and for good reason. Their delicate vanilla flavor complements rather than competes with the pudding, and they soften to the perfect texture after a few hours of chilling. Nilla Wafers are the traditional brand, but any quality vanilla wafer works well.
Whole milk is the base of the from-scratch pudding and is non-negotiable for the richest, creamiest result. Lower-fat milks produce a thinner pudding that does not set as firmly or taste as satisfying. If you want to go even richer, substitute half the milk with heavy cream.
Egg yolks give the homemade pudding its custard-like depth and beautiful pale yellow color. They also create a silkier, more cohesive texture than pudding made with cornstarch alone. Do not skip the tempering step – adding hot milk too quickly to raw yolks will scramble them.
Heavy whipping cream is whipped to soft peaks and folded into the pudding as well as layered on top. Using real heavy cream rather than a whipped topping like Cool Whip is the single biggest upgrade you can make to this recipe. The flavor difference is dramatic and immediately noticeable.
Cream cheese adds a subtle tang to the whipped topping that balances the sweetness of the pudding and bananas beautifully. It also stabilizes the whipped cream so it holds its shape in the refrigerator for up to 24 hours without deflating.
How to Make No-Bake Banana Pudding
- Make the vanilla pudding base. In a medium saucepan, whisk together half a cup of granulated sugar, three tablespoons of cornstarch, and a quarter teaspoon of salt. Gradually whisk in two and a half cups of whole milk until smooth. Place over medium heat and cook, stirring constantly, until the mixture begins to thicken and bubble, about eight minutes.
- Temper the egg yolks. In a small bowl, whisk four egg yolks together. Slowly ladle a half cup of the hot milk mixture into the yolks while whisking constantly to temper them. Pour the tempered yolk mixture back into the saucepan and cook for two more minutes, stirring continuously.
- Finish the pudding. Remove from heat and stir in two tablespoons of unsalted butter and two teaspoons of pure vanilla extract until fully melted and incorporated. Transfer to a bowl and press a sheet of plastic wrap directly onto the surface of the pudding to prevent a skin from forming. Refrigerate for at least two hours until fully chilled and set.
- Make the whipped cream topping. Beat eight ounces of softened cream cheese with half a cup of powdered sugar until smooth and fluffy. In a separate bowl, whip one and a half cups of cold heavy cream to soft peaks. Fold the whipped cream into the cream cheese mixture in two additions until combined and airy.
- Fold pudding and cream together. Once the pudding is fully chilled, fold half of the whipped cream mixture gently into the pudding until combined. Reserve the other half for the topping layer.
- Begin layering. In a large trifle dish or 9×13 inch pan, arrange a single layer of vanilla wafers across the entire bottom.
- Add the first pudding layer. Spoon half of the pudding mixture evenly over the wafer layer and smooth with a spatula.
- Add the banana layer. Slice three to four ripe bananas into quarter-inch rounds and arrange them in an even layer over the pudding.
- Add more wafers. Place another layer of vanilla wafers over the banana slices.
- Add the second pudding layer. Spoon the remaining pudding mixture over the second wafer layer and smooth evenly.
- Top with whipped cream. Spread the reserved whipped cream mixture across the top in an even, generous layer. For a decorative finish, use a piping bag to pipe rosettes across the surface.
- Garnish and chill. Arrange a final row of vanilla wafers and fresh banana slices across the top for decoration. Cover and refrigerate for a minimum of four hours, ideally overnight, before serving.
Variations and Tips
For summer desserts healthy adaptations, substitute the whole milk with unsweetened almond milk and use coconut cream in place of heavy whipping cream. Reduce the sugar in the pudding base to a third of a cup and sweeten the topping with a tablespoon of honey instead of powdered sugar. The result is lighter but still deeply satisfying.
For gluten free summer desserts, simply swap the standard vanilla wafers for a certified gluten-free vanilla cookie. Several widely available brands produce excellent gluten-free options that soften and layer just as beautifully as the original.
For a tropical summer twist that makes this recipe feel fresh and unexpected, replace half the bananas with thin slices of fresh mango and add a quarter teaspoon of coconut extract to the pudding base. Top with toasted coconut flakes for a summer desserts with fruit variation that feels genuinely special.
Pro tip: Toss your sliced bananas in a teaspoon of fresh lemon juice before layering them into the pudding. The lemon juice slows oxidation significantly and keeps your banana slices looking fresh and bright rather than brown for the full chilling period and beyond.
How to Meal Prep
No-Bake Banana Pudding is one of the most meal-prep friendly summer desserts no bake recipes in existence – the entire dessert is designed to be made ahead and actually improves with time in the refrigerator.
The vanilla pudding base can be made up to three days in advance and stored covered in the refrigerator. The whipped cream mixture can be prepared up to 24 hours ahead and stored in a covered container, giving it a quick stir before using.
For the best results when prepping for a party, assemble the full dessert the night before your event and refrigerate it covered overnight. The wafers will have softened perfectly and the layers will have melded into that classic, cohesive banana pudding texture that everyone loves.
If you are making individual portions for a large gathering, layer the pudding into clear plastic cups or mason jars up to 24 hours ahead. This approach makes serving effortless and the individual portions look beautiful on any dessert table, making them among the most practical summer desserts for a party you can prepare.
Hold back the top layer of fresh banana slices and wafer garnish until a few hours before serving to maintain the best possible appearance.
FAQs
Can I use instant pudding mix instead of making the pudding from scratch? Yes, two packages of instant vanilla pudding prepared with whole milk can substitute for the homemade base. The texture will be slightly less rich and the flavor noticeably less complex, but the overall result is still a very good banana pudding. For the best version of this recipe, the from-scratch pudding is strongly worth the extra 15 minutes.
How do I keep the bananas from turning brown? Tossing sliced bananas in a small amount of fresh lemon juice before layering is the most effective method. The acid slows the oxidation process significantly. Also avoid using overripe bananas – firmer, just-ripe fruit browns much more slowly once sliced and layered into the pudding.
Can this be made as summer desserts for a party in individual servings? Absolutely. Individual mason jars or clear plastic cups work beautifully for this recipe and make serving a large crowd completely effortless. Layer the components in the same order and chill for at least four hours. Individual portions also refrigerate and transport more easily than a single large dish.
How long does No-Bake Banana Pudding keep in the refrigerator? The assembled pudding keeps well for up to three days covered in the refrigerator. The banana slices will continue to soften and the wafers will become increasingly tender over time. The flavor on day two is arguably better than day one – though the fresh banana garnish on top is best replaced if serving after the first day.
Cultural Context
Banana pudding is one of the most iconic and beloved desserts in the American South, with roots that stretch back to the late nineteenth century when bananas first became widely available across the United States following the growth of the banana trade from Central America and the Caribbean.
The recipe as most Americans know it today – layered with vanilla wafers and topped with meringue or whipped cream – became a national fixture in the mid-twentieth century, largely because Nabisco began printing a banana pudding recipe on the back of their Nilla Wafer box in the 1940s. From that moment forward, the dessert became inseparable from summer gatherings, church potlucks, and family reunions across the country.
In the American South in particular, banana pudding carries the kind of cultural weight that very few desserts achieve. It is a dish of genuine hospitality – generous, unfussy, made to be shared in large quantities and enjoyed without ceremony. As summer desserts ideas go, it represents something rare: a recipe that has crossed generations, regions, and social contexts without ever losing its ability to make people genuinely happy the moment it appears on a table.
Its endurance is a testament to the simple truth that the best summer desserts are not always the most complicated ones – sometimes they are just the ones made with care, good ingredients, and the knowledge that everyone in the room is going to love them.

No-Bake Banana Pudding
Equipment
- saucepan
- whisk
- mixing bowls
- electric mixer
- spatula
- 9×13 dish or trifle bowl
Ingredients
- 1/2 cup granulated sugar
- 3 tbsp cornstarch
- 1/4 tsp salt
- 2 1/2 cups whole milk
- 4 egg yolks
- 2 tbsp unsalted butter
- 2 tsp vanilla extract
- 8 oz cream cheese, softened
- 1/2 cup powdered sugar
- 1 1/2 cups heavy whipping cream
- 3-4 ripe bananas, sliced
- 1 box vanilla wafers
Instructions
- Whisk sugar, cornstarch, salt, and milk in a saucepan and cook until thickened.
- Temper egg yolks with hot mixture, then return to pan and cook briefly.
- Stir in butter and vanilla, then chill pudding until set.
- Beat cream cheese and powdered sugar, then fold in whipped cream.
- Fold half of whipped mixture into chilled pudding.
- Layer vanilla wafers in the bottom of a dish.
- Add pudding, sliced bananas, and repeat layers.
- Top with remaining whipped cream and garnish.
- Refrigerate for at least 4 hours or overnight before serving.