There is a specific phenomenon that happens every time cake balls appear at a party. People walk past them once, do a double take, pick one up telling themselves it is just a taste, and then return three more times before the evening is over.
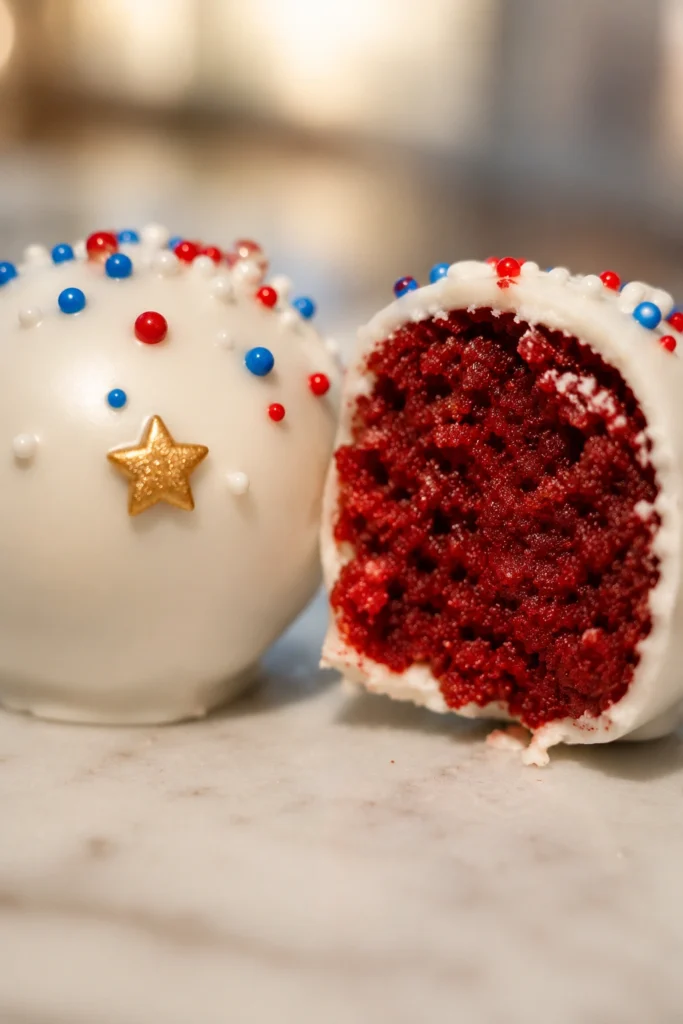
Patriotic 4th of July Cake Balls are that dessert. Bite-sized, coated in red, white, and blue chocolate, with a moist, tender cake center that no one can quite identify until you tell them the secret, they are the kind of 4th of July food that generates genuine conversation and recipe requests.
They are also one of the most practical 4th of July food ideas for a crowd on this list. No plates, no forks, no serving utensils required. Just a platter, a crowd, and a batch that will be gone before you expect it.
Why You’ll Love This 4th of July Food Dessert
Cake balls sit in the perfect intersection of impressive and achievable. They look like something from a specialty bakery display case. The actual skill required to make them is minimal, which makes them one of the most rewarding 4th of July food recipes for bakers at any experience level.
They are built for the 4th of July food for a crowd reality. A single batch yields between 36 and 48 individual pieces depending on size, meaning one recipe covers a large gathering without doubling. They are also self-contained, individually portioned, and require no refrigeration for short periods, making them genuinely excellent 4th of July food finger foods for outdoor parties.
The make-ahead factor is exceptional. Cake balls actually improve after a night in the refrigerator as the chocolate shell sets completely and the interior firms up to a fudgy, truffle-like consistency that is even better than freshly made. This makes them one of the smartest 4th of July food BBQ party ideas for hosts who want a spectacular dessert without any day-of effort.
Common Mistakes and How to Avoid Them
Adding too much frosting. This is the single most common cake ball mistake and the one that causes the most disappointment. The frosting is a binder, not a flavor component. Too much frosting creates a sickly sweet, overly soft center that never firms up properly and falls apart when you try to coat it. Start with two tablespoons and add more only if the mixture will not hold its shape when pressed.
Skipping the freezer step before dipping. Cake balls must be frozen solid before you attempt to dip them in melted chocolate. A cold, firm cake ball holds its shape during dipping and allows the chocolate to set against it almost immediately. A room temperature cake ball is soft, fragile, and will either fall off the dipping tool or crack the chocolate coating as it warms and expands after dipping.
Overheating the chocolate coating. Chocolate candy melts and white chocolate seize or turn grainy when overheated. Melt in 30-second intervals in the microwave, stirring thoroughly between each interval. The chocolate should be fluid and glossy but never hot to the touch. If it thickens while you work, reheat for 15 seconds only.
Making them too large. Cake balls should be approximately one inch in diameter, about the size of a large grape. Larger than this and the ratio of coating to filling becomes unbalanced, the center takes longer to set, and they become difficult to eat in one bite, which defeats the entire purpose of a 4th of July food finger foods dessert.
Key Ingredients: What Makes These Work
Vanilla or White Cake: A white or vanilla box cake baked and cooled completely is the fastest and most reliable base for cake balls. The neutral flavor accepts the frosting and chocolate coating without competing, and the fine, even crumb of a box cake breaks down into a perfectly smooth mixture. A homemade white cake works equally well if you prefer to bake from scratch.
Vanilla Frosting: Store-bought vanilla frosting is the standard binder here and it works perfectly. It provides just enough fat and sweetness to hold the crumbled cake together into a moldable dough without adding complexity you do not need. Cream cheese frosting is an excellent alternative if you want a slightly tangy, richer center.
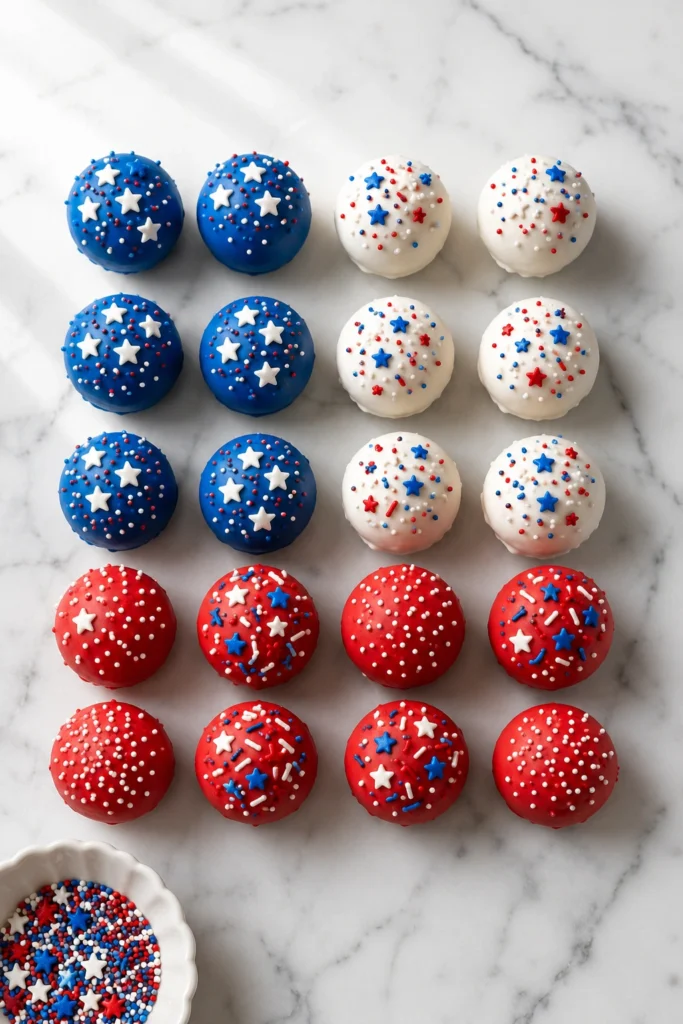
Red Candy Melts: Wilton or similar brand red candy melts provide a vivid, patriotic red coating that sets firmly at room temperature and does not require tempering the way real chocolate does. They melt smoothly, dip cleanly, and hold their color without fading, making them the most practical choice for decorative 4th of July food dessert work.
White Chocolate or White Candy Melts: Your white coating layer. White candy melts behave identically to red and are easier to work with than real white chocolate, which can be temperamental. They also take colored drizzles and sprinkles beautifully.
Blue Candy Melts: Completes the patriotic color trio. Use royal blue or navy blue candy melts for the deepest, most vivid color payoff against the red and white coatings.
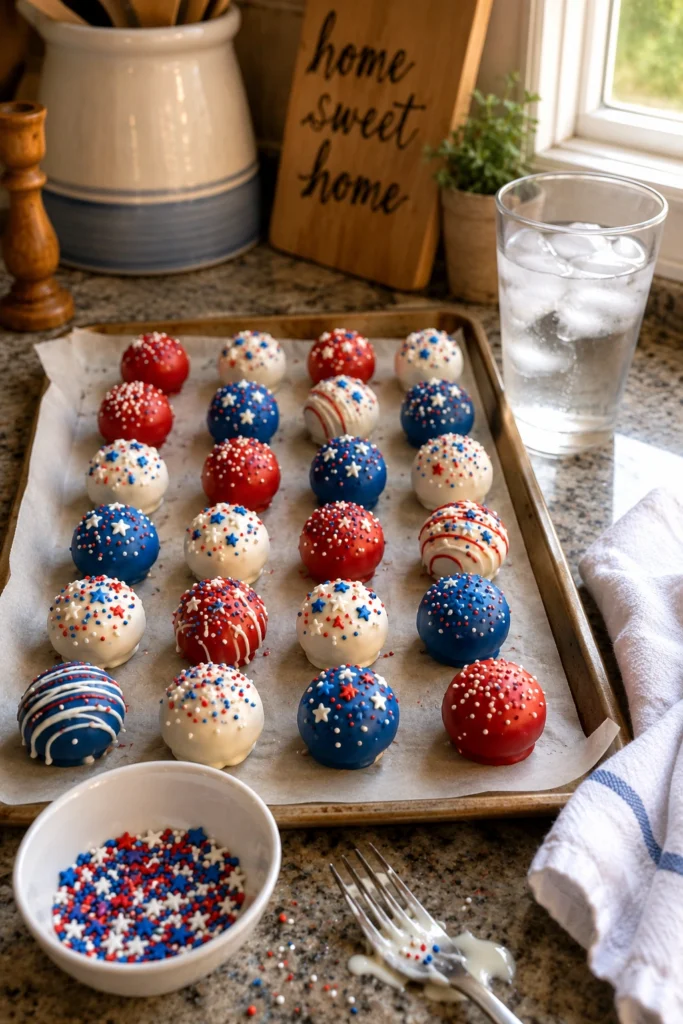
Red, White, and Blue Sprinkles: The finishing touch that ties the patriotic theme together visually. Apply them immediately after dipping before the chocolate sets. Star-shaped sprinkles, nonpareils, or a patriotic jimmies mix all work beautifully and add texture to the finished surface.
Coconut Oil: Adding half a teaspoon of coconut oil per cup of melted candy melts thins the coating to the perfect dipping consistency and adds a subtle sheen to the finished surface that makes these look genuinely professional.
How to Make Patriotic 4th of July Cake Balls
Yield: 36 to 48 cake balls Prep Time: 45 minutes Freeze Time: 1 hour plus 15 minutes Total Time: Approximately 2 hours active and passive
Ingredients:
- 1 box white or vanilla cake mix, baked according to package directions in a 9×13 pan and cooled completely
- 3 to 5 tablespoons vanilla or cream cheese frosting
- 2 cups red candy melts
- 2 cups white candy melts or white chocolate chips
- 1 cup blue candy melts
- 1 and 1/2 teaspoons coconut oil, divided
- Red, white, and blue sprinkles, stars, or nonpareils for decorating
- Lollipop sticks or toothpicks (optional, for dipping)
Instructions:
- Bake your cake according to package directions in a 9×13 pan. Allow it to cool completely to room temperature, at least one hour. Do not rush this step.
- Once fully cooled, crumble the entire cake into a large mixing bowl using your hands or a fork until you have fine, even crumbles with no large chunks remaining.
- Add two tablespoons of frosting to the crumbled cake and mix thoroughly with a spatula or your hands. Squeeze a small amount of the mixture in your palm. If it holds together cleanly without crumbling, stop adding frosting. If it crumbles, add frosting one tablespoon at a time until it just holds its shape.
- Line two baking sheets with parchment paper. Using a tablespoon or a small cookie scoop, portion the cake mixture and roll between your palms into smooth, uniform balls approximately one inch in diameter.
- Place the rolled balls on the prepared parchment-lined baking sheets. Once all balls are rolled, place the trays in the freezer for a minimum of one hour until completely solid and firm.
- When ready to dip, melt your red candy melts in a microwave-safe bowl in 30-second intervals, stirring between each, until completely smooth. Stir in half a teaspoon of coconut oil.
- Working quickly with one frozen cake ball at a time, insert a toothpick or lollipop stick into the ball, dip it fully into the melted chocolate, allow the excess to drip off, and place it back on the parchment. Add sprinkles immediately before the coating sets.
- Repeat with white and blue candy melts for a variety of colored cake balls, or coat all in white and add red and blue drizzles over the top for a tri-color effect on each ball.
- For a drizzle effect, melt a small amount of contrasting color candy melt, transfer to a zip-lock bag, snip a tiny corner, and drizzle over the set white base coat in thin lines.
- Return all finished cake balls to the refrigerator for at least 15 minutes to allow the coating to fully set before arranging on a serving platter.
Variations and Tips
Gluten-Free Version: Use a certified gluten-free vanilla cake mix. Every other component of this recipe is naturally gluten-free. The technique and result are identical, making this one of the most inclusive 4th of July food ideas for a crowd with mixed dietary needs.
Chocolate Cake Version: Swap the white cake base for a chocolate cake mix and use cream cheese frosting as the binder. Coat in white chocolate and add red and blue drizzles. The contrast of dark chocolate interior against the white coating is visually stunning when bitten into and is especially popular as 4th of July food for kids.
Red Velvet Version: Use a red velvet cake mix for an interior that is already patriotic in color. When guests bite into a white-coated cake ball and see the vivid red interior, the reaction is always immediate and enthusiastic. Pair with cream cheese frosting as the binder for the classic red velvet flavor combination.
Lemon Variation: Use a lemon cake mix and lemon frosting for a bright, citrusy center that pairs beautifully with the sweet white chocolate coating. This lighter flavor profile works especially well for summer outdoor 4th of July food BBQ party ideas where guests want something refreshing.
Pro Tip: Set up your dipping station before you take the cake balls out of the freezer. Have your melted chocolates ready, your sprinkles in shallow bowls, your parchment-lined trays positioned, and your toothpicks within reach. You have a narrow window of time before the frozen cake balls begin to warm, so an organized station makes the entire process smooth and efficient.
How to Meal Prep These for Your 4th of July Party
Cake balls are arguably the single best make-ahead dessert in the entire 4th of July food recipes category. Every stage of the process can be completed days before your event.
Bake and crumble the cake up to three days in advance. Store the crumbled cake covered at room temperature or mix it with the frosting, roll the balls, and freeze them on their trays. Rolled, undipped cake balls keep in the freezer for up to six weeks in a sealed freezer bag, meaning you can have your entire dessert ready weeks before the 4th of July.
Once dipped and decorated, finished cake balls store in a sealed container in the refrigerator for up to one week and in the freezer for up to two months. Pull them from the refrigerator 10 minutes before serving so the coating loses its chill but the interior remains firm and fudgy.
For serving as 4th of July food for a crowd, arrange them on a tiered platter or in a shallow box lined with parchment, alternating red, white, and blue coated balls in a pattern that creates a full patriotic visual impact without any additional decoration needed.
FAQs
Why is my chocolate coating cracking after I dip the cake balls? Cracking almost always happens because of a temperature difference between the frozen cake ball and the warm chocolate coating. As the frozen center warms up after dipping, it expands slightly and cracks the chocolate shell. The fix is to let your rolled cake balls sit at room temperature for three to four minutes after removing from the freezer before dipping. They should be very cold and firm but not frozen solid all the way through.
Can I use real chocolate instead of candy melts? Yes, but real chocolate requires tempering to set properly with a glossy, snapping finish. Untempered real chocolate sets with a dull, streaky appearance and a soft texture. If you want to use real chocolate, melt it carefully and work quickly. Candy melts are strongly recommended for beginners and for large batches because they are far more forgiving and consistent.
How do I get a smooth, even coating without drips or lumps? The key is chocolate consistency and excess removal. Your melted candy melts should be fluid enough to coat the ball in one smooth pass. After dipping, hold the ball above the bowl and tap your wrist gently several times to let excess chocolate drip back in before placing on parchment. A toothpick inserted in the top gives you control during dipping that fingers cannot provide.
Are these good for kids to help make? The rolling and decorating stages are ideal for kids. Rolling the cake mixture into balls requires no heat or equipment, and pressing sprinkles onto freshly dipped cake balls is a task children handle enthusiastically. Reserve the melting chocolate steps for adults and set the kids up with their own rolling and decorating station for a genuine 4th of July food for kids activity that doubles as dessert production.
Cultural Context: Cake Balls, American Ingenuity, and the Holiday Dessert Table
The cake ball, also known in its stick-mounted form as the cake pop, is a genuinely American invention that emerged from home baking culture in the early 2000s. Its origin is rooted in a practical instinct that defines much of American home cooking: the refusal to waste a failed or imperfect cake.
What began as a way to repurpose crumbled cake scraps by binding them with frosting and coating them in chocolate became one of the most widely replicated dessert formats of the past two decades. Starbucks helped bring the cake pop to mainstream awareness through their bakery case, but the home baker community had already claimed it as their own long before it became a commercial product.
Dressing cake balls in the colors of the American flag for the 4th of July is a natural extension of the American baking tradition of adapting simple, crowd-pleasing formats to fit the visual language of the holiday. Red, white, and blue have adorned American celebration food since the earliest Independence Day gatherings, and the cake ball simply becomes another canvas for that expression.
These Patriotic 4th of July Cake Balls carry that tradition forward in a format that is modern, practical, and genuinely fun, which is exactly the spirit the holiday calls for.
Patriotic 4th of July Cake Balls
Equipment
- 9×13-inch baking pan
- mixing bowls
- spatula
- Cookie scoop
- parchment paper
- microwave-safe bowls
- baking sheets
Ingredients
- 1 box white or vanilla cake mix, baked and cooled
- 3-5 tbsp vanilla or cream cheese frosting
- 2 cups red candy melts
- 2 cups white candy melts or white chocolate chips
- 1 cup blue candy melts
- 1 1/2 tsp coconut oil, divided
- red, white, and blue sprinkles or stars
- lollipop sticks or toothpicks (optional)
Instructions
- Bake cake according to package directions in a 9×13-inch pan and cool completely.
- Crumble the cooled cake into fine crumbs in a large bowl.
- Add frosting gradually and mix until the cake mixture just holds together when pressed.
- Roll the mixture into 1-inch balls and place on parchment-lined baking sheets.
- Freeze the cake balls for at least 1 hour until firm.
- Melt red candy melts in the microwave in 30-second intervals, stirring between each, then mix in a small amount of coconut oil.
- Dip frozen cake balls into melted coating using a toothpick or lollipop stick and let excess coating drip off.
- Decorate immediately with patriotic sprinkles before the coating sets.
- Repeat the dipping process with white and blue candy melts for color variety.
- Optional: drizzle contrasting candy melts over coated cake balls for extra decoration.
- Refrigerate finished cake balls for at least 15 minutes before serving.