
No appetizer disappears faster at a party than a perfect Deviled Egg. They are the ultimate crowd-pleaser—creamy, savory, and perfectly bite-sized. But why settle for basic when you can elevate a classic? Introducing Bacon and Chives Deviled Eggs, a decadent, smoky, and herbaceous twist that takes this retro favorite into modern culinary stardom.
This recipe takes everything you love about the traditional deviled egg—the smooth, tangy yolk filling—and injects it with flavor powerhouses: crumbled, salty crispy bacon and bright, fresh chives. The smoky bacon provides a rich, savory depth, while the chives offer a welcome pop of delicate onion flavor and a vibrant green visual contrast. They’re the perfect appetizer for holidays, summer cookouts, game days, or any time you need a stunning dish that’s deceptively simple to make.
We’ll walk you through the non-negotiable steps: mastering the perfect hard-boiled egg (no greenish rings here!), achieving a velvety smooth yolk filling, and perfecting the creamy, tangy balance. Get ready to serve the most irresistible bacon deviled eggs your friends and family have ever tasted!
Why Bacon and Chives Deviled Eggs Are Always a Winner
This specific combination of ingredients is a hit for its balance of texture and flavor, making it a highly requested and shared recipe.
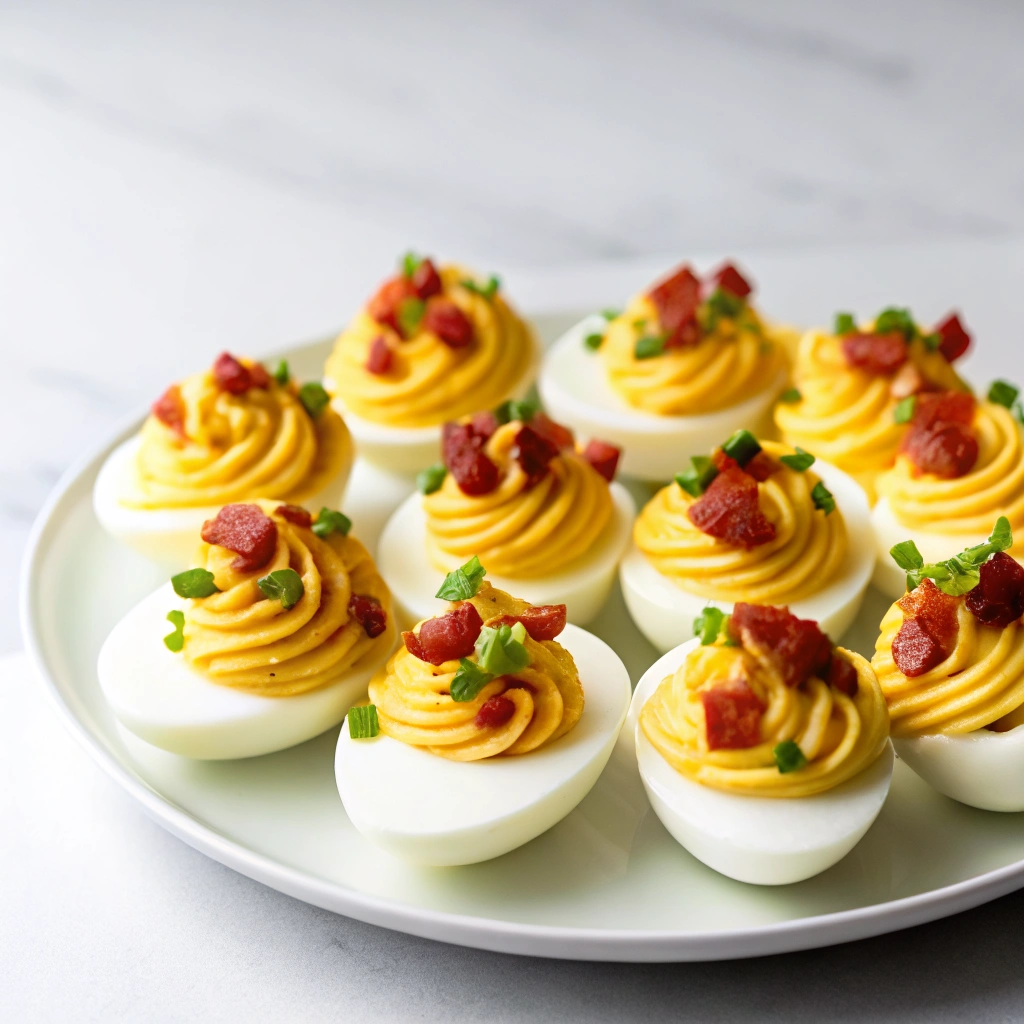
- The Texture Trifecta: Classic deviled eggs are entirely soft. Adding finely crumbled crispy bacon provides a necessary crunch and chew that contrasts beautifully with the smooth filling and tender egg white.
- Savory-Aromatic Balance: Bacon provides deep umami (savory) and smoke. Chives provide a subtle, fresh, aromatic bite without the harshness of raw onion or garlic. They are the perfect, delicate flavor pairing.
- Visual Appeal: The vibrant green chives and deep red-brown bacon against the stark white egg and pale yellow filling are stunning, making them a centerpiece on any platter.
- Make-Ahead Mastery: Deviled eggs are one of the best appetizers to prepare in advance. The filling can be made up to a day ahead, and the assembled eggs travel well, making them ideal for zero-stress entertaining.
- No Fuss, High Impact: Despite the sophisticated flavor profile, the ingredients are simple, and the process is easy. It’s high-impact flavor with low-effort cooking.
Ingredients
Success starts with fresh, quality ingredients. We recommend using a high-quality mayonnaise and sharp Dijon mustard for the best tang.
For the Perfect Hard-Boiled Eggs
- 12 large eggs (preferably 7-10 days old for easier peeling)
- Water
- Ice (for the ice bath)
For the Creamy Filling
- 12 cooked egg yolks
- 1/2 cup mayonnaise (high-quality, full-fat is best)
- 2 tablespoons Dijon mustard
- 1 teaspoon apple cider vinegar or white vinegar
- 1/4 teaspoon Kosher salt
- 1/4 teaspoon black pepper
- 1/4 teaspoon sweet paprika (optional, for color and depth)
For the Bacon and Chives
- 4-6 slices thick-cut bacon, cooked until very crisp and finely crumbled
- 2 tablespoons fresh chives, finely chopped (plus extra for garnish)
Step-by-Step Instructions: Boil, Mix, and Pipe
Follow this guide to get perfectly peelable eggs and a silky-smooth, well-balanced filling.
Part 1: Achieving the Perfect Hard-Boiled Egg (20 Minutes)
- Boil Water: Place the eggs in a saucepan and cover them with about an inch of cold water.
- Cook: Bring the water to a rolling boil over high heat. Once boiling, immediately turn off the heat, cover the pan with a lid, and let the eggs sit in the hot water for exactly 12 minutes.
- Ice Bath (CRUCIAL): Immediately transfer the eggs to a large bowl filled with ice water using a slotted spoon. This ice bath stops the cooking process instantly, preventing the undesirable green-gray ring from forming around the yolk and, most importantly, making the shells incredibly easy to peel. Let them sit in the ice bath for 10 minutes.
- Peel: Gently crack the eggs on a hard surface and peel under cold running water. Once peeled, slice each egg in half lengthwise and carefully scoop the yolks into a medium mixing bowl. Place the egg white halves on a platter, cut-side up.
Part 2: Mixing the Flavorful Filling (10 Minutes)
- Mash Yolks: Using a fork, thoroughly mash the egg yolks until they resemble a fine crumble. Pro Tip: For an ultra-smooth filling, push the yolks through a fine-mesh sieve or use a small food processor.
- Add Wet Ingredients: Add the mayonnaise, Dijon mustard, apple cider vinegar, salt, pepper, and paprika to the mashed yolks. Mix everything with a sturdy fork or spatula until the mixture is completely smooth and creamy.
- Fold in Flavor: Gently fold in the crumbled bacon and the 2 tablespoons of chopped chives. Mix just until they are evenly distributed. Taste the filling and adjust the salt, pepper, or vinegar/mustard for flavor balance.
Part 3: Assembly and Garnish (10 Minutes)
- Fill the Whites: Transfer the yolk filling into a zip-top bag (or a pastry bag fitted with a wide star tip for an elegant look). Snip a small corner off the bag.
- Pipe: Pipe the filling evenly into each egg white half, creating a nice swirl or dome.
- Garnish: Garnish each egg immediately with a sprinkle of the reserved crispy bacon crumbles and a pinch of extra fresh chives.
- Chill and Serve: Cover the platter loosely with plastic wrap and chill the eggs for at least 30 minutes to allow the flavors to meld. Serve cold.
Pro Tips for the Ultimate Deviled Eggs
Achieving the perfect Deviled Egg means mastering the egg, the filling, and the preparation.
- The Steaming Method for Peeling: If you consistently struggle with peeling eggs, try steaming them! Place eggs in a steamer basket over 1 inch of boiling water, cover, and steam for 12 minutes. Transfer immediately to an ice bath. This method yields eggs that practically shed their shells.
- Sift Your Yolks: If you want that famous, velvety-smooth restaurant-quality filling, do not skip the sifting step. Push the cooked yolks through a fine-mesh sieve before mixing them with the mayonnaise and mustard. This removes any tiny lumps and incorporates air for a fluffier texture.
- Achieve Tangy Balance: The key to a great deviled egg is the balance of fat (mayo/yolks) and acidity (mustard/vinegar). Always use Dijon mustard for its depth and tangy kick, and finish with a small splash of vinegar or pickle juice. Taste the filling and don’t be afraid to add a touch more acid!
- The Chilling Rule: Always chill the assembled eggs for at least 30 minutes before serving. This allows the filling to firm up slightly (preventing collapse) and gives the flavors time to meld beautifully.
- Keep Bacon Crisp: To ensure your bacon garnish stays crispy, sprinkle the crumbles on the egg just before serving. If you add them hours beforehand, the moisture from the filling will cause them to soften.
Serving Suggestions and Creative Variations
These Bacon and Chives Deviled Eggs are spectacular on their own, but they also serve as a great base for creative twists.
Presentation and Pairing
- The Presentation Platter: If you don’t have a dedicated deviled egg platter, line a regular platter with a layer of crumpled aluminum foil or a bed of fresh, flat-leaf parsley. This prevents the eggs from sliding around.
- Wine Pairing: Deviled eggs, especially with bacon, pair wonderfully with high-acid, slightly sparkling wines. A dry Prosecco or a light, crisp Sauvignon Blanc cuts through the richness of the yolk.
- Dipping Salt: Offer a small dish of smoked paprika mixed with a flaky sea salt (like Maldon). Guests can lightly dip the tip of their deviled egg for an extra burst of texture and smoky flavor.
Flavor and Filling Variations
- Ranch Deviled Eggs: Replace the vinegar and plain mayonnaise with 1/2 cup of high-quality Ranch Dressing. Add a packet of dry ranch seasoning mix to the yolk for an intense herby flavor.
- Smoky Chipotle Deviled Eggs: Add 1/2 teaspoon of smoked paprika and a small dash of adobo sauce from a can of chipotle peppers (about 1/4 teaspoon). This gives the filling a smoky heat. Substitute the bacon for crispy Chorizo crumbles for a bolder kick.
- Pickle Perfection: Substitute the apple cider vinegar with 1 tablespoon of finely minced cornichons (small pickles) and a splash of the pickle brine. The crunch of the pickles adds a nice texture change.
- Loaded Baked Potato Deviled Eggs: Add 1/4 cup of grated sharp cheddar cheese and a pinch of dried potato flakes (yes, really!) to the filling for a more robust texture. Top with bacon, chives, and a dollop of sour cream.
Frequently Asked Questions
- Can I make Deviled Eggs the day before the party? Yes, but with one crucial caveat. You can make the filling and the cooked egg white halves up to 24 hours in advance. Store the egg white halves on the platter, covered tightly, in the refrigerator. Store the prepared filling in the sealed zip-top bag (or airtight container) in the refrigerator. Do not assemble (fill) the eggs until 1-2 hours before serving. Assembled deviled eggs tend to dry out and the filling can start to soften the egg whites if left sitting overnight.
- What is the best way to transport Deviled Eggs? If you have a dedicated deviled egg carrier, use it! If not, transport the egg whites and the filling separately. Put the filling in a pastry bag or zip-top bag and store the bag in an insulated cooler. Arrange the egg whites in a baking dish covered with a paper towel on the bottom (to absorb moisture) and cover them tightly. Assemble them quickly once you arrive at your destination.
- Why does my yolk have a green ring around it? The green-gray ring (ferrous sulfide) forms when eggs are overcooked. It’s a harmless chemical reaction caused by sulfur in the egg white reacting with iron in the yolk due to high heat exposure. The key to prevention is the precise 12-minute cook time followed by the immediate ice bath to stop the cooking process dead in its tracks.
- My filling is too thick/too thin. How do I fix it?
- Too Thick: Slowly add a teaspoon of reserved pickle juice or a splash of milk/cream until the desired texture is reached.
- Too Thin: Add 1 extra mashed yolk (if you have one) or mix in 1/2 teaspoon of dry mustard powder or a very small amount of dry potato flakes (as noted in the variation tip) to absorb excess moisture.
- How long are Deviled Eggs safe to eat? Due to the mayonnaise and egg content, deviled eggs should not be left at room temperature for more than 2 hours. Always store them covered in the refrigerator. They are best consumed within 2 days of preparation.
These Bacon and Chives Deviled Eggs are the perfect combination of classic flavor and modern appeal. They are truly the secret weapon for effortless, elevated entertaining.
Don’t forget to Pin this recipe for your next party and let us know your favorite unique deviled egg topping in the comments below!

Bacon and Chives Deviled Eggs
Ingredients
Equipment
Method
- Place eggs in a saucepan and cover with cold water. Bring to a boil, then cover and remove from heat. Let sit for 10–12 minutes.
- Transfer eggs to a bowl of ice water and let cool for 5 minutes. Peel the eggs once cooled.
- Slice eggs in half lengthwise and remove yolks into a mixing bowl. Set egg whites aside.
- Mash yolks with mayonnaise, mustard, vinegar, salt, and pepper until smooth and creamy.
- Stir in chopped bacon and chives, reserving a little for garnish.
- Spoon or pipe the filling into the egg whites. Garnish with reserved bacon, chives, and a pinch of paprika.