
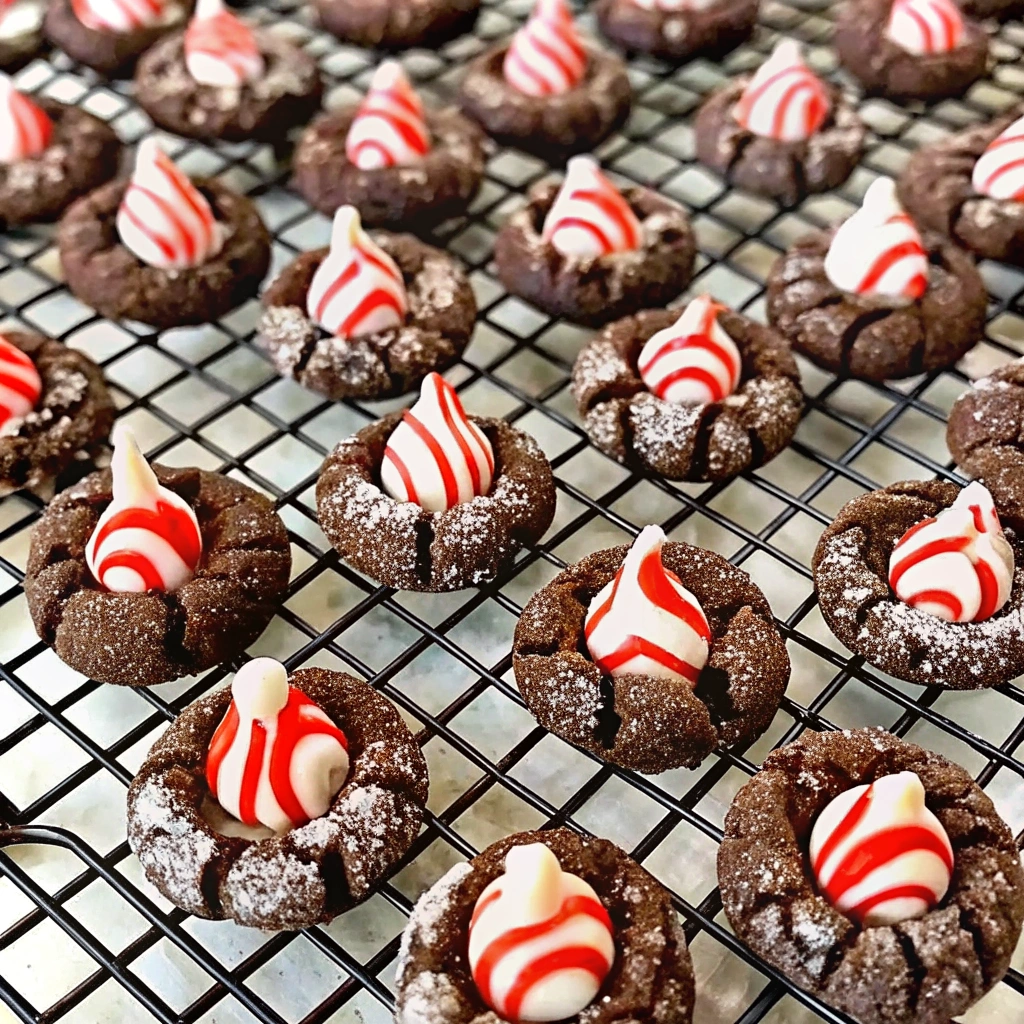
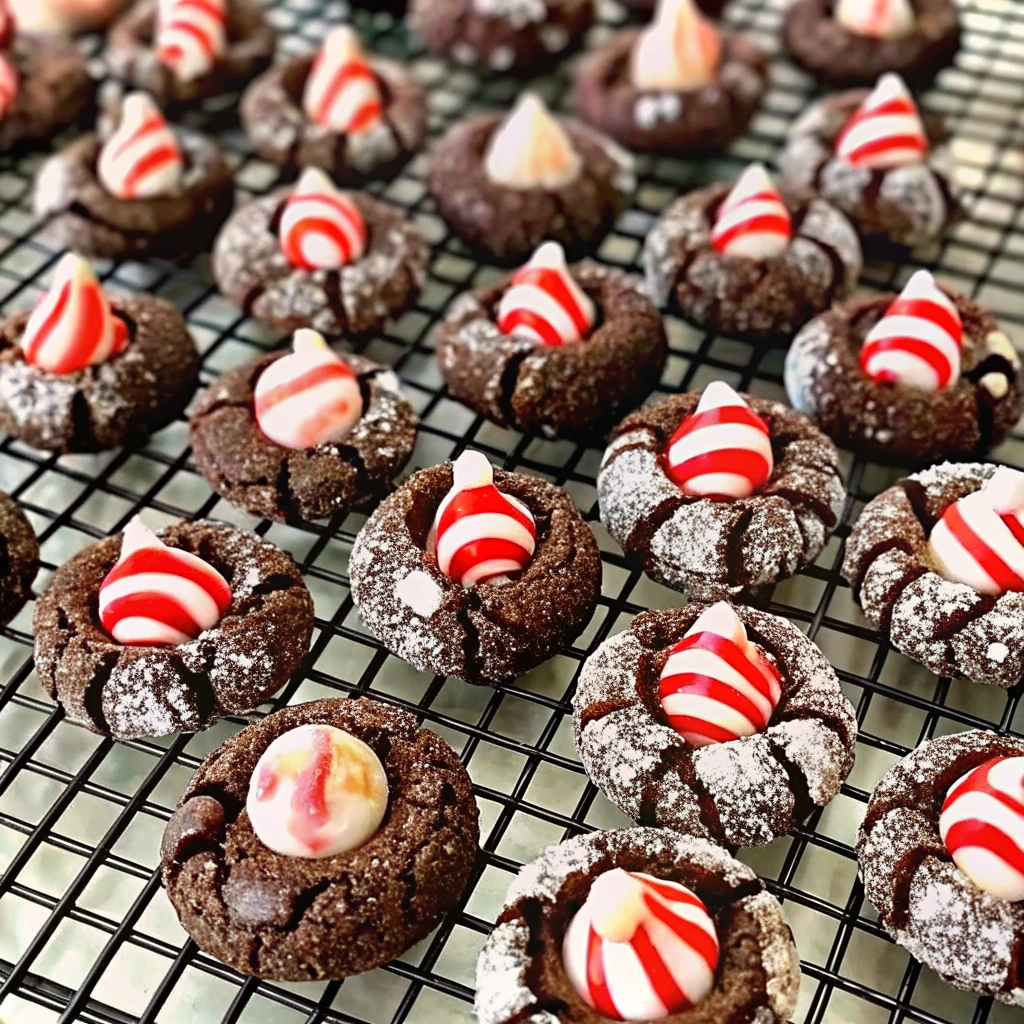
It’s just not Christmas without a “blossom” cookie! These Chocolate Candy Cane Blossoms are a festive and delicious twist on the classic peanut butter blossom, and trust me when I say they’re about to become your new holiday baking obsession.
Picture this: a soft, chewy chocolate cookie rolled in sparkling sugar, fresh from the oven, and topped with an iconic Hershey’s Candy Cane Kiss that’s just starting to melt into the warm cookie. The combination of rich chocolate and cool peppermint is absolutely magical—it tastes like Christmas in cookie form. And here’s the best part: they are so easy and look absolutely incredible on any cookie platter. No fancy decorating skills required, yet they look like they came straight from a professional bakery.
This is the perfect cookie for a holiday party or cookie exchange. They’re eye-catching, delicious, and guaranteed to disappear faster than you can say “more peppermint, please!” Let’s make some holiday magic happen!
Why These Peppermint Kiss Cookies Disappear FAST
Every single time I bring these Chocolate Candy Cane Blossoms to a holiday gathering, they’re the first cookies to vanish from the platter. Here’s why they’re absolutely irresistible:
The perfect flavor combo: chocolate + peppermint. This is the classic holiday pairing that never fails. The rich, cocoa-forward cookie base provides that deep chocolate flavor, while the peppermint kiss adds a refreshing, minty brightness. It’s like a sophisticated version of those chocolate peppermint bark candies everyone loves, but in soft, chewy cookie form. One bite and you’ll understand why people keep coming back for “just one more.”
Super festive and pretty. Let’s be honest—half the fun of holiday baking is making cookies that look as good as they taste! These cookies are Pinterest gold. The sparkly sugar coating catches the light beautifully, and those red-and-white striped Candy Cane Kisses are instantly recognizable as festive and fun. They look stunning on a cookie tray, beautiful in a gift box, and absolutely perfect in photos for your holiday Instagram feed.
Easy to make with no chilling or special tools. Unlike some Christmas cookies that require cookie cutters, chilling time, or intricate decorating, these are wonderfully straightforward. No waiting around for dough to firm up, no searching for the perfect cookie cutter, no royal icing stress. You literally just roll balls of dough, roll them in sugar, bake, and press in a Kiss. Even beginner bakers can nail these on the first try!
A fun baking project with kids. If you’ve got little helpers in the kitchen, these cookies are perfect for them. Kids love rolling the dough into balls, coating them in sparkly sugar, and (the best part!) unwrapping and pressing in the Kisses. It’s hands-on, it’s fun, and everyone feels like they contributed to the final delicious result.
Just a Few Simple Ingredients
The beauty of this recipe is that it uses mostly pantry staples you probably already have on hand. No hunting down specialty ingredients or making a special grocery store run!
You’ll need the basics for any good cookie: all-purpose flour, unsweetened cocoa powder (this is what gives us that deep chocolate flavor), butter (softened, for the perfect texture), granulated sugar and brown sugar (the combo gives you both sweetness and chewiness), eggs, vanilla extract, and a bit of baking soda and salt.
For rolling, you’ll want granulated sugar or sparkling sugar—the sparkly kind makes them extra special and festive!
And of course, the star ingredient: Hershey’s Candy Cane Kisses! These are the iconic red-and-white striped kisses with that perfect peppermint flavor. They typically show up in stores around November and sell out quickly, so grab a few bags when you see them. More on where to find them in the FAQs below!
If you’re a chocolate lover building out your Christmas cookie lineup, these pair wonderfully with other chocolatey favorites like our classic Chocolate Chip Christmas Cookies for a decadent dessert spread!
How to Make Perfect Blossoms (Step-by-Step)
Ready to bake? This recipe comes together quickly and easily—let me walk you through every step so your cookies turn out absolutely perfect.
Step 1: Make the Easy Chocolate Cookie Dough
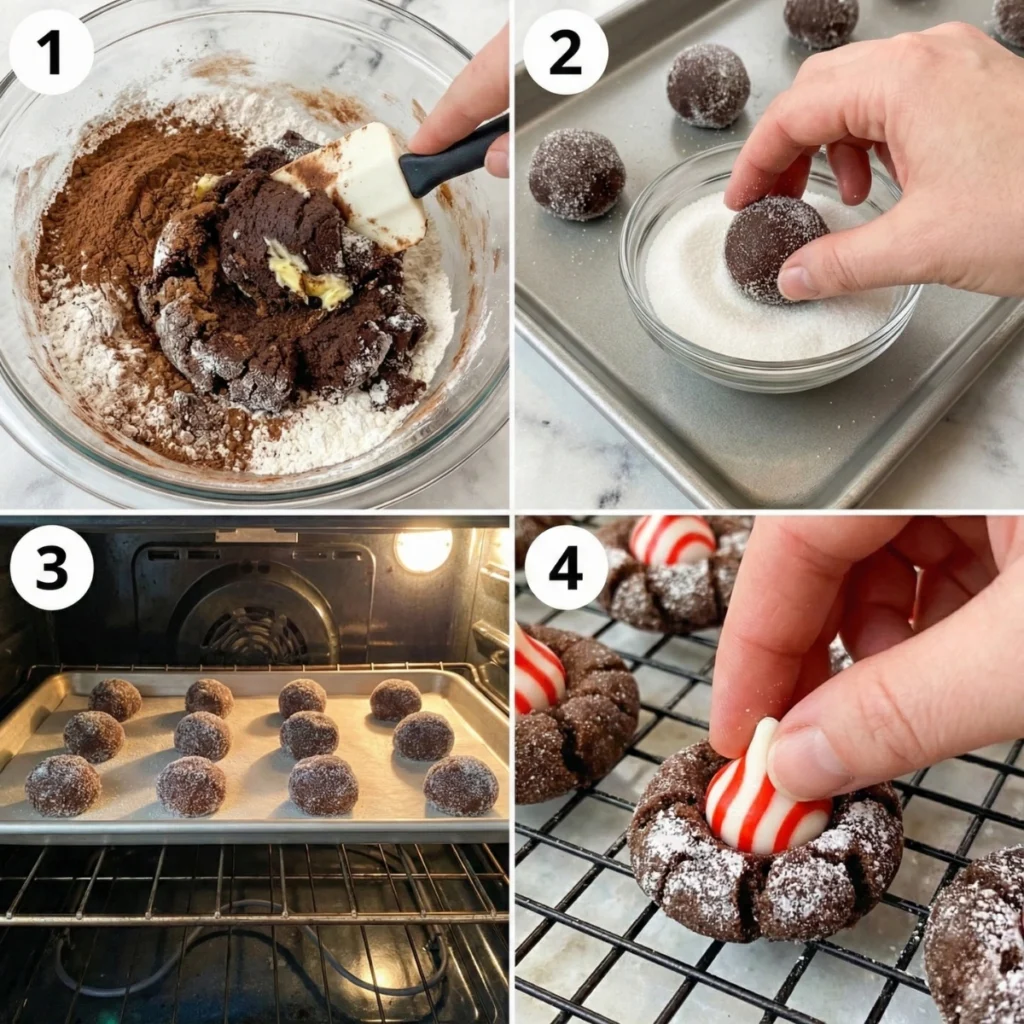
Start by creaming your softened butter with both granulated and brown sugar until the mixture is light and fluffy—this takes about 3-4 minutes with an electric mixer. Beat in your eggs one at a time, followed by the vanilla extract. In a separate bowl, whisk together your dry ingredients: flour, cocoa powder, baking soda, and salt. Gradually add the dry mixture to the wet ingredients, mixing on low speed just until everything comes together. The dough will be soft, slightly sticky, and smell absolutely amazing—like a chocolate lover’s dream!
Step 2: Roll in Sugar (And What Kind to Use!)
Scoop your dough into balls about 1 tablespoon each (a cookie scoop makes this super easy and keeps them uniform in size). Now comes the fun part: roll each ball in sugar! You can use regular granulated sugar for a classic look, or go with coarse sparkling sugar (sometimes called sanding sugar) for extra sparkle and crunch. The sparkling sugar really makes these cookies shine under the lights and gives them that “wow” factor. Roll generously so each cookie is completely coated!
Step 3: Bake to Perfection
Arrange your sugar-coated dough balls on a parchment-lined baking sheet, spacing them about 2 inches apart (they will spread slightly). Bake at 350°F for about 8-10 minutes. Here’s what to look for: the cookies should look set around the edges but still slightly soft in the center. They’ll have those beautiful crackles on top from the sugar coating. Don’t overbake them—you want these to stay soft and chewy!
Step 4: The “Blossom” Moment
As soon as the cookies come out of the oven, immediately press a Candy Cane Kiss firmly into the center of each cookie. The cookie will crack around the edges (that’s perfect!), and the Kiss will sink in slightly. The warmth of the cookie will make the bottom of the Kiss just slightly melty, which helps it adhere beautifully. Let the cookies cool completely on the baking sheet—this helps the Kiss set properly.
The “Secret” to Stopping Your Kisses from Melting
This is one of the most common questions I get about blossom cookies, so let’s tackle it head-on: How do you keep those beautiful Candy Cane Kisses from turning into a melted mess?
Tip #1: Unwrap them all first. Before you even start baking, unwrap all your Candy Cane Kisses and have them ready to go. This way, you can press them into the hot cookies immediately when they come out of the oven. If you wait too long to unwrap them, the cookies start to cool down and the Kiss won’t adhere properly. But if you work too slowly while unwrapping, the cookies get too cool. Having them pre-unwrapped is the key to perfect timing!
Tip #2: Press them in immediately. As soon as your baking sheet comes out of the oven, start pressing in those Kisses. Don’t wait! The cookies are at the perfect temperature right out of the oven—hot enough to slightly melt the bottom of the Kiss (which helps it stick), but if you work quickly, the Kiss itself won’t completely melt into a puddle.
Tip #3: The freezer trick. Here’s a pro move: before you start baking, put your unwrapped Candy Cane Kisses in the freezer for 10-15 minutes. The cold Kisses are much more resistant to melting when they hit the warm cookies. This gives you a little extra time to work and ensures they keep their beautiful shape. This is especially helpful if you’re baking multiple batches or if your kitchen is warm!
Tip #4: Let them cool completely on the pan. Don’t try to move the cookies to a cooling rack right away. Let them sit on the baking sheet until they’re completely cool. This allows the Kiss to firm back up in place without sliding or melting further.
Variations & Storing Your Cookies
One of the best things about this recipe is how versatile it is! Here are some fun ways to mix things up:
Try Different Kiss Flavors: While Candy Cane Kisses are the star of the show during the holidays, you can make these year-round with different Kiss varieties! Try regular milk chocolate Kisses for a classic combo, caramel-filled Kisses for something extra decadent, Hugs (the white and milk chocolate striped ones) for a pretty look, or mint truffle Kisses if you can find them. Each variation brings its own delicious twist to the chocolate cookie base.
Roll in Sprinkles Instead of Sugar: For an extra festive look, try rolling your cookie dough balls in Christmas sprinkles or red and green sanding sugar instead of plain white sugar. This makes them even more colorful and fun, especially if you’re making them with kids or for a party.
Add Peppermint Extract: Want to double down on the peppermint flavor? Add ¼ teaspoon of peppermint extract to your cookie dough along with the vanilla. This creates an even stronger mint-chocolate experience!
Storing Your Cookies: Store your Chocolate Candy Cane Blossoms in an airtight container at room temperature, with layers separated by parchment or wax paper (to protect those pretty Kisses). They’ll stay soft and delicious for up to 5 days—though I guarantee they won’t last that long!
Freezing: You can absolutely freeze these cookies! Once completely cooled, arrange them in a single layer in a freezer-safe container with parchment paper between layers. They’ll keep beautifully for up to 3 months. Thaw at room temperature for about 30 minutes before serving. The Kisses might develop a slight “bloom” (white coating) from the freezer, but they’ll still taste perfect!
You can also freeze the unbaked cookie dough balls (already rolled in sugar) on a baking sheet, then transfer to a freezer bag. Bake straight from frozen, adding 1-2 extra minutes to the baking time, then press in the Kisses as usual.
Frequently Asked Questions
Where can I find Candy Cane Kisses?
Hershey’s Candy Cane Kisses are a seasonal product that typically hits store shelves in early to mid-November and sticks around through December. You can find them at most major grocery stores, Target, Walmart, drugstores like CVS and Walgreens, and of course, online at Amazon (though they’re usually more expensive there). Here’s my best advice: when you see them in stores, stock up! They sell out fast as we get closer to Christmas. Buy extra bags and store them in a cool, dry place—they’ll keep for months. If you can’t find them locally, check online retailers, but order early to ensure delivery before your holiday baking!
Can I use a different cookie base (like peanut butter)?
Absolutely! The classic blossom cookie is actually made with peanut butter dough, and it’s delicious with Candy Cane Kisses too. You can use your favorite peanut butter cookie recipe and follow the same method—roll in sugar, bake, and press in the Kiss. The peanut butter-peppermint combo is surprisingly tasty! You could also try these Kisses on snickerdoodles, sugar cookies, or even brownie cookies. The chocolate base we’re using here is my personal favorite for the holidays because it really lets that peppermint shine, but feel free to experiment!
How do I get the sugar to stick and sparkle?
The key is making sure your cookie dough balls are slightly sticky when you roll them in sugar. If your dough has been refrigerated, let it sit at room temperature for a few minutes to soften slightly—this helps the sugar adhere better. Roll each ball generously in the sugar, using your hands to gently press the sugar into the dough. If you’re having trouble getting the sugar to stick, you can lightly dampen your hands with water before rolling the dough balls. For extra sparkle, use coarse sparkling sugar (sanding sugar) instead of regular granulated sugar—it catches the light beautifully and creates that professional bakery look!
Time to Bake Some Holiday Magic!
These Chocolate Candy Cane Blossoms are always the first to go at our holiday parties, and now you know exactly why. They’re the perfect bite of festive flavor—rich chocolate, refreshing peppermint, and that gorgeous sparkly presentation that makes everyone reach for seconds (and thirds!).
You are going to be the star of the cookie exchange with these! Let me know if you try them in the comments below—I love hearing about your baking adventures. And don’t forget to Pin this recipe for later so you can find it when you’re ready to start your holiday baking. Trust me, once you make these once, they’ll be on your Christmas cookie list every single year!
Chocolate Crinkle Candy Cane Kiss Cookies
Ingredients
Equipment
Method
- Preheat oven to 350°F.
- Cream butter and brown sugar together until fluffy.
- Mix in the eggs.
- Add flour, cocoa powder, baking powder, and salt.
- Mix until just combined.
- Fold in the mini chocolate chips.
- Scoop dough by rounded tablespoon and roll each ball in powdered sugar.
- Place cookie dough balls on a cookie sheet, about 12 per sheet.
- Bake for about 8 minutes.
- Let sit 1–2 minutes before transferring to a cooling rack.
- Press one Hershey Kiss into the center of each cookie.
- Serve immediately or cool completely before freezing.