Pumpkin Cinnamon Rolls
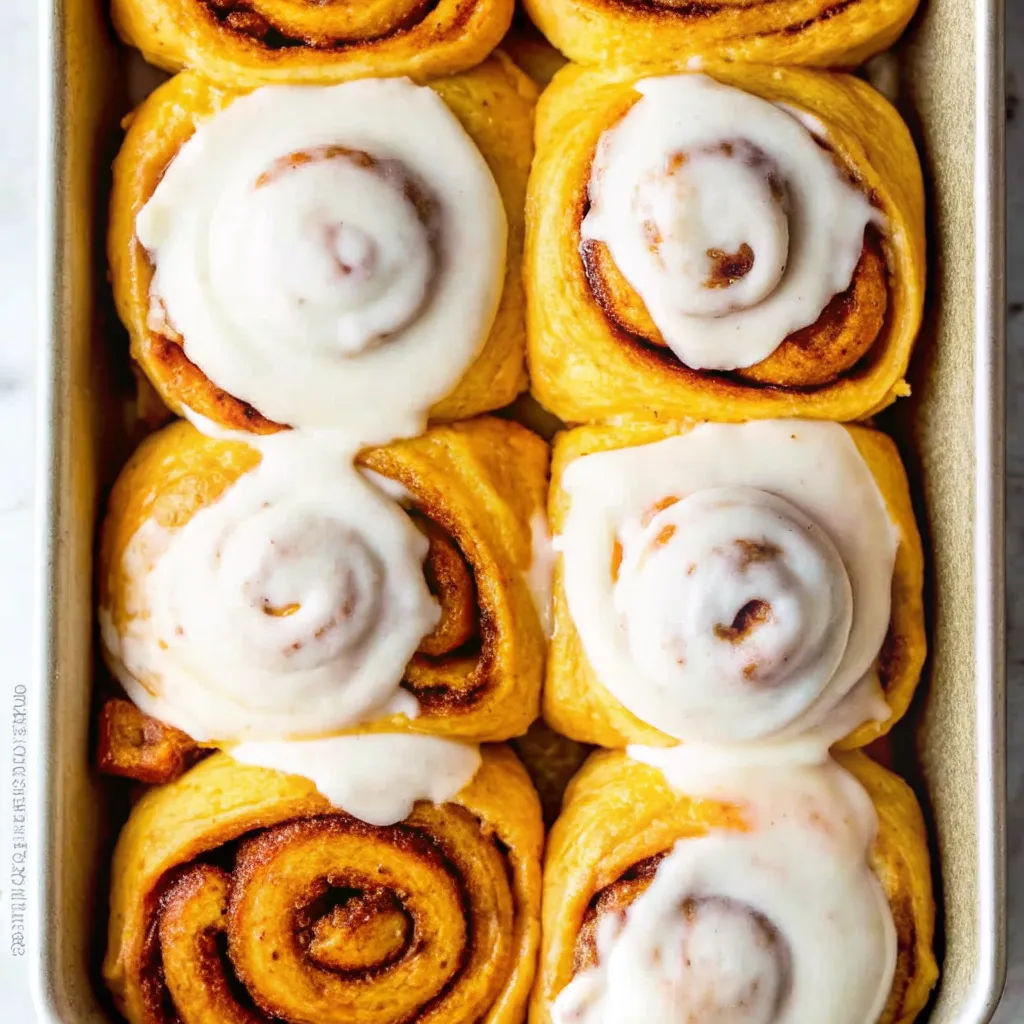
There’s something magical about the smell of cinnamon rolls baking in the oven. Now, imagine that cozy aroma infused with the warmth of pumpkin spice—it’s the perfect way to welcome …

Satisfy your sweet tooth with our collection of decadent dessert recipes. From cakes and cookies to simple sweet treats, find your perfect indulgence.
There’s something magical about the smell of cinnamon rolls baking in the oven. Now, imagine that cozy aroma infused with the warmth of pumpkin spice—it’s the perfect way to welcome …
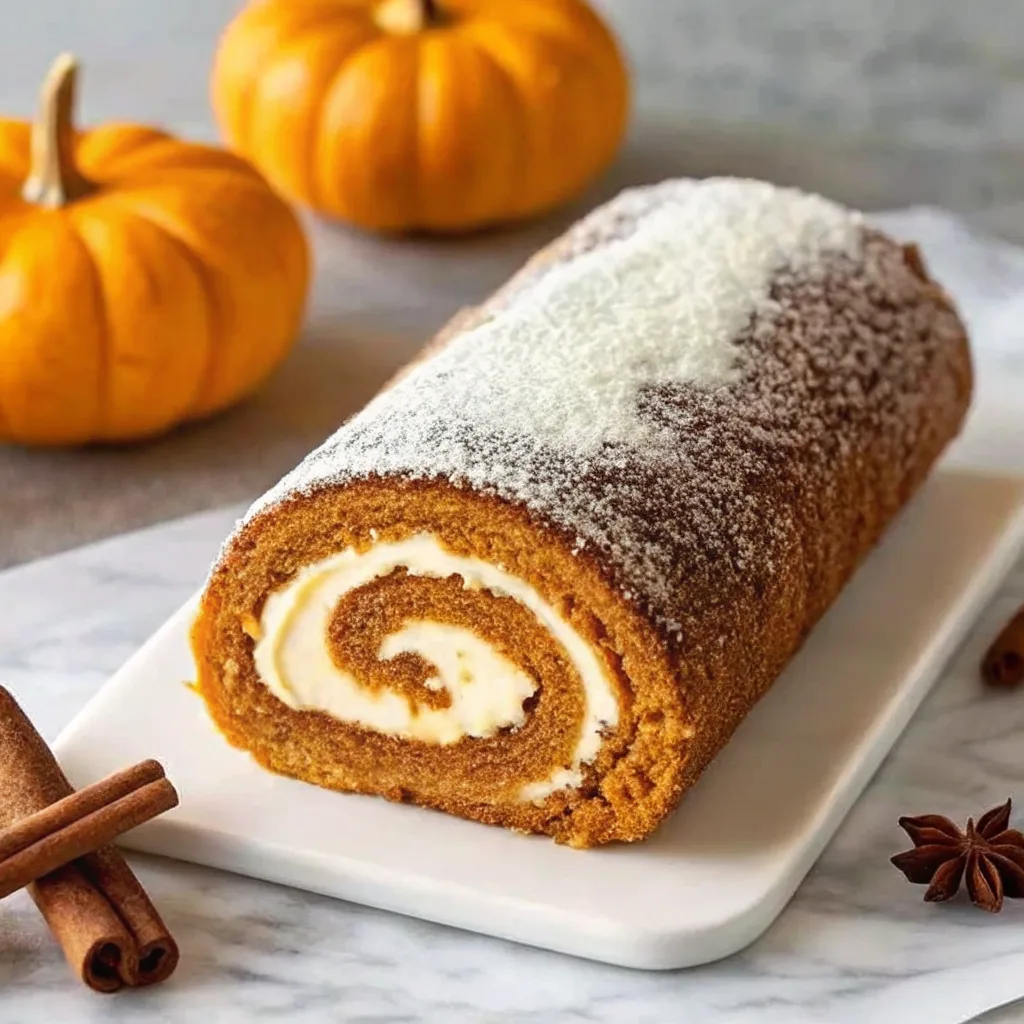
Few desserts capture the magic of fall quite like a Creamy Pumpkin Spice Roll Cake. With its moist, spiced pumpkin sponge cake and luscious cream cheese filling, this classic dessert …
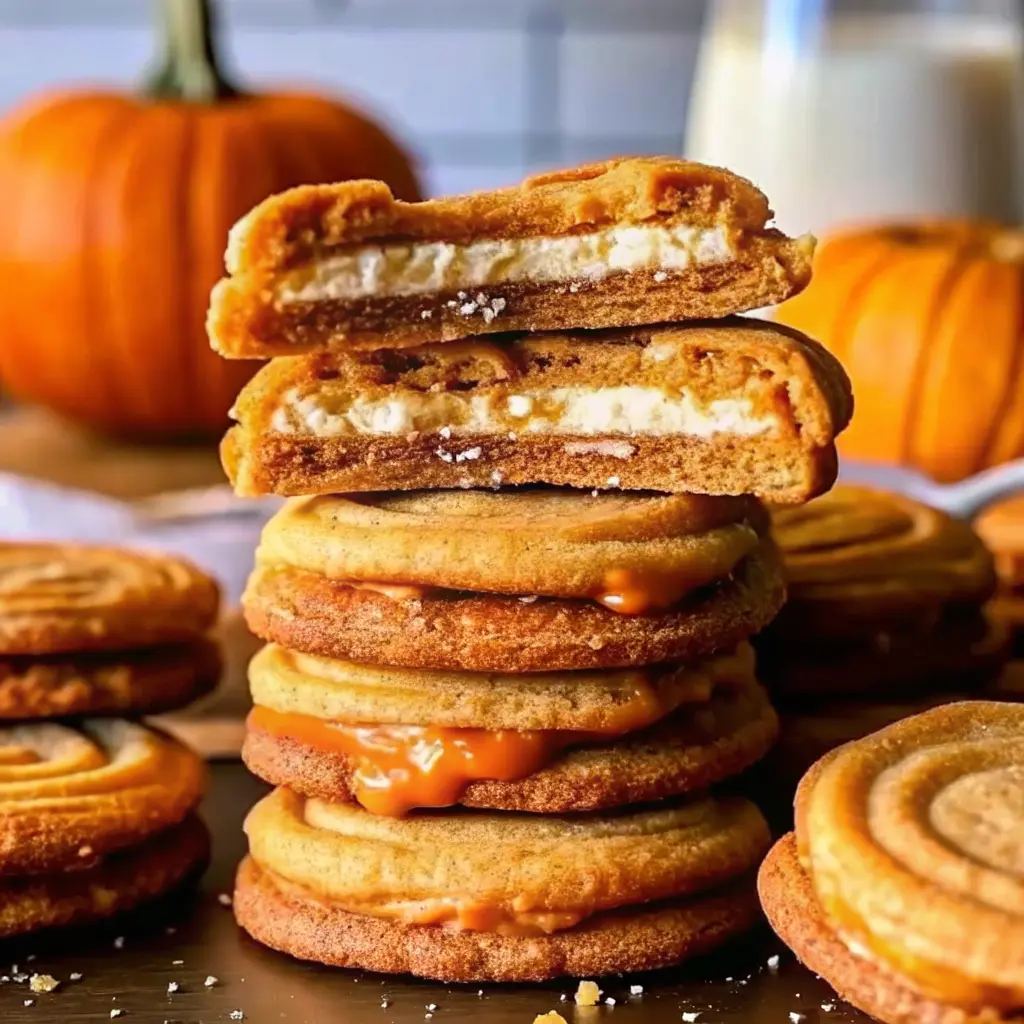
Pumpkin season is all about cozy flavors, and when you combine pumpkin with cheesecake, you get a dessert that’s truly irresistible. These Pumpkin Cheesecake Cookies take the warmth of spiced …
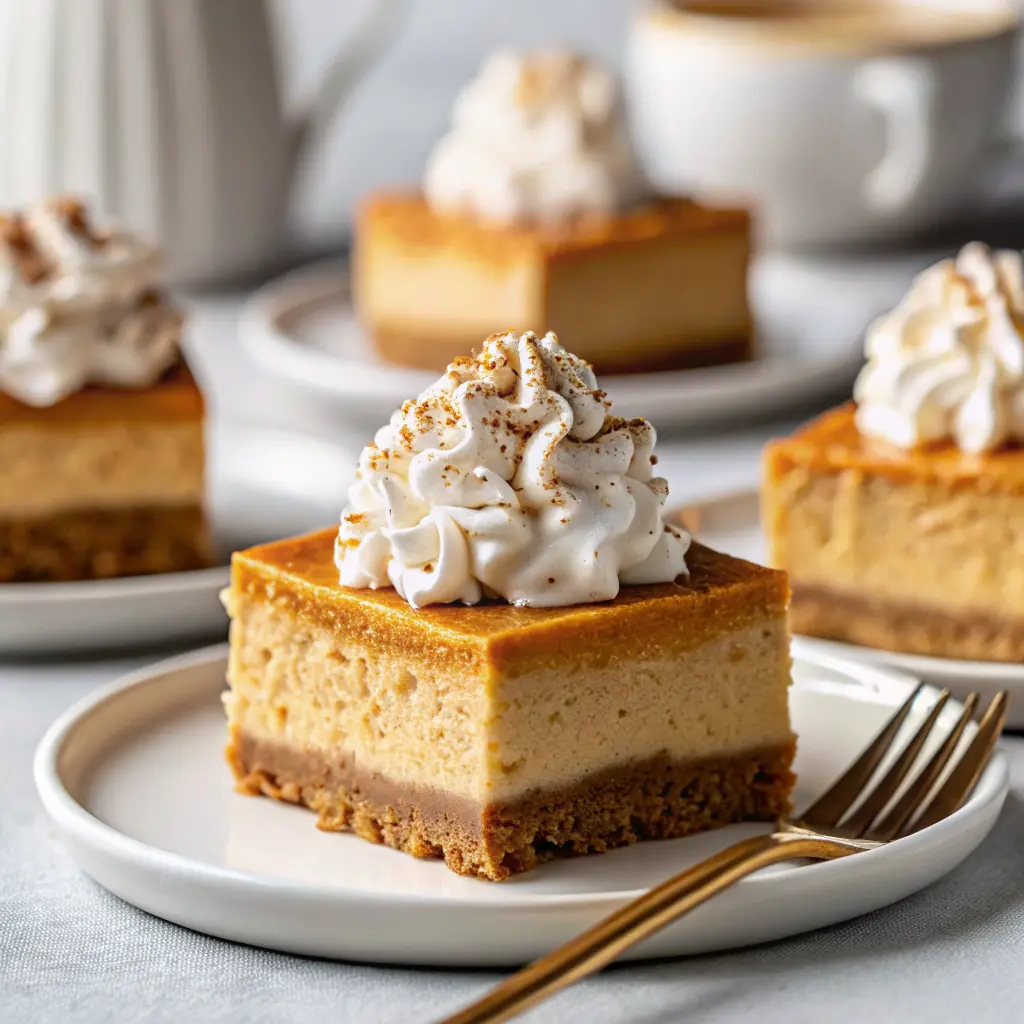
When the air turns crisp and pumpkin spice fills every corner of the season, there’s nothing more comforting than a dessert that tastes like fall but doesn’t require you to …
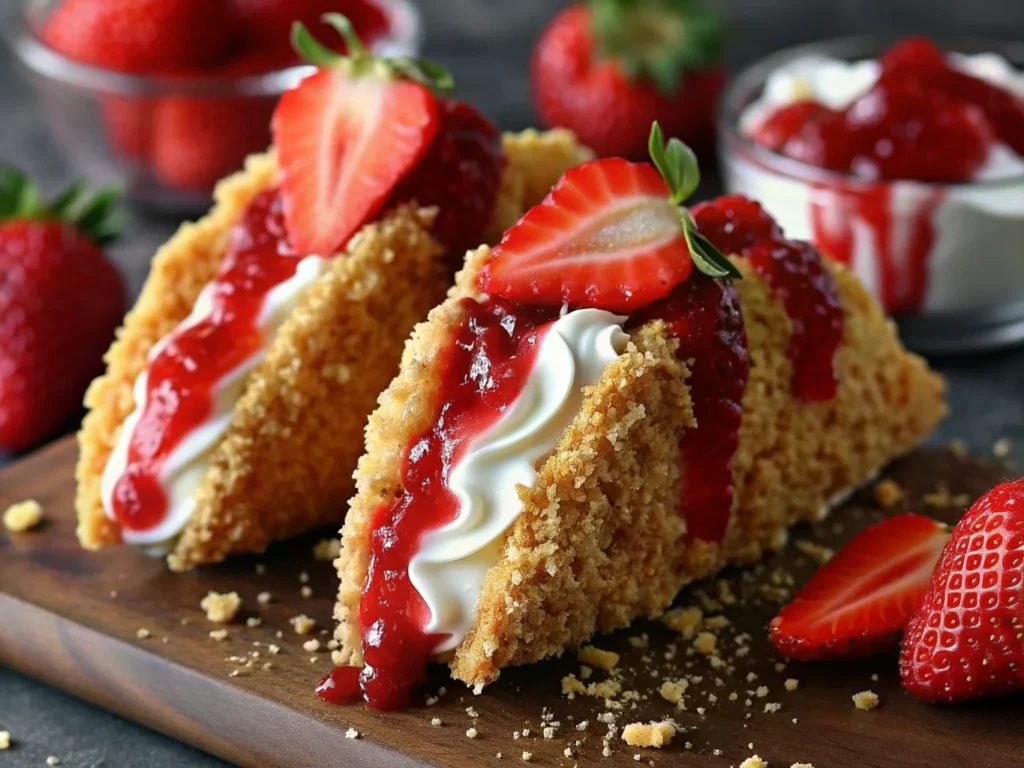
Strawberry Crunch Cheesecake Tacos have taken over my kitchen lately. Honestly, I once found myself standing in the bakery aisle thinking, “There has to be an easier way to get that perfect mix of crunch and creamy.” Sick of boring, ordinary desserts? Oh, same here. Enter these little beauties! They seriously taste like summer, picnics, and a five-star restaurant dessert all rolled into one (except you can make them without wearing shoes). How to prepare Strawberry Crunch Cheesecake Tacos? Okay, let’s talk messes. The first time I tried this, stuff was everywhere. Cheesecake filling on the counter. Crumbs in my hair. You get the picture. But now, I’ve got this Strawberry Crunch Cheesecake Tacos recipe down to something even a sleep-deprived college student could manage. Here’s the deal: you shape small tortillas into taco shells (hint: bake or fry, your call), whip up a creamy cheesecake-y filling, and smother it with that irresistible strawberry crunch topping (you know the one, from the ice cream bars). The result? Pure joy in every bite. Maybe your kitchen’s cleaner than mine, but give yourself space because the crunch sprinkle gets wild. Trust me, worth it. Most of the work is hands-on for maybe half an hour. Let them chill in the fridge for a bit if you want them extra cold and set. And if you’re impatient like me, you’ll probably eat the first one straight away. Dessert Taco Ingredients Let’s keep this simple, because who really wants a mile-long list? That’s it, friend. Most of this you probably already have, unless your late-night snack raids have depleted your cookie stash. How To Make Strawberry Cheesecake Tacos Actual story: I’ve botched a lot of DIY desserts. This one? Pretty forgiving. Let’s break it down. First, shape those tortillas. You want them taco-style, but they’re tiny. Either wrap them around your oven rack to bake or fry in a pan with a sprinkle of sugar so they get a little golden. While they cool, beat the cream cheese, pour in the heavy cream, sugar, and vanilla, and whip till it’s almost mousse-like. No fancy mixer? Elbow grease works, but it’s a workout. For the crunch, pulse up the Golden Oreos in a food processor or smash in a bag. Melt some butter, stir in the strawberry Jello powder, and mix. Dump it all together, spread it on a baking tray, and toast briefly in the oven. Once cooled, break it up. Now (here’s my favorite part) fill your cooled shells with the cheesecake mixture, dunk or sprinkle the crunch all over, and add fresh strawberries. They look so fancy, but I swear, they’re easier than making pancakes. Tips and tricks Gonna be straight with you: neatness is not rewarded here. That crunchy stuff goes everywhere, but it tastes so good you won’t care. Let’s keep it real for a sec. Try using mini tortillas so you can eat two (or maybe three) without guilt. If you’re short on time, chill the filled tacos in the freezer for ten minutes. Want extra crunch? Double up on the Oreo mix. And if strawberries aren’t in season, grab frozen or swap for raspberries. Nobody’s judging. I’ve also discovered that piping in the cheesecake mix (instead of spooning) ups your “fancy factor.” Messy or not, these Strawberry Crunch Cheesecake Tacos absolutely steal the show. Best. Dessert. Ever. My kids and I fought over the last one, and I’m not proud of how competitive I got. – Jess from Montana How long will these Cheesecake Tacos last So here’s the rundown. These Strawberry Crunch Cheesecake Tacos are freshest on day one. The shells are crisp, the filling’s just set, and the crunch is…well, crunchy. By day two? Still tasty, but textures change a bit. Pop any leftovers in an airtight container in the fridge. They’ll keep for about two days. After that, the shells get softer, and the crunch topping loses its snap. Not gross. Just not five-star. You can freeze the filling ahead though if you’d like, and assemble closer to the time you’ll eat. Trust me, don’t freeze the whole taco. Soggy city. If you somehow have extras (can’t relate), let them sit out a little at room temp before eating for best flavor. Serving Suggestions FAQs Can I use graham crackers instead of Oreos? Yeah, totally! Crunch will be a bit different, but still delish. Do I have to use strawberry Jello? Nope. Try raspberry or cherry for a twist, but strawberry’s classic. What if I don’t have a hand mixer? You can mix by hand. Takes more muscle, but you get bragging rights. …
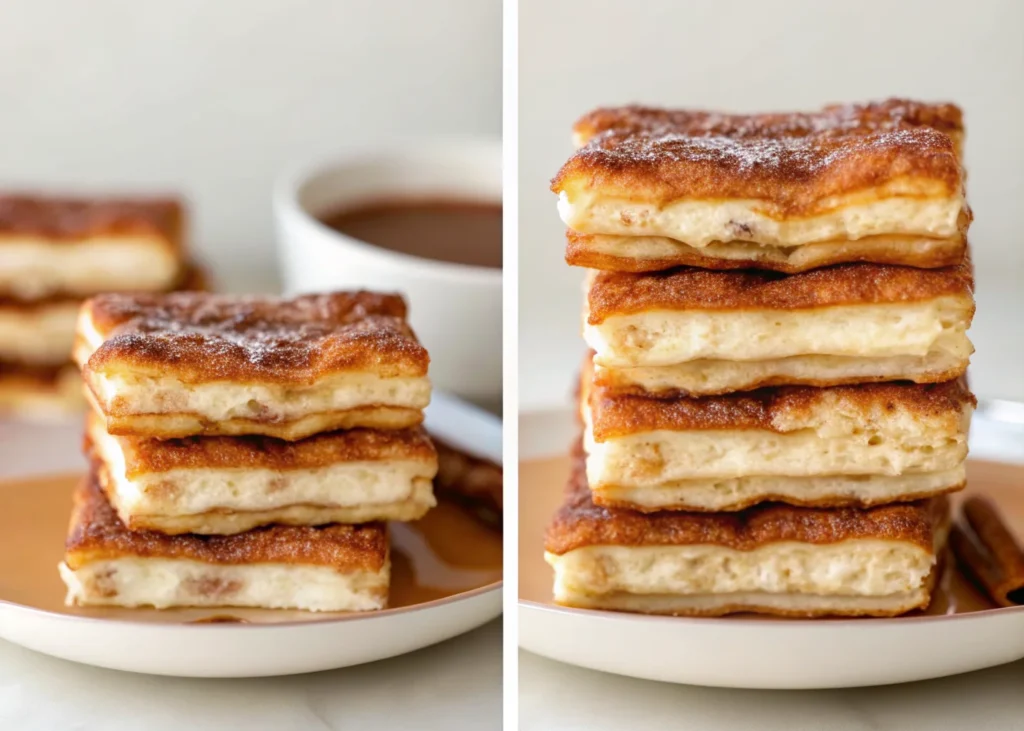
Ever found yourself stuck before a party, wishing for an insanely easy and crowd-pleasing treat? Simple Churro Cheesecake for Parties is your answer, I swear by it. The combo hits just right: creamy, sweet, cinnamon-crispy top. Oh, and no need for fancy tricks or a college degree in baking, trust me. I’ve been there, staring at an empty dessert tray, regretting overly complicated recipes. This is not that. Your friends will ask for take-home slices, just watch. Why this Simple Churro Cheesecake works Alright, let’s get serious (well, as serious as churro cheesecake bars get). What makes this dessert hit every time? First off, crescent dough. It’s already rolled out and buttery so you skip any knead-and-rise drama. Then, two simple mixes: one for a cinnamon-sugar blanket, the other for your cheesecake filling. But here’s the real kicker: no water baths, no fussing with cracks, and pretty much zero baking nerves. The result? It’s soft and creamy inside, golden and cinnamon-sugary outside. If you can press, sprinkle, and mix, you’ve already got the skills. The bars hold their shape so people aren’t left with a goopy mess. Which, honestly, is rare for something this easy. Sometimes, people flip out and think it’s some top-secret bakery hack. (You don’t have to correct them. Wink!) “I made these for my cousin’s graduation and they vanished before I could even grab a second piece. Can’t believe how easy it was!” – Mindy, actual party dessert hero Ingredients for churro cheesecake bars Want to know the wildest part? You need, like, six main items. Here’s the full list – double-check your fridge! Not kidding, it’s that simple. If you wanna get all fancy, swap in Neufchâtel cheese or try a different sugar, but honestly, classic grocery store stuff works best here. Oh, and don’t skip the cinnamon, or it’s basically just, well, cheesecake in a crust. Optional toppings or variations So you want to jazz things up a smidge? I don’t blame you. Honestly, folks go nuts for the classic churro cheesecake bars, but you can keep things interesting. Sometimes, I drizzle caramel right on top before slicing. Other times, I chop up a few strawberries and toss them on when it cools. Chocolate chips? Dangerous. You could even use pumpkin pie spice instead of cinnamon for a cozy fall twist, but I’m warning you, it’s addictive. Some brave souls in my family have tried adding a pinch of cayenne to the cinnamon sugar. Now that’s a shocker! Or, use a flavored extract in the filling (think orange or almond). Don’t let anybody tell you variations are cheating; the real crime is running out before the party ends. Recipe overview for churro cheesecake bars Let’s get real: I hate recipes that are one hundred steps. This is NOT one of them. Preheat your oven, line up your ingredients, and here’s the nutshell version. Spread out the first can of crescent dough in a baking dish. Whip up your cream cheese with half the sugar and vanilla. Slather that (generously, please) over the dough. Lay the second sheet of dough on top, pour on that glorious melted butter, and rain down your cinnamon-sugar mix. Into the oven it goes, usually about 30 minutes, until the golden edges smell ridiculously good. Cool it a bit unless you want molten filling everywhere. My tip: cut big bars. Nobody likes mini bites of this stuff. (table_seo); Tips for serving and enjoying churro cheesecake bars So you’ve baked the masterpiece – now what? I’ve got some ideas: Trust me, you’ll want coffee or milk nearby – this dessert is bold. I’ve even served these with little bowls of dulce de leche for dunking. That’s next-level party moves. FAQs Do I have to use crescent dough? Not necessarily, but it’s basically perfect for this recipe. Puff pastry or pie crust works, but expect a different texture. How do you keep churro cheesecake bars from being soggy? Don’t overdo the butter on top, and make sure you bake until golden at the edges. Cooling helps firm things up too. Can I freeze churro cheesecake bars? Absolutely. Cut into bars, wrap well, and you’re golden for about a month. Thaw in the fridge. Is there a gluten-free option? Grab gluten-free crescent dough or make a homemade substitute. It’s not quite the same, but still really tasty. …
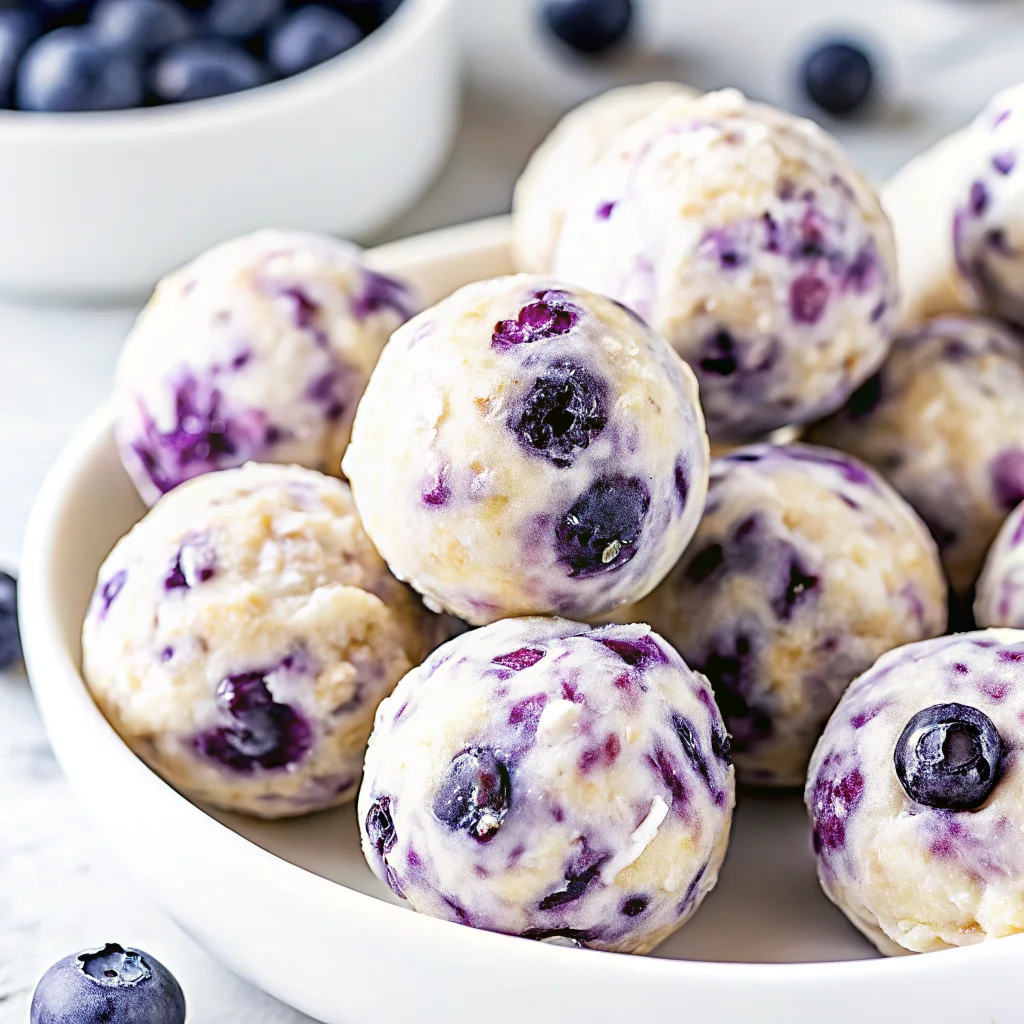
Blueberry Cheesecake Protein Bites are my go-to when that sweet tooth hits harder than you’d expect—usually just when I’m trying to be all healthy and whatnot. I mean, don’t you hate that? You work all morning and suddenly boom, there’s this urge for a creamy treat. Regular snacks either crash my energy, or taste like cardboard shoes (ugh). But, these? Oh, they actually taste like real cheesecake—and pack a protein punch that keeps you feeling full, not funky. If you’re always scrounging for a smart, tasty snack, get ready to love these little guys. Ingredients used to make Blueberry Protein Balls Now, let’s get after what’s actually inside these Blueberry Cheesecake Protein Bites. Nothing complicated here—promise. You’ll need oats, vanilla protein powder, and almond flour. Toss in a bit of cream cheese (YEP), some nut butter (I’m a peanut butter fan, fight me), and a handful of fresh blueberries. I like a squirt of honey or maple syrup for sweetness, too. Oh, don’t forget a splash of vanilla extract. I know, that sounds like a long list—honestly, you probably have half this stuff already. Just dump it all in a big bowl, mash, roll, chill, done. “These bites are my life-saver for post-workout cravings. Zero guilt, tons of flavor. My kids even fight over them.” – Jenna, busy mom of three. Recipe Variations and Optional Add Ins Alright, wanna get wild? Here’s where I mess with my Blueberry Cheesecake Protein Bites. Swapping nut butters is easy—try almond or cashew for a totally new flavor. No fresh blueberries? Dried works too (just chop ’em up so you don’t get a mega chunk). A friend of mine sneaks in chia seeds for that extra health halo. Chocolate chips? Honestly I’ve slipped some mini ones in and it’s like dessert at a five-star restaurant—no shame. You could even blend in a handful of spinach. Sounds bizarre, but you barely know it’s there. These little tweaks are all welcome. More Recipes Using Berries Let’s say you grabbed berries on sale (I do this too much)—good news, there’s a whole world outside Blueberry Cheesecake Protein Bites. For busy mornings, blend extra blueberries into your overnight oats. Raspberries actually slap in homemade yogurt parfaits. My cousin freezes strawberries and blends them up with protein powder for a quick smoothie. Gotta say, tossing a trio of mixed berries into baked oatmeal is next-level comfort food. Berries don’t last? Freeze ’em, then use later—no more sad, fuzzy fruit in the back of your fridge. How to Make this Healthier Real talk: these Blueberry Cheesecake Protein Bites are already healthy, but you can crank it up a notch. Switch to a lower fat cream cheese for less richness, more lightness. Stevia or monk fruit syrup instead of honey cuts the added sugar (let’s save those calories for a treat later). You can use gluten-free oats so anyone can enjoy ’em. Adding flaxseed is a sneaky move for more fiber—no one will notice, promise. Oh, and leave out chocolate chips if you wanna be super strict, but honestly, sometimes your sanity needs a boost too. How do you store protein balls? Easy answer here—pop your Blueberry Cheesecake Protein Bites in a container with a lid. They keep best in the fridge, for up to a week (but let’s be honest, mine never last that long). You can even freeze them. Just grab and go whenever you want. A tip: keep parchment between layers so they don’t stick together into one mega-ball. Portability factor? Through the roof. FAQs Q: Can I use a different fruit instead of blueberries? A: Totally! Strawberries, raspberries, even chopped cherries. Just don’t drown the dough or it’ll get mushy. Q: Do I have to use protein powder? A: It helps boost the protein, but you could skip it if you want a lighter snack. Maybe add a bit more oats or almond flour if it feels too sticky. Q: Can I freeze these? A: Absolutely. Just flatten ‘em slightly so they don’t clump. Thaw for a few minutes before eating. Q: Are they kid-friendly? A: For sure. Kids love the sweet-tart blueberry hit. I just make the balls a bit smaller for little hands. Q: Is this recipe gluten-free? A: As long as your oats are certified gluten-free, you’re good. Give These a Go! Alright, there it is—my full confession about Blueberry Cheesecake Protein Bites. They’re easy, they taste decadent, and they fit in a lunchbox. What more do we want? If you like quick, healthy bites like these, there are even more ideas over on my favorite healthy snack roundup. I promise these’ll beat the pants off anything in a vending machine. Grab those blueberries and get rolling—trust me, your snacking routine will thank you.
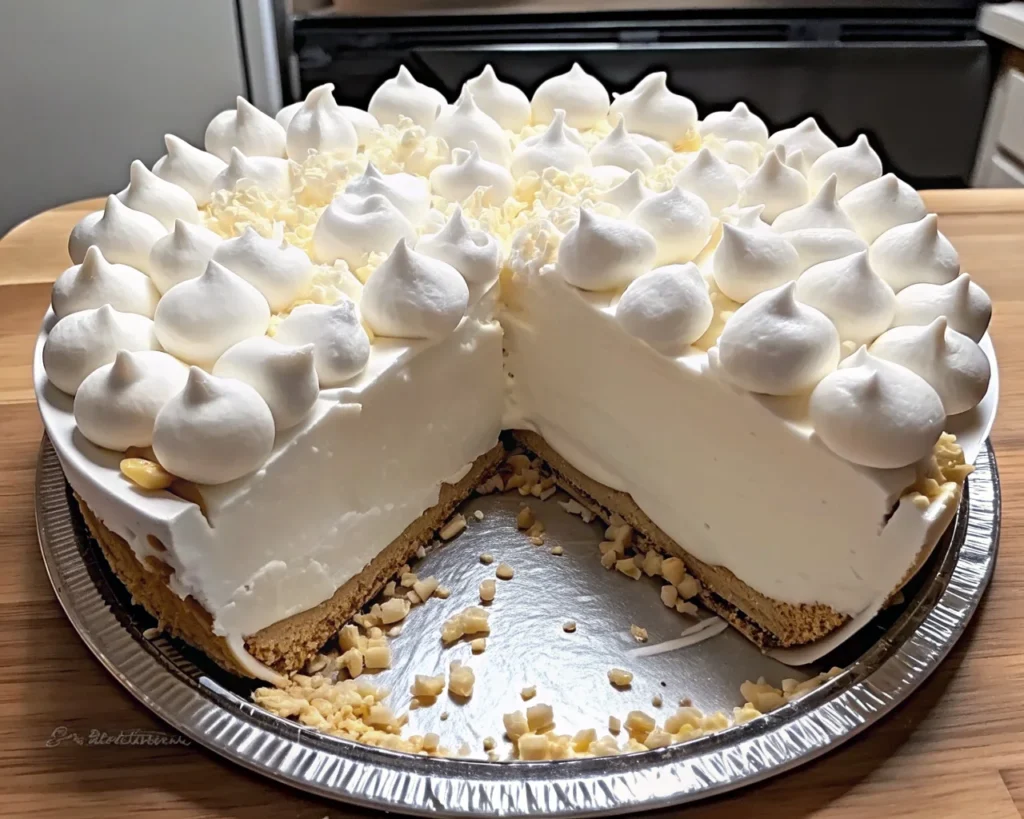
Marshmallow Whip Cheesecake is exactly what my sweet tooth craves when I’m feeling lazy but desperately want something that tastes impressive. Let’s be honest—sometimes you just don’t want to deal with that whole water bath, cracks on top, heavy oven lifting drama. Been there! I wanted a simple no-bake treat that I could whip up for family get-togethers, birthday surprises, or just those rough days when I need edible comfort. If you’re looking to master this creamy, no-fuss dessert, keep reading for every step and tip you need—plus a bunch of real-life mishaps I’ve learned from. Ingredients & Substitutions Okay, ingredients first. Grab a block of cream cheese—full fat is my go-to, but I’ve honestly used reduced fat in a pinch. No one has ever noticed. Next, marshmallow cream (sometimes called marshmallow fluff). You can scoop it with zero skill, which is helpful when you’re in a rush. Heavy cream helps it set up nice and fluffy. For the crust, crushed graham crackers. If you’re feeling creative, try swapping in vanilla wafers or even crushed Oreos. A touch of sugar and melted butter brings it all together. I’ve also tossed in a splash of vanilla extract and a dash of lemon zest when feeling fancy, but not necessary. Try to avoid ultra-strong extracts or low-quality cream cheese. Trust me, it can taste kind of weird. If you’re dairy-free, use vegan cream cheese and coconut cream instead of heavy cream—you’ll still get that crazy-good texture. “I never thought I could make something this good without turning on the oven. My whole family is obsessed. Zero cracks. Zero stress!” – Dana S. Is This Marshmallow Cream Cheesecake Too Sweet? Here’s the thing—marshmallow whip cheesecake definitely has a sweet side, but not in that headache-inducing, sugar-bomb way. The tang from the cream cheese pulls back some of the sugariness from the marshmallow cream, so it’s got balance. Personally, I’ll admit: If you add extra marshmallow fluff (I did this once on a dare) you get a sweeter, more candy bar vibe. If you use a crust with chocolate cookies or add a drizzle of caramel, you’re bumping the sweetness up another level. For folks who don’t want super sweet, stick to classic graham cracker crust and don’t overload the batter with extra sugar. Biggest tip: taste as you mix! No science degree required. Delicious Pairings: What To Serve With Marshmallow Cream Cheesecake Serving this marshmallow whip cheesecake is kinda my favorite part because there’s so many ways to make it over-the-top. Here’s how I like to serve mine: Just don’t feel tied down—you can absolutely eat it plain. Sometimes I do that and pretend it’s “minimalism.” How To Store No-Bake Marshmallow Cream Cheesecake If you’ve got leftovers (big if) you’ll want to keep your marshmallow whip cheesecake chilled in the fridge. It’s happiest in an airtight container, or if you leave it in the springform pan, just wrap it up tightly with plastic wrap. It stays fresh and fluffy for about four days. Usually mine disappears way before that, though! Here’s the funny part: the texture actually gets better after sitting overnight. Just don’t try to store it at room temp or on the back porch at a summer barbecue—it’ll get way too soft. Can I Freeze Marshmallow Cream Cheesecake? Yup, you totally can freeze this marshmallow whip cheesecake. Just wrap the whole cheesecake or individual slices really tight in plastic, and then in some foil if you can. That keeps out freezer funk. You’ll want to thaw it in the fridge (never room temp), and give it a few hours to soften up before serving. Texture-wise, it stays surprisingly creamy—though, I’ll admit, after a long time in the freezer it can pick up a slight iciness. If you’re prepping ahead for a party, freezing is a lifesaver. Just know that fresh is always best, like most things in life. FAQs Q: Can I make marshmallow whip cheesecake ahead of time? A: Absolutely. In fact, it gets better the next day. Q: Can I use marshmallows instead of marshmallow fluff? A: Sort of. You could melt them with a little cream, but it won’t be as smooth. Q: Can I use Cool Whip for the cream? A: Sure, it works, but the flavor is less rich. Q: How do I get neat slices? A: Use a hot knife and wipe it off between cuts. Makes you feel like a dessert pro. Q: Does it need gelatin to set? A: Not at all! The marshmallow cream thickens it up just fine. Ready to Dive In? So, there you go—everything you need to rock a classic marshmallow whip cheesecake, even if you’ve never baked a day in your life. Simple ingredients, simple steps, unreal payoff. Give it a whirl, and don’t be afraid to customize with toppings or crust swaps. For more fun dessert ideas, check out this easy homemade cheesecake guide. If you try it, let me know how it goes—unless you eat it all before anyone else gets a bite. I’ve been there.
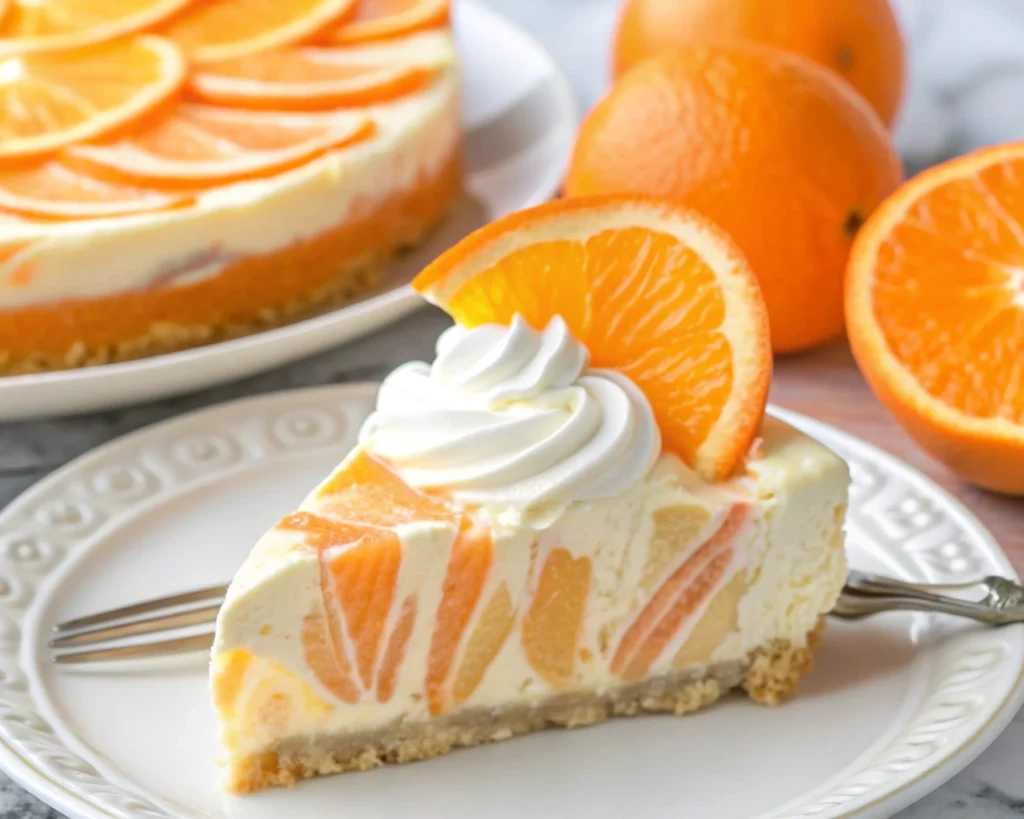
Ever get those days when you crave a big slice of dessert, but you look at the oven and, just, nope? Yeah, me too. And that’s how I fell in love with No-Bake Orange Creamsicle Cheesecake! It’s creamy, tastes exactly like those dreamy orange creamsicle pops from childhood, and takes super minimal effort. Honestly, it’s my go-to for potlucks and last-minute Friday night gatherings. The best part: you won’t even break a sweat putting this together. Why You’ll Love This Easy No-Bake Orange Creamsicle Cheesecake First of all, No-Bake Orange Creamsicle Cheesecake is ridiculously easy. Like, even my neighbor who can’t boil water has made this with zero disaster stories. You get that fresh, citrus pop from orange plus all the creamy goodness. It legit tastes like sunshine in pie form. The texture’s smooth and fluffy, which feels kinda fancy for something you didn’t bake. It works for all season cravings. Once you bring it to a party, good luck leaving with leftovers. My family seriously asks for this at birthdays and BBQs. “I made this for our book club meeting and not a crumb was left! It’s refreshing and SO easy!” – Annie B. How to Make No-Bake Orange Creamsicle Cheesecake So, let’s break it down. First, you’re gonna crush up some graham crackers for the crust. Melted butter, mix-mix, press into the pan. Easy. Next, whip up the filling: blend up some cream cheese, sugar, and a splash of orange juice (I do fresh-squeezed, but from the bottle works too, don’t stress) along with vanilla. Fold in some whipped topping for that cloud-like fluffiness. Then pour it onto the crust. Now comes the worst part: waiting. I pop it in the fridge for at least 4 hours, overnight if patience exists. Top it with extra whipped cream or some orange zest if you’re feeling classy. Done! Serving Suggestions for No-Bake Orange Creamsicle Cheesecake Storing & Preserving No-Bake Orange Creamsicle Cheesecake You’ll want to keep your cheesecake in the fridge at all times. I’m talking, the colder, the better, or it’ll get too soft. If you’re prepping ahead, cover it with plastic wrap or slide it into a big airtight container (I’ve totally just thrown a baking pan in with foil on top in a hurry). It actually keeps well for up to 4 days. Don’t freeze—it gets weird and grainy. If you must, eat within a couple days for best flavor. You’ll see, it probably gets gobbled up before that’s an issue anyway! Tips for Perfect No-Bake Orange Creamsicle Cheesecake Honestly, don’t overthink it. Use full-fat cream cheese for that rich, velvety vibe. Let it soften a bit before mixing. Don’t rush the chilling time, even if dessert is calling you name. Whip the filling till it’s fluffy; don’t just stir, really blend it up for dreamy texture. If your crust feels too crumbly, add another spoonful of butter. Canned whipped topping is totally fine. You want things simple and delicious, not complicated. Just remember—your fridge does most of the work for you! Fun Variations of No-Bake Orange Creamsicle Cheesecake Craving change? Sub lemon juice for orange and you’ve got a lemony cheesecake. Maybe swirl in raspberry jam before chilling for patterned prettiness. Sometimes I’ll swap graham crackers for shortbread—whoa, tastes fancy! For a boozy treat, add a splash of orange liqueur. Kids love it as pops: spoon filling into ice-pop molds with a bit of crust—frozen cheesecake lollies! Don’t be afraid to experiment and let your taste buds do the picking. FAQs Can I use low-fat cream cheese for this recipe? Sure, but the cheesecake won’t be quite as rich or creamy. Full-fat is best if you ask me. How long does No-Bake Orange Creamsicle Cheesecake take to set? At least four hours in the fridge is key. Overnight is even better if you can wait. Can I make this ahead of time? Absolutely! Make it the day before and keep it chilled until you’re ready to slice and serve. What’s the best way to get a smooth filling? Let your cream cheese fully soften and blend until there are zero lumps—you want that velvety vibe. Does this taste exactly like a creamsicle popsicle? Honestly, yes! It’s got that exact mix of citrusy tang and creamy sweetness. This Is the Only No-Bake Orange Creamsicle Cheesecake Recipe You’ll Need! Alright, bottom line: No-Bake Orange Creamsicle Cheesecake is as easy as it is nostalgic. Even if you mess up a little, it still tastes fantastic. Give it a try, take to your next gathering, and watch it disappear. If you want more dessert inspiration, check out this easy cheesecake roundup for ideas to mix things up. Trust me, you’ll want to keep this recipe in your back pocket!
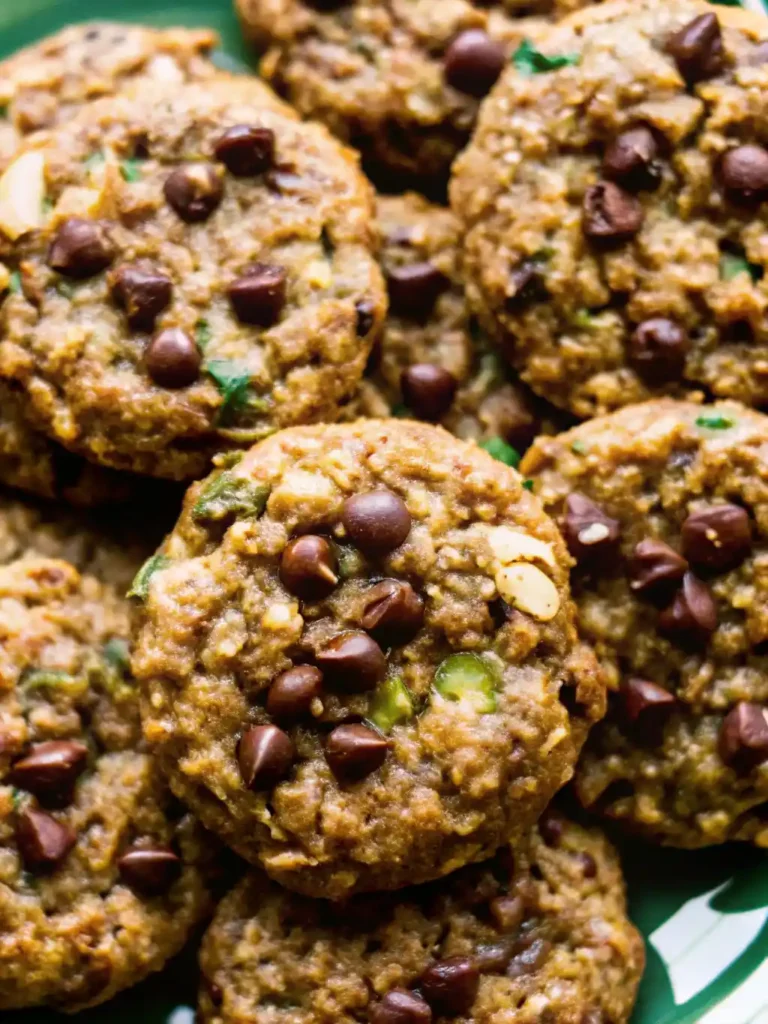
Zucchini cookies sound weirdly irresistible, don’t they? I mean, let’s be real. You buy a couple of zucchini for dinner and the next thing you know, they’re still sitting in your fridge awkwardly staring at you. If you’re tired of the same old zucchini bread (though, this amazing moist zucchini bread recipe is worth bookmarking), let’s talk cookies. Soft, chewy, lightly sweet, and just sneaky enough for veggie haters. Ready to see how zucchini can turn basic cookies into something cozy and delicious? Success Tips for Using Zucchini in Cookies Here’s the honest truth: zucchini cookies can go badly if you treat zucchini like just any other mix-in. Don’t skip removing the extra water. I learned that the hard way—a soggy mess isn’t what you want. Grab a clean kitchen towel or even a few strong paper towels, and press that grated zucchini until it’s barely damp. This helps the cookies bake up soft, not mushy. Another thing, use the smaller holes on your grater so you don’t get big lumpy bites. I’m also a fan of sneaking in a little extra cinnamon. Makes your kitchen smell five-star level. And here’s my wildcard move: toss the zucchini with a bit of flour before adding it to the dough. Magic. “I never dreamed veggies could actually taste good in cookies. These are now my go-to for family BBQs—and nobody complains about eating their greens.” – Janet, real human and accidental zucchini fan Ingredient Notes and Substitutions For Zucchini Cookies Let’s keep this practical. You’ll need basic staples: flour, brown sugar, and a bit of cinnamon. Trust me, brown sugar is key for that chewiness—don’t swap it out unless you absolutely have to. If you’re out of eggs (yep, been there), a good flax egg works fine. Butter works best, but I’ve tested coconut oil and it’s not half bad. Chocolate chips? Always a yes. Chopped walnuts or pecans—if you like a crunch, toss them in. And don’t stress if you don’t have vanilla, just leave it out or add a dash of almond extract for a twist. One time I even tried golden raisins and, not to brag, but the cookies vanished so fast I barely got a taste. Preparation Steps for Soft Zucchini Cookies Okay, so you’re ready to bake. Start by grating your zucchini and squeezing out as much juice as possible. Beat your butter and sugar together until it looks fluffy. Add your egg (or egg substitute) and vanilla, mixing well. Now, stir in the zucchini. In a separate bowl, whisk flour, baking powder, cinnamon, and a pinch of salt. Add dry ingredients to wet—don’t overmix. Just till it comes together. Fold in your chocolate chips and nuts if you’re feeling fancy. I like dropping spoonfuls of dough onto the baking tray. You don’t need perfect balls. A little rustic never hurt anyone. Pop them in a moderate oven—think 350°F—for about 10-12 minutes. Chilling and Storing Zucchini Cookies Now, you could bake these straight after mixing, but I’ll tell you something game-changing. Chilling the dough for an hour (or, let’s face it, overnight if life gets busy) keeps the cookies from spreading into sad puddles. The flavor deepens, too. So worth the wait. As for leftovers—honestly, there rarely are. But if you’re lucky, keep zucchini cookies in a container with a tight lid. Room temp for a few days, or pop them in the freezer if you want to hang onto summer for a bit longer. Oh, and these actually taste even better the next day, no joke. If you are fan of cookies try this Summer Cookies: Easy …