
Looking for a truly special, heirloom cookie to add to your Christmas baking list? These Italian Cuccidati cookies are the classic, fragrant, fig-filled cookies that belong on every holiday platter. If you’ve been scrolling through Pinterest searching for something more unique than your standard holiday fare, you’ve just struck gold.
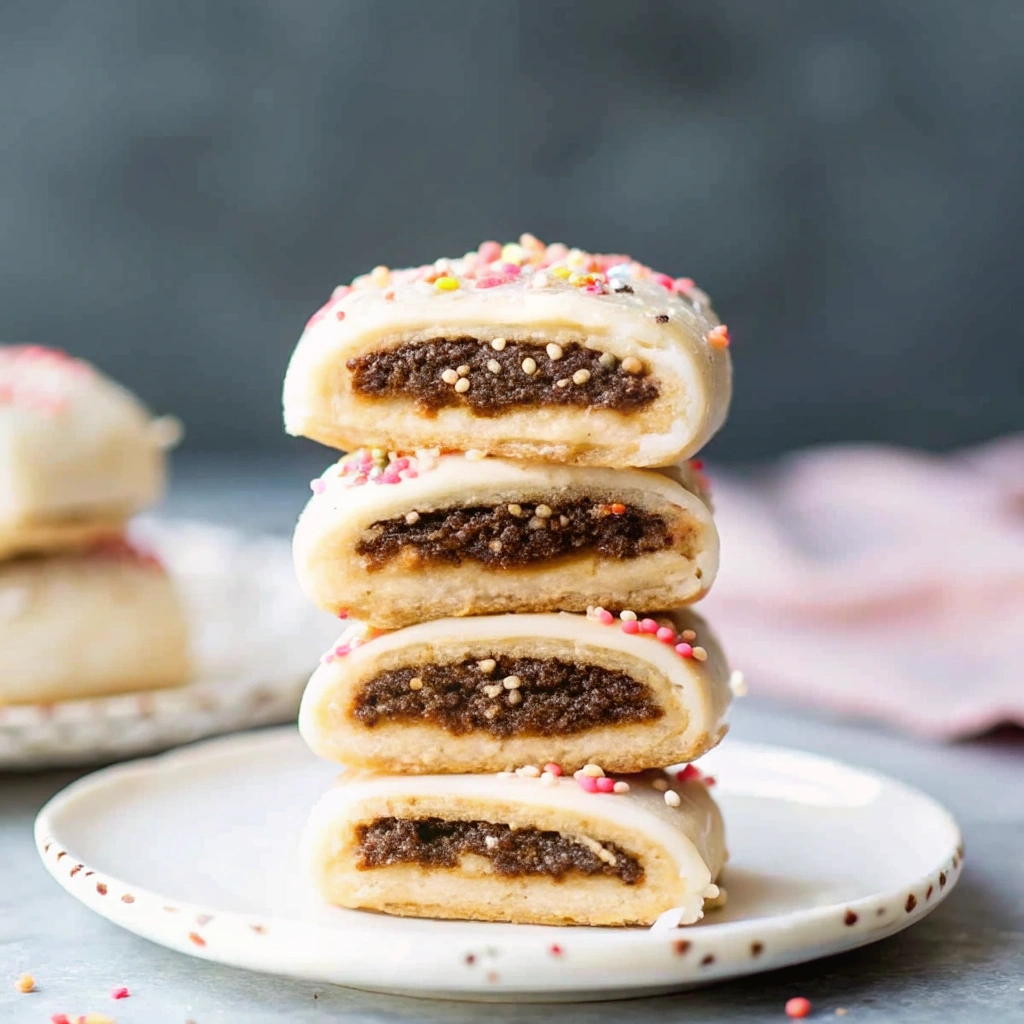
Picture this: tender, buttery cookies wrapped around a spiced filling of figs, dates, honey, and warm winter spices, then topped with a sweet glaze and festive sprinkles. These aren’t just cookies—they’re edible nostalgia, the kind of recipe that gets passed down through generations for a very good reason. Yes, they have a few steps (I won’t lie to you!), but the result is absolutely spectacular. And here’s the best part: they actually taste better after a day or two, making them the ultimate make-ahead Christmas cookie. Trust me, once you bite into that jammy, spiced filling encased in that delicate cookie dough, you’ll understand why Italian families have been making these for centuries.
Why You’ll Fall in Love with These Fig Cookies
Let’s be honest—your holiday cookie tray is probably already loaded with chocolate chip cookies, sugar cookies, and gingerbread. Those are wonderful, but Italian Cuccidati cookies bring something completely different to the table, and that’s exactly why you need them in your life.
First, the flavor profile is unlike anything else in your Christmas baking lineup. We’re talking about a filling that’s deeply complex: sweet figs and dates mingling with toasted nuts, brightened with fresh orange zest, and warmed with cinnamon and just a hint of clove. It’s aromatic, it’s sophisticated, and it tastes like Christmas in Sicily.
Second, these cookies are absolutely stunning on a cookie platter. They have that rustic, handmade charm that looks like you spent hours in the kitchen (which, okay, you kind of did—but in the best way). The glossy glaze catches the light, the colorful sprinkles add that festive pop, and each cookie has its own unique character depending on how you shaped it.
And here’s what really makes these special: Cuccidati cookies are a make-ahead dream. Unlike some cookies that are best eaten fresh from the oven, these actually improve as they sit. The flavors meld together, the texture becomes more tender, and after 2-3 days, they reach absolute perfection. This means you can bake them well before your holiday gathering and actually enjoy the party instead of being stuck in the kitchen. Now that’s what I call a Christmas miracle.
What’s In That Amazing Cuccidati Filling?
The filling is where the magic happens, friends. This isn’t just fig jam from a jar—we’re building layers of flavor from scratch, and every ingredient plays an important role.
The star of the show is dried figs, which bring that deep, honeyed sweetness and jammy texture. Most traditional recipes add dates or raisins (or both!) for extra richness and natural sweetness. Then comes the nuts—typically walnuts or almonds—which add a wonderful toasted flavor and some texture to contrast all that fruit.
But wait, there’s more! Fresh orange zest brightens everything up with its citrusy perfection (this is KEY—don’t skip it), while a drizzle of honey adds floral notes and helps bind it all together. Finally, warm spices like cinnamon and a tiny pinch of clove make the filling smell like a Sicilian Christmas market.
When you pulse all of this together in a food processor, you get this incredible, chunky-smooth paste that’s sweet, nutty, spiced, and absolutely irresistible. Fair warning: you will want to eat it by the spoonful. (I won’t tell if you sneak a taste.)
If you’re building out your holiday cookie collection, these pair beautifully with other classic treats—try them alongside our soft sugar cookies for a nice variety on your dessert table.
How to Make Italian Cuccidati (Step-by-Step)
Okay, let’s break this down so it feels totally manageable. Yes, there are multiple components, but I promise each step is straightforward. Think of it as a fun little baking project—maybe pour yourself a glass of wine and put on some holiday music!
Step 1: Make the Filling (and Let It Rest)
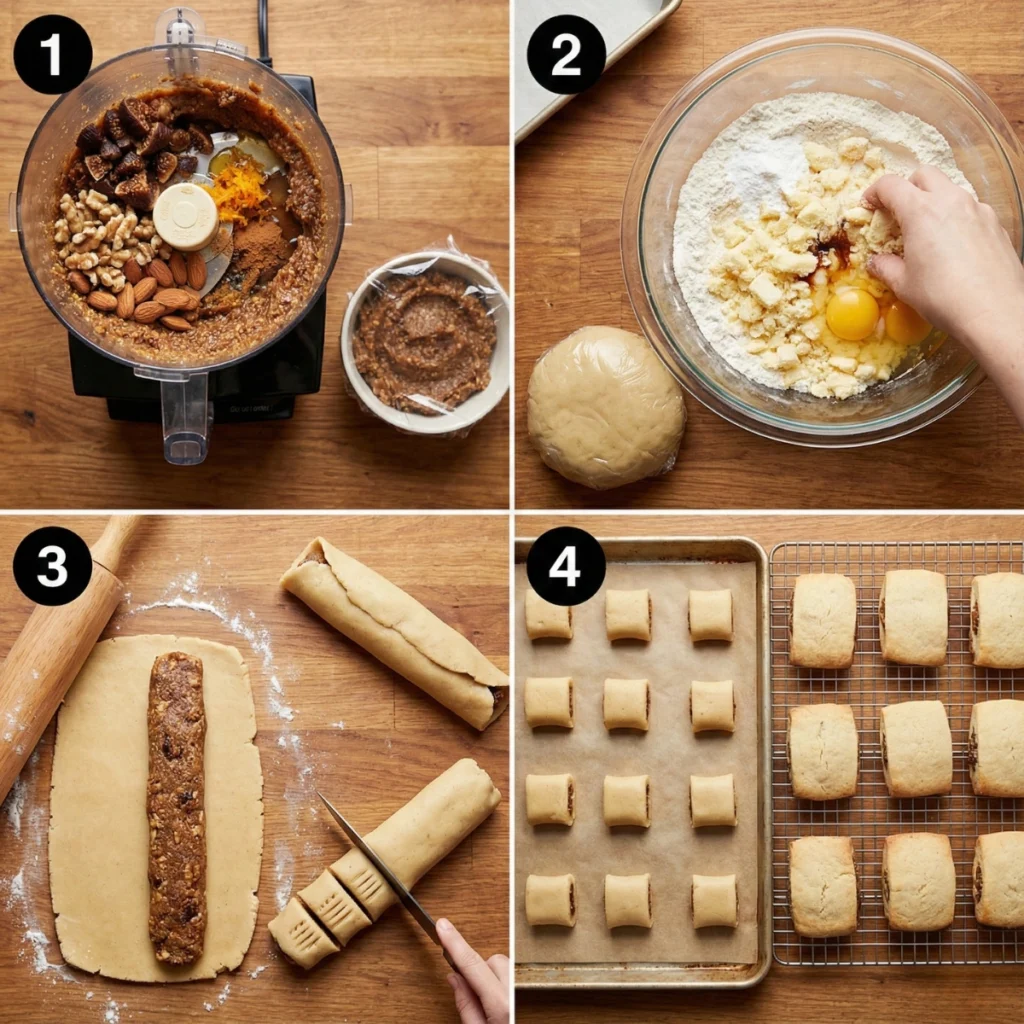
Start by combining your dried figs, dates (or raisins), toasted nuts, orange zest, honey, and spices in a food processor. Pulse everything until you have a thick, spreadable paste—it should hold together when you pinch it but still have some texture. Here’s the important part: let this filling rest in the refrigerator for at least an hour, or even overnight. This resting time allows all those flavors to marry together and makes the filling easier to work with.
Step 2: Make the Tender Cookie Dough
While your filling is chilling, make the cookie dough. This is a simple, buttery dough that’s enriched with eggs and just a touch of sugar—it’s not overly sweet because the filling brings plenty of sweetness. Mix your dry ingredients (flour, baking powder, a pinch of salt), then cut in cold butter until the mixture looks like coarse crumbs. Add your wet ingredients (eggs, vanilla, maybe a splash of milk), and bring it all together into a soft dough. Wrap it up and let it rest in the fridge for at least 30 minutes. This rest makes it much easier to roll out.
Step 3: Fill and Shape the Cookies
Here’s where it gets fun! Roll out your dough into a rectangle about ¼-inch thick. Spread a log of filling down the length of the dough, leaving space at the edges. Now, fold the dough over the filling like you’re making a stuffed burrito, seal the edges, and you’ve got a long log. Cut the log into individual cookies—typically about 1-2 inches each. Some people cut them straight across, others cut them on a diagonal for a prettier presentation. You can even score the tops with a fork for a traditional look.
Step 4: Bake to Golden Perfection
Arrange your cookies on a parchment-lined baking sheet (they don’t spread much, so you can place them fairly close together). Bake at 350°F for about 15-20 minutes, until they’re just lightly golden on the bottom and set on top. Don’t overbake them—you want these to stay tender!
The Easy Icing & Festive Sprinkles
This is the moment your cookies go from homemade to gorgeous—and it couldn’t be easier.
Once your cookies have cooled completely, whip up a simple powdered sugar glaze. All you need is powdered sugar, a splash of milk (or water), and maybe a tiny bit of vanilla extract. Whisk it together until it’s smooth and pourable but not too thin—you want it to coat the cookies beautifully without running off completely.
Drizzle or brush the glaze over each cookie while they’re on a cooling rack (put some parchment paper underneath to catch the drips). Now for the fun part: while the glaze is still wet, shower them with rainbow nonpareils (those tiny, colorful ball sprinkles). This is the traditional finish for Cuccidati, and they make the cookies look absolutely festive and Pinterest-perfect.
The glaze will set in about 30 minutes, giving you a beautiful, slightly shiny finish that’s not too heavy or overly sweet—it’s just the right amount of frosting to complement that spiced filling.
Your Guide to Making Cuccidati Ahead (Storing & Freezing)
Since these are holiday cookies, you’re probably baking for a crowd—and you definitely want to get ahead. Good news: Cuccidati are incredibly forgiving and storage-friendly!
Storing Unbaked Cookies: You can shape your filled cookies, arrange them on a baking sheet, and freeze them solid. Once frozen, transfer them to a freezer bag or airtight container. When you’re ready to bake, you can bake them straight from frozen—just add a couple of extra minutes to the baking time.
Storing Baked Cookies (Before Icing): Once baked and cooled, store the cookies in an airtight container at room temperature. Here’s the magic: they actually get better after 2-3 days! The flavors develop, the filling becomes more jammy, and the cookie softens slightly. You can keep them for up to a week before icing, or even longer if you freeze them.
After Icing: Once glazed and sprinkled, store your Cuccidati in a single layer (or between sheets of parchment paper) in an airtight container. They’ll keep beautifully at room temperature for up to two weeks. The texture becomes more tender over time, and honestly, they’re never better than on day three or four.
Freezing Finished Cookies: Yes, you can freeze them even after icing! Layer them carefully with parchment paper in between, and freeze for up to 3 months. Thaw at room temperature for a few hours before serving.

Frequently Asked Questions
How long do Italian fig cookies last?
When stored properly in an airtight container at room temperature, Italian Cuccidati cookies will stay fresh for up to two weeks—though they rarely last that long in my house! The beautiful thing about these cookies is that they actually improve with age. After 2-3 days, the filling becomes more tender and jammy, and the flavors meld together beautifully. If you want to keep them even longer, you can freeze them (iced or un-iced) for up to 3 months.
Can I use a different filling (e.g., all dates)?
Absolutely! While traditional Cuccidati use figs as the base, many bakers customize the filling to their taste. You can use all dates instead of figs, or do a combination of figs, dates, and raisins. Some recipes use dried apricots or prunes too. Just keep the overall quantity the same, and make sure to include the orange zest, honey, and spices—those are what really make the filling special. The nuts are also flexible: walnuts are traditional, but almonds or pecans work beautifully too.
Why is my cookie dough crumbly?
If your dough is too crumbly and won’t come together, it usually means it needs a bit more moisture. The fix is simple: add liquid one tablespoon at a time (milk, water, or even an extra egg yolk) until the dough holds together when you pinch it. Make sure you’re measuring your flour correctly—too much flour is the most common culprit. Also, be patient and knead the dough gently; sometimes it just needs a little encouragement to come together. If your kitchen is very dry or cold, that can affect the dough too, so don’t be afraid to adjust!
Let’s Start a Delicious New Tradition
These Italian Cuccidati cookies are so much more than just another recipe—they’re a connection to heritage, a labor of love, and the kind of special treat that makes the holidays feel truly magical. Yes, they take a little time. Yes, they have a few steps. But I promise you, when you bite into that tender, spiced, fig-filled cookie and taste generations of Italian baking tradition, you’ll understand exactly why these are worth every single minute.
I can’t wait for you to start a new family tradition with these! When you make them, leave a comment below and tell me how they turned out—I love hearing your baking stories. And don’t forget to save this recipe to your favorite Christmas Cookies board on Pinterest so you can find it again next year (and trust me, you’ll want to make these every single holiday season from now on). Happy baking!
Italian Fig Cookies (Cuccidati)
Ingredients
Equipment
Method
- Whisk together flour, salt, and baking powder in a large bowl.
- Cream butter and sugar in a stand mixer until light and fluffy. Add eggs and vanilla and mix until combined.
- Add the flour mixture gradually, alternating with the milk, until a cohesive dough forms.
- Turn dough onto a floured surface, knead lightly until smooth, divide into 8 discs, wrap, and chill at least 2 hours.
- Soak figs, dates, and raisins in hot water for 10 minutes, drain, and pulse in a food processor. Add nuts, honey, liqueur, zests, and spices; process until mostly smooth.
- Preheat oven to 375°F. Roll each dough disc into a 12×3–4 inch rectangle. Add filling along the long edge and roll into a log.
- Slice logs into 1¼-inch pieces and place on parchment-lined baking sheets.
- Bake 12–15 minutes until lightly browned, rotating sheets halfway through. Cool completely.
- Whisk powdered sugar, milk, and vanilla until smooth and pourable.
- Dip tops of cooled cookies in glaze, add sprinkles, and let dry completely.