
When it comes to St Patrick’s Day treats that deliver maximum cuteness with minimum effort, these Leprechaun Hat S’mores are absolute champions. They’re the kind of festive, whimsical dessert that makes kids squeal with delight and adults marvel at how something so adorable can be so ridiculously simple to make.
Picture this: fudge-striped cookies become leprechaun hat brims, fluffy marshmallows transform into hat bodies, chocolate kisses crown the top, and a swirl of green frosting ties everything together with a perfect little buckle. It’s like edible magic, except instead of requiring culinary school training, all you need is the ability to stack things and spread frosting.
The brilliance of these St Patrick’s Day treats is that they require zero baking, minimal ingredients, and about 15 minutes from start to finish. They’re perfect for classroom parties, last-minute celebration planning, or crafting with kids who are bouncing-off-the-walls excited about finding leprechauns and pots of gold.
Why You’ll Love These Leprechaun Hat S’mores
These festive treats exist at the perfect intersection of adorable, delicious, and actually achievable on a busy weeknight. Unlike elaborate decorated cookies that require piping skills and hours of patience, these little leprechaun hats come together faster than you can sing “When Irish Eyes Are Smiling.”
Kids can genuinely help make these from start to finish, which is rare and wonderful when it comes to St Patrick’s Day treats. Even toddlers can help stack cookies and marshmallows with minimal supervision. Older kids can pipe the frosting buckles themselves, developing fine motor skills while creating something they’re genuinely proud to share and eat.
The no-bake factor cannot be overstated. Your oven stays off, your kitchen stays cool, and you avoid the inevitable “why are my cookies spreading into weird shapes” frustration that plagues so many holiday baking attempts. These assemble at room temperature and require nothing more complicated than unwrapping some chocolate.
Budget-conscious families will appreciate that every ingredient is readily available at any grocery store and costs just pennies per treat. A single batch makes enough to feed a classroom or party without requiring a second mortgage. These might be the most economical St Patrick’s Day treats you’ll ever make.
The finished product is genuinely Instagram-worthy despite taking essentially zero skill to create. They photograph beautifully, stack nicely on serving platters, and make people assume you spent way more time and effort than you actually did. Never underestimate the power of looking like a Pinterest hero while barely breaking a sweat.
Key Ingredients
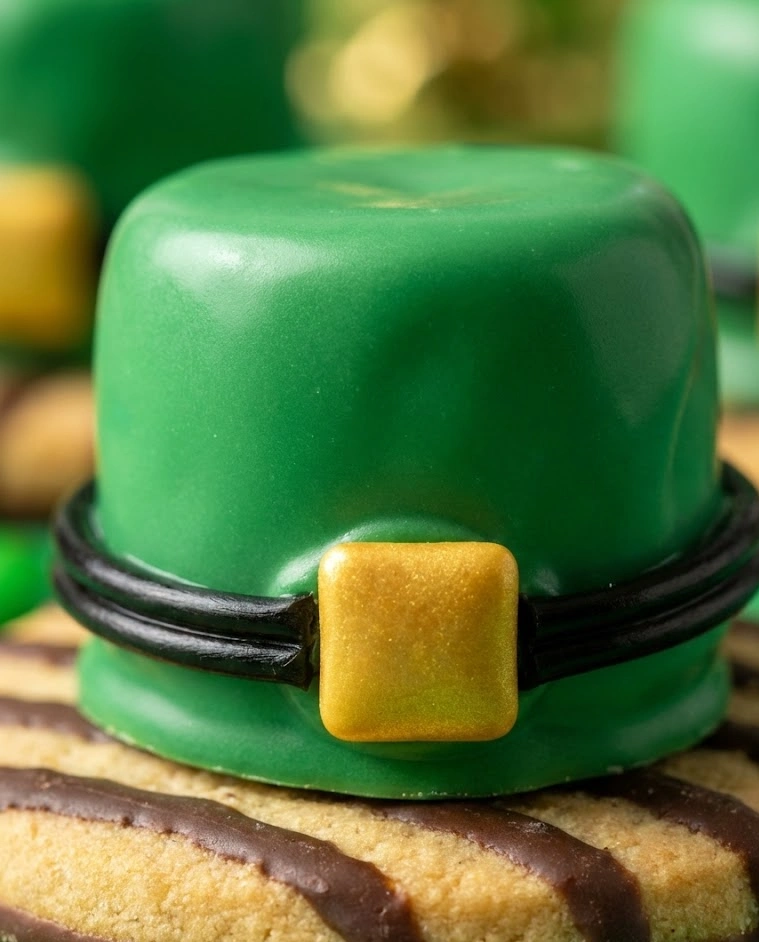
Fudge-Striped Cookies serve as the leprechaun hat brim and provide the essential chocolatey base for these treats. Keebler Fudge Stripes are the classic choice and their distinctive striped pattern adds visual interest that makes the finished hats even cuter. The cookies are sturdy enough to support a marshmallow and kiss without breaking, and their round shape creates a perfect hat brim proportion. Store-brand fudge-striped cookies work equally well and save money without sacrificing results.
Large Marshmallows become the main body of the leprechaun hat and their fluffy white texture provides the perfect canvas for green frosting. Standard-size marshmallows work best – mini marshmallows are too small to create the proper hat proportion, and jumbo marshmallows overwhelm the cookie base. The marshmallow needs to be room temperature and fresh for the frosting to stick properly, so avoid using stale marshmallows that have started to harden.
Hershey’s Kisses crown each leprechaun hat with the perfect pointed top. The classic milk chocolate variety is traditional, but dark chocolate kisses work beautifully too. The cone shape is essential to the leprechaun hat illusion, so don’t try to substitute with other types of chocolate. Keep the foil wrappers on while you assemble the treats, then unwrap just before placing on top for easier handling.
Green Frosting creates the leprechaun hat color and the decorative buckle that makes these treats unmistakably festive. Store-bought vanilla frosting tinted with green gel food coloring works perfectly and saves significant time. For the most vibrant, true-green color, use gel food coloring rather than liquid drops – gel colors are more concentrated and won’t thin the frosting. You can absolutely use pre-tinted green frosting from the store if you prefer maximum convenience.
Yellow Frosting or Decorating Gel adds the buckle detail that transforms these from generic green treats into recognizable leprechaun hats. A tiny dollop or small rectangle of yellow creates that signature gold buckle on the hatband. Store-bought yellow decorating gel in a tube with a fine tip makes this detail especially easy, but regular yellow frosting works perfectly fine.
Black Edible Marker or Frosting (optional) outlines the yellow buckle for extra definition and makes the detail pop. This step is completely optional and recommended only if you’re going for maximum cuteness or entering a dessert contest. A food-safe edible marker is easier to control than trying to pipe tiny black frosting details.
How to Make Leprechaun Hat S’mores
Step 1: Set up your assembly station before you begin. Line a large baking sheet or serving platter with parchment paper so you have a place to set completed hats as you work. Lay out all your ingredients within arm’s reach – the cookies, marshmallows, unwrapped Hershey’s Kisses, and your frosting in piping bags or zip-top bags.
Step 2: If you’re making your own green frosting, start by placing about 1 cup of store-bought vanilla frosting in a medium bowl. Add green gel food coloring one drop at a time, stirring thoroughly between additions, until you achieve a vibrant leprechaun-hat green. Start with less color than you think you need – you can always add more, but you can’t take it back.
Step 3: Transfer the green frosting to a piping bag fitted with a large round tip, or simply use a zip-top plastic bag with one corner snipped off. The opening should be about 1/4 inch wide for easy piping. If the frosting seems too stiff to pipe smoothly, microwave it for 5-10 seconds to soften slightly.
Step 4: Arrange your fudge-striped cookies in rows on your work surface with the chocolate-striped side facing down. This creates a flat, stable base for stacking and puts the pretty striped pattern on top where it shows as the hat brim.
Step 5: Pipe a small dollop of green frosting onto the center of each cookie. This acts as “glue” to hold the marshmallow securely in place. You need just enough to create adhesion – about a teaspoon-sized blob per cookie.
Step 6: Place one large marshmallow upright in the center of each frosted cookie, pressing down gently but firmly to secure it. The marshmallow should stick immediately to the frosting. If any marshmallows won’t stay put, add a tiny bit more frosting and press again.
Step 7: Working one marshmallow at a time, use your piping bag to cover the entire visible surface of the marshmallow with green frosting. Start at the base where the marshmallow meets the cookie and pipe in a spiral motion upward to the top. You can also spread the frosting with a small offset spatula or butter knife if piping feels awkward.
Step 8: While the green frosting is still sticky, carefully press an unwrapped Hershey’s Kiss onto the very top of each green marshmallow, pointed side up. The Kiss should nestle into the frosting slightly and stick securely. This creates the peaked top of the leprechaun hat.
Step 9: Allow the assembled hats to sit at room temperature for about 10-15 minutes so the green frosting can set slightly. This makes adding the buckle detail much easier since you won’t accidentally smudge the green while decorating.
Step 10: Using yellow frosting in a piping bag or tube of yellow decorating gel, pipe a small rectangle or square shape onto the front of each green hat to represent the leprechaun’s gold buckle. Position it slightly off-center and about halfway up the hat for the most authentic leprechaun hat appearance. Each buckle only needs to be about the size of a small Chiclet.
Step 11: If using an edible black marker or black frosting, carefully draw or pipe a thin border around the yellow buckle to make it pop visually. Add a small horizontal line across the middle of the buckle if desired for extra detail. This step is purely decorative and completely optional.
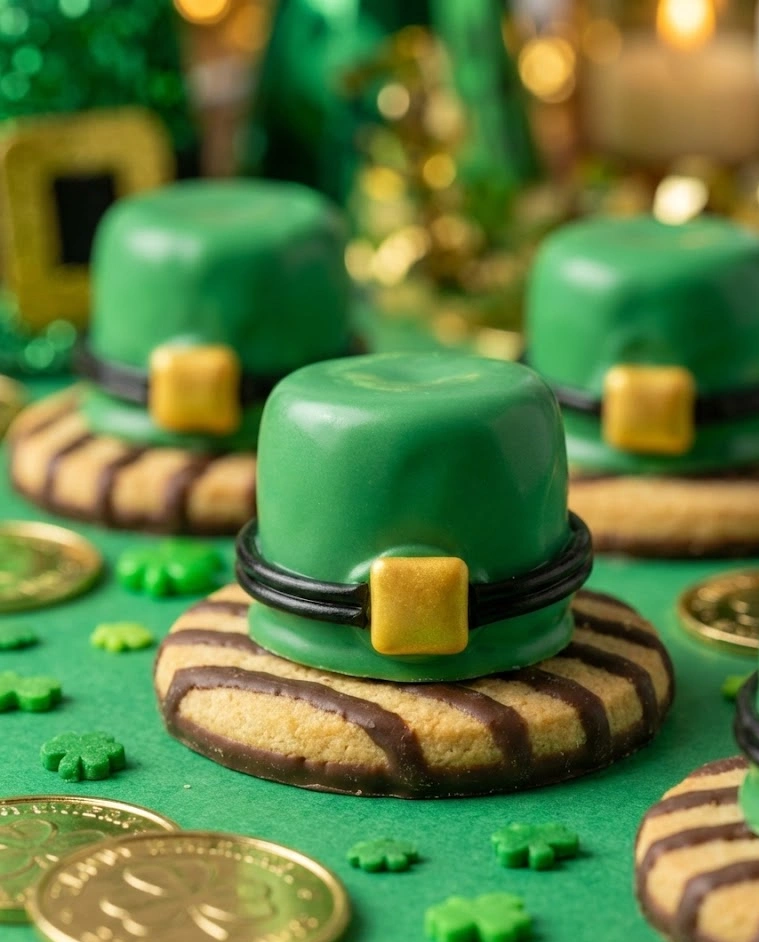
Step 12: Let the finished Leprechaun Hat S’mores sit at room temperature for at least 30 minutes to allow all the frosting to set completely before serving or packaging. Once set, they can be carefully stacked on serving platters or arranged in treat boxes for gifting.
Variations & Tips
Rainbow Leprechaun Hats: Instead of coating all the marshmallows in green, create a rainbow assortment using the full spectrum of food coloring. Pink, blue, yellow, orange, and purple leprechaun hats arranged together create a stunning, colorful display that still feels festive for St Patrick’s Day treats.
Chocolate Lover’s Version: Use chocolate-covered marshmallows instead of plain white ones, or coat regular marshmallows in melted chocolate instead of frosting for a richer, more decadent treat. The chocolate sets firm and creates a smoother surface for adding decorative details.
Gluten-Free Leprechaun Hats: Substitute the fudge-striped cookies with gluten-free chocolate cookies of similar size and shape. Kinnikinnick or Goodie Girl Cookies make excellent gluten-free alternatives that work perfectly as hat brims.
Mini Leprechaun Hats: Use mini Oreos or Keebler Grasshopper cookies as the base, regular marshmallows cut in half horizontally, and chocolate chips instead of Kisses for adorable bite-sized versions perfect for little hands or dessert platters with other treats.
Gold Coin Addition: Press a small gold-foil-wrapped chocolate coin into the cookie base next to each hat for an extra festive touch. The gold coins reference the pot of gold at the end of the rainbow and add another layer of leprechaun magic.
Sprinkle Magic: While the green frosting is still wet, dust the hats lightly with edible green glitter or shamrock-shaped sprinkles for extra sparkle and festivity. This step makes them even more special for parties or classroom celebrations.
Cream-Filled Option: Split the marshmallows horizontally before placing them on the cookies and spread a thin layer of chocolate hazelnut spread, peanut butter, or marshmallow fluff in the center before reassembling. This hidden surprise makes them taste even more special when kids bite into them.
S’mores Twist: For a more traditional s’more flavor, place a small square of chocolate bar between the cookie and marshmallow before assembling. When you bite through, you’ll get that classic graham-chocolate-marshmallow combination with a fun leprechaun theme.
Pro Tip – Frosting Temperature: If your green frosting is too stiff to spread smoothly over the marshmallows, microwave it for just 5-10 seconds to soften it slightly. If it’s too runny and won’t stay on the marshmallow, refrigerate for 10 minutes to firm up. The perfect consistency should spread easily but hold its shape without running down the sides.
Assembly Line Efficiency: If making these with kids or preparing a large batch, set up an assembly line. One person frosts cookies and adds marshmallows, another person coats marshmallows in green frosting, a third adds Kisses, and a fourth adds buckle details. You’ll finish in half the time with better quality control.
Leftovers & Storage
Leprechaun Hat S’mores store surprisingly well considering they’re made with marshmallows, which typically don’t love moisture or extended storage times. The key is proper packaging that protects them from air exposure while preventing the frosting from getting smudged or stuck to containers.
Store completed leprechaun hats in a single layer in an airtight container at room temperature for up to 3 days. Place squares of parchment or wax paper between layers if you need to stack them, being very gentle to avoid crushing the Kiss tops or smudging the green frosting.
Avoid refrigerating these St Patrick’s Day treats unless absolutely necessary. The cold temperature causes the frosting to weep condensation when brought back to room temperature, creating a sticky mess that ruins their appearance. Room temperature storage in a cool, dry place preserves them perfectly.
If you must refrigerate due to warm weather or extended storage needs, bring them to room temperature slowly by removing them from the fridge 1-2 hours before serving. This gradual temperature change minimizes condensation issues that would otherwise make the frosting weepy and unappealing.
For transportation to parties or classrooms, arrange the finished hats in a sturdy container with high sides and pack crumpled parchment paper gently around them to prevent shifting during travel. A cupcake carrier works brilliantly since each leprechaun hat sits securely in a cupcake well and can’t tip over or get squished.
These treats don’t freeze well due to the marshmallow component, which becomes unpleasantly hard and loses its fluffy texture after freezing and thawing. Always make them within 1-2 days of when you plan to serve them for best results.
If the frosting buckles start to slide off or the Kisses lose their adhesion after a day or two, simply dab a tiny bit of fresh frosting underneath and reattach. The “repairs” are invisible once the frosting sets again.
For maximum freshness and visual appeal, consider doing an assembly line approach where you prepare components ahead but assemble them the day of serving. You can frost and tint frosting up to a week ahead and store it in an airtight container in the refrigerator. Bring to room temperature and restir before using. The cookies and wrapped Kisses obviously store indefinitely in the pantry. Only the final assembly needs to happen close to serving time.
Leprechaun Hat S’mores prove once and for all that the very best St Patrick’s Day treats don’t require baking talent, hours of free time, or a pantry full of specialty ingredients. They just require a playful spirit, basic grocery store supplies, and the willingness to embrace the magic of the season. Make these once and they’ll become a non-negotiable tradition that your kids will demand every single March for years to come!
Leprechaun Hat S’mores
Ingredients
Equipment
Method
- Line a baking sheet with parchment paper and arrange all ingredients within reach.
- Tint the vanilla frosting with green gel food coloring until vibrant green.
- Transfer green frosting to a piping bag or zip-top bag with the corner snipped.
- Place fudge-striped cookies chocolate side down on the work surface.
- Pipe a small dollop of green frosting onto the center of each cookie.
- Press one marshmallow upright onto each frosted cookie base.
- Pipe or spread green frosting over the entire marshmallow, covering it completely.
- Press an unwrapped Hershey’s Kiss onto the top of each frosted marshmallow.
- Let hats sit 10–15 minutes so frosting begins to set.
- Pipe a small yellow rectangle on the front of each hat to form the buckle.
- Outline buckle with black edible marker or frosting if desired.
- Let set at room temperature for at least 30 minutes before serving.