
When you want St Patrick’s Day treats that genuinely wow a crowd while still being totally achievable in a home kitchen, these St. Patrick’s Day Oreo Cupcakes are your golden ticket to baking glory. They’re the kind of dessert that makes people pause mid-conversation to photograph them before taking that first incredible bite.
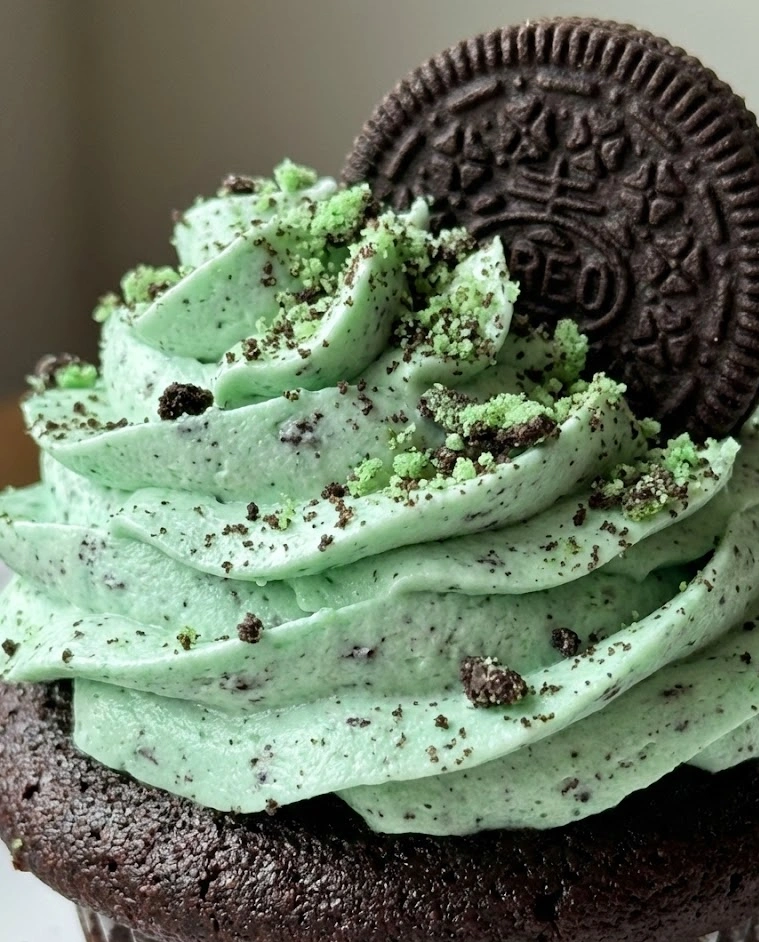
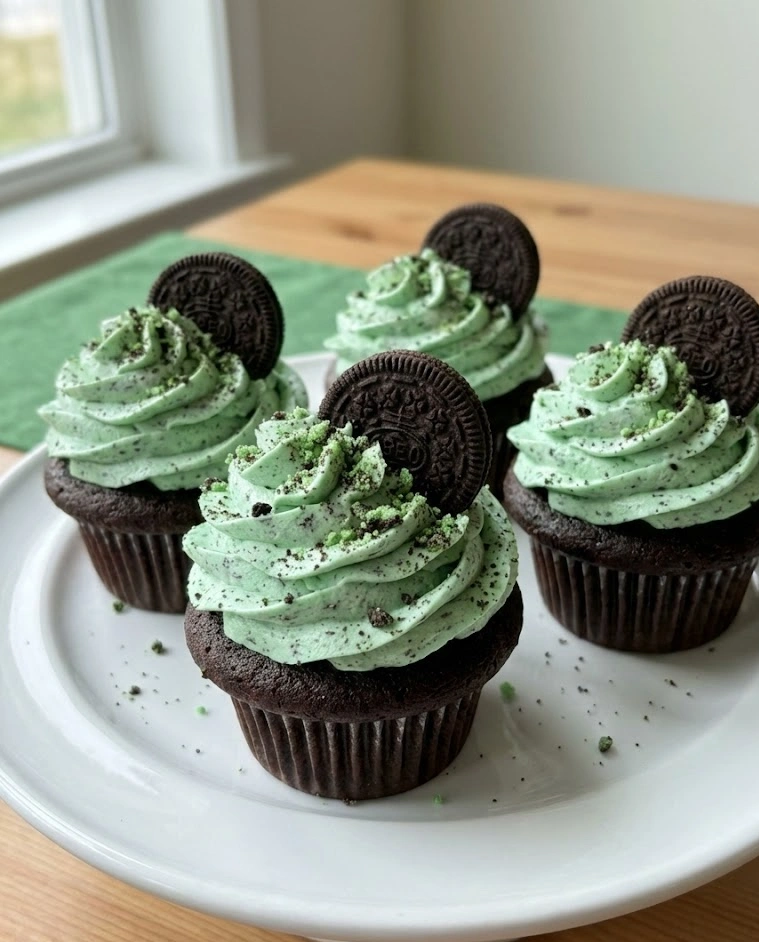
Picture this: moist, rich chocolate cupcakes studded throughout with crushed Oreo cookies, crowned with towering swirls of vibrant emerald green cream cheese frosting, and topped with a whole Oreo cookie that stands at attention like a little edible flag. Add shamrock sprinkles, maybe a dusting of edible gold, and you’ve got a dessert that screams “St Patrick’s Day celebration” from across the room.
The magic of these cupcakes lies in how they balance impressive presentation with genuinely delicious flavor. The cookies-and-cream combination is universally beloved, the chocolate and cream cheese pairing is absolutely classic, and the festive green color makes them unmistakably perfect for St Patrick’s Day treats without relying on artificial mint flavoring that not everyone loves.
Why You’ll Love These St. Patrick’s Day Oreo Cupcakes
These cupcakes deliver maximum visual impact with minimal specialized skills required. If you can make boxed cake mix and pipe frosting (or even just spread it with a knife), you can create bakery-quality cupcakes that look like they cost five dollars each at a fancy shop.
The Oreo addition transforms basic chocolate cupcakes into something extraordinary without adding complexity to the recipe. Crushed Oreos folded into the batter create pockets of cookies-and-cream flavor throughout, while the whole Oreo on top serves as both decoration and a delicious bonus treat.
These are genuinely crowd-pleasing St Patrick’s Day treats that appeal to all ages. Kids love them for the cookies and the bright green frosting. Adults appreciate the sophisticated cream cheese frosting and the moist, tender crumb of the chocolate cake. Nobody feels left out or disappointed.
The make-ahead potential is exceptional. Bake the cupcakes a day or two in advance and store them unfrosted. Make the frosting the night before and refrigerate it. On the day of your celebration, simply bring everything to room temperature, frost, and decorate. You’ll look pulled-together and stress-free instead of frazzled and flour-covered.
Budget-wise, these deliver incredible value. A batch makes 24 cupcakes, enough to feed a large gathering, and the ingredients are mostly pantry staples plus a package of Oreos. That’s significantly more economical than ordering custom cupcakes from a bakery.
Key Ingredients
Chocolate Cake Mix forms the foundation of these cupcakes and provides consistently moist, tender results without the fuss of measuring seven different dry ingredients. A standard devil’s food or chocolate fudge cake mix works beautifully. You’ll also need whatever the box calls for – typically eggs, oil, and water. For even richer cupcakes, substitute the oil with melted butter and the water with whole milk or buttermilk.
Oreo Cookies are the signature ingredient that makes these St Patrick’s Day treats so special. You’ll need about 24-30 cookies total – some crushed and folded into the batter, some kept whole for topping. Regular Oreos are perfect, though Mega Stuf or Double Stuf varieties work if you want extra creaminess. Don’t use the green-colored Oreos unless you want green and white specks throughout your chocolate batter, which some people love but others find less appealing.
Cream Cheese creates the tangy, luxurious frosting that balances the sweetness of the cake and makes these cupcakes taste sophisticated rather than one-dimensionally sugary. Use full-fat brick-style cream cheese, not the spreadable kind in a tub, which contains stabilizers that prevent proper frosting texture. The cream cheese must be softened to room temperature before beating, or your frosting will be lumpy.
Butter combines with the cream cheese to create a frosting that’s both stable enough to pipe beautiful swirls and rich enough to taste absolutely indulgent. Like the cream cheese, it must be softened to room temperature – not melted, not cold. Room temperature butter should give slightly when pressed but still hold its shape.
Powdered Sugar sweetens and thickens the cream cheese frosting to the perfect pipeable consistency. You’ll need about 4 cups for a standard batch, though you can adjust slightly based on your preferred sweetness level and desired frosting texture. Sift the powdered sugar before adding it to avoid lumps in your otherwise silky frosting.
Green Gel Food Coloring transforms white cream cheese frosting into that show-stopping emerald color that makes these unmistakably St Patrick’s Day treats. Gel coloring is essential – liquid food coloring adds too much moisture and won’t create vibrant color. Start with a small amount and add gradually until you achieve your desired shade. AmeriColor “Electric Green” or Wilton “Kelly Green” create the most beautiful leprechaun-approved shades.
Heavy Cream adjusts the frosting consistency to your exact needs. If your frosting seems too thick to pipe smoothly, add cream one tablespoon at a time until it reaches perfect pipeable consistency. If it’s too thin, add more powdered sugar. This fine-tuning makes the difference between frustrating frosting and professional-looking swirls.
Vanilla Extract adds depth and rounds out the flavors in both the cake and frosting. Use pure vanilla extract rather than imitation for the best flavor, though imitation works in a pinch. The vanilla is especially important in cream cheese frosting, where it softens the tanginess and creates a more balanced flavor profile.
Shamrock Sprinkles and Edible Gold (optional) are the finishing touches that take these from pretty cupcakes to legitimately stunning St Patrick’s Day treats. Look for shamrock-shaped sprinkles, green jimmies, gold stars, or edible gold luster dust. These decorative elements are completely optional but add significant visual impact for minimal effort.
How to Make St. Patrick’s Day Oreo Cupcakes
Step 1: Preheat your oven to 350°F (175°C). Line two 12-cup muffin tins with cupcake liners – you can use regular paper liners, but foil liners in green, gold, or shamrock patterns add extra festive flair. Place the lined tins on a sturdy baking sheet for easy oven transport.
Step 2: Place 15-18 Oreo cookies in a food processor and pulse until they’re crushed into coarse crumbs, or seal them in a zip-top bag and crush with a rolling pin. You want a mixture of fine crumbs and small chunks, not powder. The variety in texture creates interesting pockets of cookies-and-cream throughout the baked cupcakes.
Step 3: Prepare your chocolate cake batter according to package directions in a large mixing bowl. For the richest, most bakery-quality results, use the “enhanced” method: replace the oil with an equal amount of melted butter, replace the water with whole milk or buttermilk, and add one extra egg beyond what the box calls for.
Step 4: Gently fold the crushed Oreos into the prepared cake batter using a rubber spatula. Fold just until the Oreo pieces are evenly distributed – overmixing will turn the batter gray and muddy-looking rather than chocolate studded with distinct cookie pieces. The batter should look marbled with dark and lighter swirls.
Step 5: Using a cookie scoop or 1/4 cup measure, fill each cupcake liner about 2/3 full. This is crucial – overfilled liners create mushroom-top cupcakes that overflow and underfilled liners create flat, sad cupcakes. The 2/3 mark creates perfectly domed cupcakes with the ideal ratio of cake to frosting.
Step 6: Bake for 18-22 minutes, rotating the pans halfway through baking time for even browning. The cupcakes are done when a toothpick inserted into the center comes out with just a few moist crumbs clinging to it. Don’t overbake – dry cupcakes are the enemy of good St Patrick’s Day treats.
Step 7: Remove the cupcakes from the oven and let them cool in the pans for 5 minutes, then transfer them carefully to wire cooling racks. Allow them to cool completely to room temperature before frosting – this is non-negotiable. Frosting warm cupcakes will cause the frosting to melt and slide off in a disappointing puddle.
Step 8: While the cupcakes cool, make your cream cheese frosting. In a large bowl using an electric mixer, beat 8 ounces of softened cream cheese and 1/2 cup softened butter together on medium speed for 2-3 minutes until completely smooth, light, and fluffy with no lumps remaining.
Step 9: Add 4 cups of sifted powdered sugar to the cream cheese mixture one cup at a time, beating on low speed after each addition until incorporated. Once all the sugar is added, increase speed to medium-high and beat for 2-3 minutes until the frosting is light, fluffy, and smooth as silk.
Step 10: Add 1 teaspoon of vanilla extract and beat it in thoroughly. Then add green gel food coloring – start with just 4-5 drops, beat until the color is evenly distributed, and assess. Add more coloring gradually, beating between additions, until you achieve a vibrant emerald green that screams St Patrick’s Day.
Step 11: Check the frosting consistency. It should hold stiff peaks when you lift the beater but still be smooth and pipeable. If it’s too thick, add heavy cream one tablespoon at a time, beating well after each addition. If it’s too thin, add more powdered sugar 1/4 cup at a time until it reaches perfect consistency.
Step 12: Transfer the green frosting to a piping bag fitted with a large star tip (Wilton 1M or 2D are perfect choices). If you don’t have piping bags, a gallon-size zip-top bag with one corner snipped off works surprisingly well, though the swirls won’t be quite as defined.
Step 13: Pipe generous swirls of green frosting on top of each completely cooled cupcake. Start from the outside edge and spiral inward and upward, creating a tall, bakery-style mound. Don’t be stingy with the frosting – these St Patrick’s Day treats should have impressive frosting-to-cake ratios that make people excited.
Step 14: While the frosting is still slightly soft, gently press one whole Oreo cookie into the top of each cupcake at a slight angle so it stands up like a little edible flag. The Oreo should nestle into the frosting and stick securely without falling over.
Step 15: Finish with a sprinkle of shamrock sprinkles, green jimmies, edible gold stars, or a light dusting of edible gold luster dust. These final touches take the cupcakes from homemade-looking to bakery-professional in seconds. Don’t skip this step if you want maximum visual impact.
Variations & Tips
Mint Chocolate Version: Add 1/2 teaspoon peppermint extract to both the cake batter and the frosting for mint chocolate Oreo cupcakes that taste like Girl Scout Thin Mints. Use chocolate mint Oreos if you can find them for even more minty intensity.
Cookies and Cream Inside: Create a surprise cream cheese filling by cutting a small cone shape from the top of each cooled cupcake, filling the cavity with extra cream cheese frosting mixed with crushed Oreos, then replacing the cake cone before frosting. This creates a hidden treasure inside each cupcake.
Rainbow Chip Addition: Fold 1/2 cup of rainbow chip sprinkles into the batter along with the crushed Oreos for bursts of color throughout. When you cut into the cupcakes, colorful specks peek through the chocolate – kids especially love this surprise.
Bailey’s Irish Cream Frosting: Replace 2 tablespoons of the heavy cream with Bailey’s Irish Cream for sophisticated adult-friendly cupcakes with genuine Irish spirit. The alcohol flavor is subtle but adds wonderful depth that elevates these St Patrick’s Day treats.
Gluten-Free Adaptation: Use a gluten-free chocolate cake mix and gluten-free Oreos (yes, they exist!). The texture will be nearly identical to traditional cupcakes, making these accessible to guests with celiac disease.
Gold Leaf Elegance: For truly special occasions, top each cupcake with a small piece of edible 24-karat gold leaf in addition to the Oreo and sprinkles. The gold catches light beautifully and makes these look genuinely expensive and luxurious.
White Chocolate Drizzle: Melt white chocolate and drizzle it over the frosted and decorated cupcakes in a decorative back-and-forth pattern. The white drizzle creates beautiful contrast against the green frosting and adds another layer of flavor.
Chocolate Stout Cupcakes: For the most authentically Irish version, replace the water in the cake mix with Irish stout beer (like Guinness). The beer adds incredible depth and moisture to the chocolate cake without making it taste beer-y. It just tastes deeply, mysteriously chocolate.
Pro Tip – The Frosting Temperature: The single biggest mistake people make with cream cheese frosting is working with ingredients that aren’t properly softened. Cold cream cheese and butter won’t blend smoothly no matter how long you beat them, resulting in lumpy, grainy frosting. Leave them on the counter for 1-2 hours before making frosting, and they should feel slightly soft when pressed but still hold their shape.
Preventing Overflow: If your cupcakes overflow during baking despite proper filling, your oven temperature may be running hot. Use an oven thermometer to verify accuracy. Too-high temperature causes the outside to set before the inside has finished rising, creating overflow and peaked tops.
Leftovers & Storage
St. Patrick’s Day Oreo Cupcakes store beautifully and actually improve slightly on the second day as the flavors meld and the cake becomes even more moist from the cream cheese frosting’s moisture. Proper storage is key to maintaining their bakery-fresh quality.
Store frosted cupcakes in an airtight container at room temperature for up to 2 days. If your kitchen is very warm (above 75°F), refrigerate them instead to prevent the cream cheese frosting from becoming too soft or developing food safety concerns. Cream cheese frosting is stable at room temperature for about 48 hours but should be refrigerated for longer storage.
For storage beyond 2 days, refrigerate the cupcakes in an airtight container for up to 5 days. The cake will remain moist and delicious, though the frosting will firm up considerably in the cold. Bring refrigerated cupcakes to room temperature 1-2 hours before serving – cold cupcakes have muted flavor and the frosting texture is too firm to be enjoyable.
Never cover cupcakes with plastic wrap directly touching the frosting – it will stick and destroy your beautiful swirls when you try to remove it. Use a cupcake carrier with individual wells, or place toothpicks in the frosting and tent loosely with plastic wrap so the covering doesn’t touch the decoration.
Unfrosted cupcakes freeze exceptionally well for up to 3 months. Cool them completely, wrap individually in plastic wrap, then place in a freezer bag with all air pressed out. Thaw at room temperature for about an hour, then frost and decorate as if they were freshly baked. The texture after freezing is virtually indistinguishable from fresh.
Frosted cupcakes can also be frozen, though the frosting won’t be quite as pristine after thawing. Freeze them uncovered on a baking sheet until solid, then transfer to an airtight container separated by parchment paper layers. Thaw in the refrigerator overnight, then bring to room temperature before serving.
For transporting these St Patrick’s Day treats to parties or events, invest in a good cupcake carrier with individual wells that hold each cupcake securely. These carriers prevent the cupcakes from sliding around and destroying the frosting during transport. Alternatively, nestle each cupcake in a muffin tin and cover the entire tin with foil.
Create an impressive party display by arranging the cupcakes on a tiered cupcake stand lined with green tissue paper or shamrock-patterned napkins. Add chocolate gold coins scattered around the base, small pots of gold made from plastic cups spray-painted gold and filled with yellow candies, or even a “rainbow” made from colorful fruit leather arching over the display.
Package individual cupcakes in clear plastic cupcake containers (available at any craft store) tied with green ribbon for perfect party favors or gifts. Add a small gift tag that says “Lucky Treats” or “Shamrock Sweets” and you’ve got professional-looking individual desserts that transport safely and look absolutely charming.
Leftover frosting stores in an airtight container in the refrigerator for up to one week. Bring it to room temperature and re-beat it before using to restore its fluffy, pipeable texture. You can use leftover green frosting to decorate sugar cookies, spread on graham crackers for kids’ snacks, or pipe onto brownies for another festive dessert.
These St. Patrick’s Day Oreo Cupcakes prove definitively that the very best St Patrick’s Day treats combine impressive visual appeal, universally beloved flavors, and achievable techniques that don’t require professional pastry training. Make them once and they’ll become your go-to festive dessert for every March celebration, requested year after year by everyone lucky enough to grab one before they vanish like leprechaun gold at sunrise!
St. Patrick’s Day Oreo Cupcakes
Ingredients
Equipment
Method
- Preheat oven to 350°F (175°C) and line two 12-cup muffin tins with cupcake liners.
- Crush 15-18 Oreo cookies into coarse crumbs using a food processor or rolling pin.
- Prepare chocolate cake batter according to package directions.
- Gently fold crushed Oreos into the batter until evenly distributed.
- Fill cupcake liners 2/3 full with batter.
- Bake for 18-22 minutes until a toothpick inserted comes out with a few moist crumbs.
- Cool cupcakes in pan for 5 minutes, then transfer to wire racks to cool completely.
- Beat softened cream cheese and butter together until smooth and fluffy.
- Add powdered sugar one cup at a time, beating until smooth and fluffy.
- Beat in vanilla extract and green gel food coloring until desired shade is reached.
- Adjust frosting consistency with heavy cream if needed until pipeable.
- Pipe generous swirls of green frosting onto cooled cupcakes.
- Press one whole Oreo cookie into the top of each cupcake.
- Decorate with shamrock sprinkles or edible gold as desired.