
Bread and butter pickles. Oh man, if you’re anything like me, you’ve eyed those pretty jars at the store and thought, “How hard could that be?” You slice into a dinner sandwich and suddenly think—these would be such a game-changer… if I could just make them myself, you know? That’s pretty much how I stumbled into this whole pickling adventure. If you want more old-school summer vibes in your kitchen (think of it like snacking on amazing moist zucchini bread straight from grandma’s counter), you’ve come to the right corner of the internet.
Table of Contents
How To Make Bread and Butter Pickles
Okay, let’s get right to the heart of it. First things first—you’ll need fresh cucumbers. Not those waxy giants, either. Get the small, snappy ones, preferably from your own garden. I learned that the hard way after an early cucumber-pocalypse. Grab some onions and a few standard spices—think mustard seeds, celery seed, turmeric. White vinegar works fine.
Thin-slice everything (I’m talking paper-thin if you can swing it) so the flavors dance together. Dump the cucumbers and onions in a big bowl, toss with salt, and let them sweat for about an hour. This part—honestly—makes them extra crisp.
After the sweat session, rinse and drain them really well. Heat up the vinegar, sugar, and your spices till it smells like a county fair. Stir that all together with the cucumbers and onions. And then, just simmer. Don’t walk away though—seriously, I burnt mine the first time and the house reeked for days.
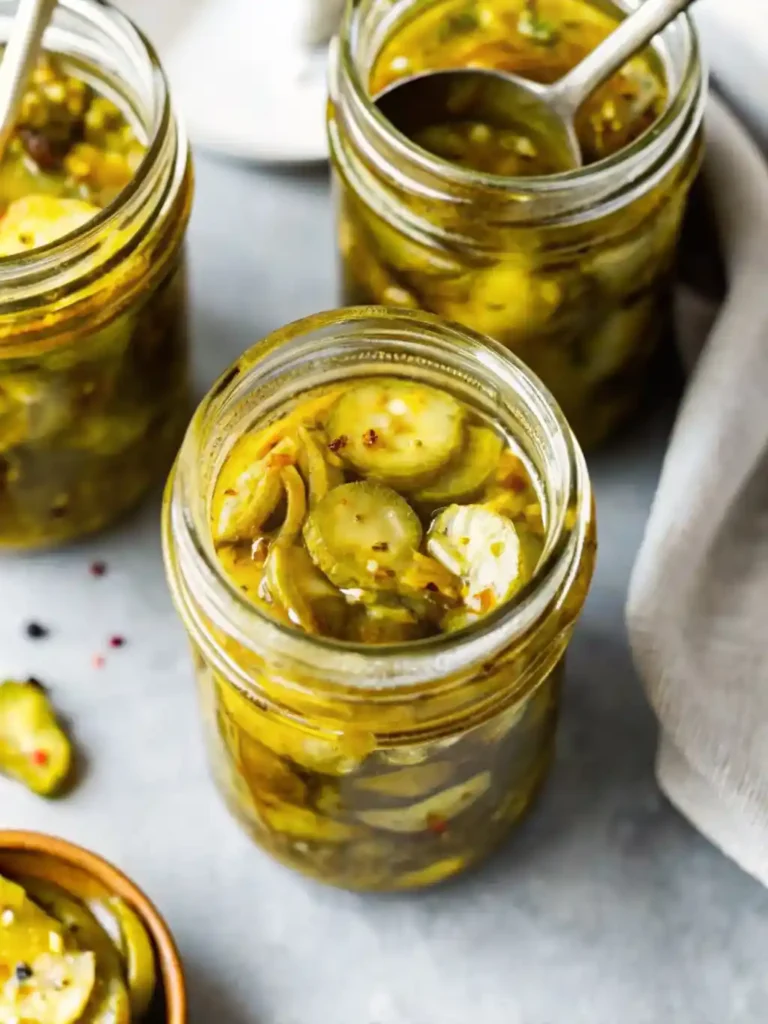
Spoon them into clean jars while they’re hot. They’ll look bright and cheerful, like a jar of summer. The tricky part? Waiting. They’re best after a week in the fridge (I know, I know—it’s hard). Trust me though, it’s worth it.
Tips for Canning Bread & Butter Pickles
Wanna keep those bread and butter pickles longer than summer? Canning is your pal. Here comes truth time: don’t let the boiling water scare you. My neighbor once convinced me “it’s just like making pasta.” Sort of true, but a little noisier.
Use fresh jars and lids, always. Your pickles will keep months and months this way—if you don’t eat them all. Make sure to sterilize your jars (I pop mine in a hot oven for a bit; old school, sure, but works). Always use a clean funnel so you’re not dropping bits everywhere.
Remember to pack your pickles in tight, but not too snug. The hot brine needs some wiggle room to do its thing. Once your jars are filled, wipe the rims so the lids seal good and proper.
Let me say this loud: don’t skip soaking your cucumbers in salt. It’s the golden rule for crispness. Soft pickles? That’s a sad sandwich right there.
If you’re worried about the process, relax! The magic is in the details, not perfection.
I’d never canned anything before last summer, but following these steps made it honestly fun—and my kids still beg for “Mom’s fancy pickles” on burgers.
Steps for Canning Pickles
It’s time to break it down plain and simple. Here we go.
- Wash jars, lids, and rings in soapy water. Rinse them like your life depends on it.
- Boil the clean jars in water for at least ten minutes to sterilize. Lids too, but not as long—maybe five minutes.
- Fill jars with your hot bread and butter pickles and brine, leaving about a quarter inch of space at the top.
- Wipe the rim of each jar, place the lid on, then screw on the ring just until it’s snug, not superhero tight.
- Process the filled jars in a boiling water bath for ten minutes.
- Remove and set jars on a towel. That pop you hear as they cool? Music to your ears.
Let them cool overnight before you move them around. You’ll know they’re sealed if the lid is sucked down in the center. If not, eat those first (or, honestly, just eat them now).
More Summery Recipes to Can
Ready to ride the canning train straight through August? Me too—it’s kinda addictive. Here’s some easy stuff that works great alongside your bread and butter pickles (and keeps the picnic table feeling festive).
- Dilly beans are a crispy favorite and zingy, just enough to make you feel fancy.
- Homemade salsa—nothing compares, and you can brag about it to everyone.
- Pickled carrots: sweet, crunchy, pretty in a jar.
- Sweet corn relish: big barbecue vibes and perfect with burgers.
Heck, try dessert too. If you like summer treats as much as I do, go for these fried strawberry cheesecake sandwiches. Trust me, happiness in every bite.
Good planning is key to a successful vegetable garden
No cucumbers, no pickles, right? Garden planning’s worth a quick chat—mostly because it’ll save you a world of frustration mid-July. Sketch the garden before you plant, even if it looks like a toddler doodle.
Start cucumbers early, in a bright spot with rich dirt. We had loads of zucchini and cucumbers last summer just by watering regularly and mulching underneath to lock in that good moisture. Toss in a couple onions alongside the cucumbers so you don’t have to dash to the store at the last minute. Good fences (or, well, netting) will fend off the rabbits. Believe me—they turn into gourmet critter salad bars if you’re not careful.
Take it from me: Label everything. I forgot once and ended up with a mystery squash that I still don’t have a name for.
FAQs
Do bread and butter pickles need to be refrigerated after opening?
Yep! Pop them in the fridge once you crack the jar—keeps the flavor sharp.
How long will canned bread and butter pickles last?
Unopened, your bread and butter pickles can last a year (sometimes more), but once opened, aim for two months max.
Can I use regular cucumbers instead of pickling cucumbers?
I mean… you can, but smaller pickling cucumbers stay crunchier. Regular ones work if you’re not going for five-star crunch.
What do bread and butter pickles taste best with?
Honestly, stack them on burgers, sandwiches, or even fancy grilled cheese. Or just fork them out of the jar—no judging here.
Is it normal for them to look a little cloudy?
Totally normal! If you followed the recipe and used clean jars, just cloudy brine from the spices. If it’s slimy or smells funny, toss it though.
Your Summer Table’s in For a Treat
So, there you go making your own bread and butter pickles isn’t rocket science, just a bit of honest work (and maybe a failed attempt or two before you get a batch that’ll make you beam).
Simple tips, easy steps, and a little patience—that’s all you need. If you want to compare or double-check on a second recipe, hop over to this Bread and Butter Pickles Recipe for another classic take that jives real well with mine. While you’re at it, peek at frozen Greek yogurt peanut butter bites for a cool treat after the pickling’s done. Let me know if you dive in—homemade pickles might just make you the “pickle person” in your friend group, and who doesn’t want that badge of honor?

Bread and Butter Pickles
Ingredients
Equipment
Method
- Place sliced cucumbers and onions in a large bowl. Sprinkle with kosher salt and mix well. Add enough ice cubes to cover. Let sit for 2 hours, then drain and rinse well.
- In a large pot, combine sugar, vinegar, mustard seeds, celery seeds, and turmeric. Bring to a boil.
- Add the drained cucumbers and onions to the pot. Return to a boil and remove from heat.
- Use a slotted spoon to transfer the pickles to clean jars. Pour brine over to cover. Let cool before sealing and refrigerating.
- Allow to chill at least 24 hours before eating for best flavor.