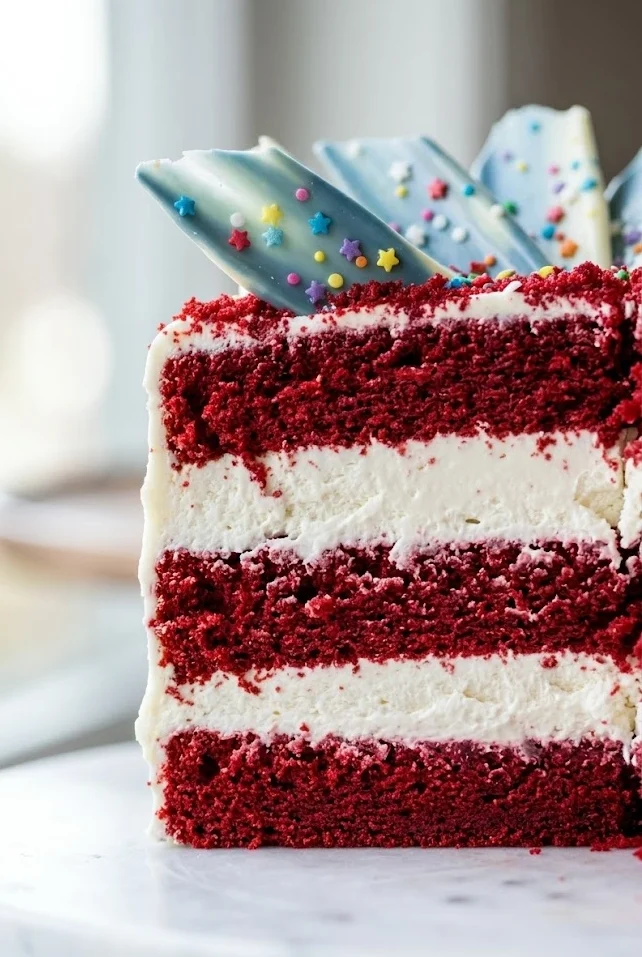
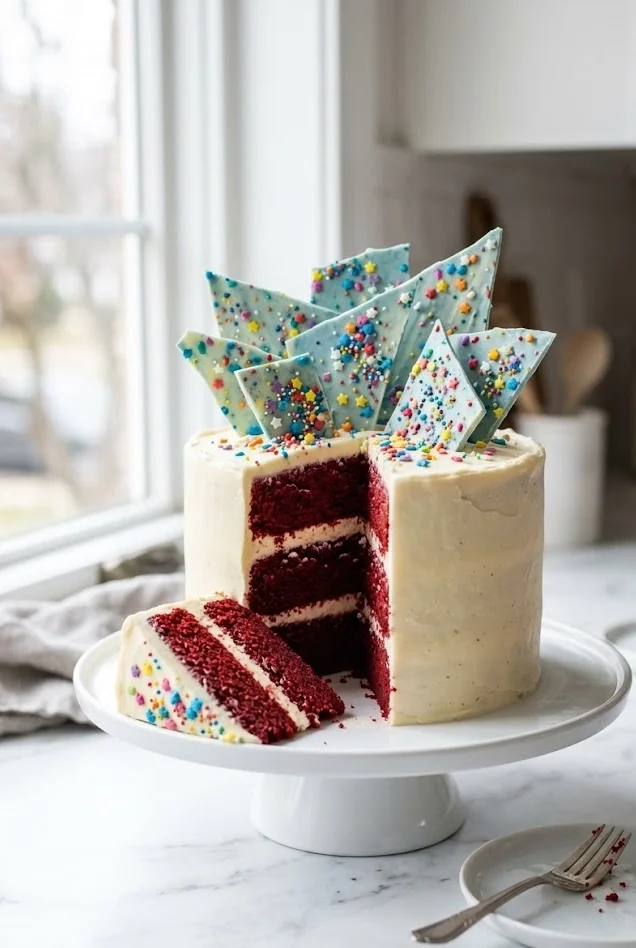
There are 4th of July food desserts that are cute, and then there are ones that make the entire room go quiet the moment you set them on the table. This Red Velvet Cheesecake Cake is firmly in the second category. Deep crimson cake layers, a cloud-light whipped cheesecake filling, and a garnish of blue-tinted white chocolate shards covered in fireworks sprinkles — it is one of the most visually spectacular 4th of July food ideas you can bring to a summer celebration.
But here is the best part: it is far more approachable than it looks. The red velvet layers follow a classic Southern method, and the whipped cheesecake filling requires no baking whatsoever. If you can make a standard layer cake, you can absolutely pull this off — and the result will easily be the most talked-about dessert at your 4th of July party.
Why You’ll Love This Red Velvet Cheesecake Cake
This cake solves a problem that most holiday desserts don’t: it’s rich and impressive without being heavy. Traditional cheesecake can feel dense and overwhelming after a full BBQ spread. This version replaces that dense filling with a whipped cream cheese filling that is billowy, light, and just as packed with that classic sweet-and-tangy cheesecake flavor — just without any of the heaviness.
The red velvet cake itself is also far from ordinary. The small addition of cocoa powder gives it a depth of flavor that sets it apart from plain vanilla cake, while the buttermilk and oil keep the crumb extraordinarily moist and tender. It genuinely melts in your mouth in a way that most celebration cakes simply don’t.
For a trifle-inspired twist, this layered cake translates beautifully into individual serving glasses too — layering crumbled red velvet cake with spoonfuls of whipped cheesecake filling makes for a stunning no-slice dessert option that works perfectly for large crowds.
Common Mistakes and How to Avoid Them
The most common issue when making this cake is getting the whipped cheesecake filling right. The filling relies on properly whipped heavy cream to create its signature light texture — and that requires your mixing bowl and the heavy cream itself to be thoroughly chilled before you begin. A warm bowl or warm cream will prevent the cream from whipping to stiff peaks, leaving you with a soft, runny filling that won’t hold between layers.
Another frequent error is adding the cream cheese mixture to the whipped cream too aggressively. Fold it in gently with a rubber spatula rather than beating it in with a mixer. Overworking the mixture at this stage deflates the air you worked hard to incorporate and collapses the filling’s lightness.
For the cake layers themselves, the most important rule is patience. All your dairy ingredients — eggs, buttermilk, and cream cheese — must be fully at room temperature before mixing. Cold ingredients cause the batter to curdle and bake unevenly. Set everything out at least an hour before you begin and the results will be noticeably better.
Key Ingredients
Cake flour is the foundation of a properly tender red velvet crumb. Its lower protein content compared to all-purpose flour means less gluten development, which translates directly into a softer, more delicate texture. Three and three-quarter cups gives you three full layers with beautiful structure.
Cocoa powder is present in a modest amount — just one and a half tablespoons — and that is entirely intentional. The goal is a subtle chocolate undertone that sets red velvet apart from vanilla cake without overpowering the signature flavor. Reducing it slightly from traditional amounts also lets the bold red color shine through more vividly.
Red gel food coloring delivers that deep, saturated crimson hue that makes this cake so visually dramatic. Gel coloring is far more concentrated than liquid food coloring, so a smaller amount produces a much more intense result without adding extra liquid to the batter. Two teaspoons produces a striking, jewel-toned red in every slice.
Buttermilk is the moisture engine of this recipe. It reacts with the baking soda and white vinegar to create lift and tenderness, and its gentle acidity enhances the subtle cocoa notes throughout the cake. Never substitute regular milk here — the chemistry is specific and essential.
Heavy whipping cream is the secret behind the ethereal cheesecake filling. Whipped to soft, pillowy peaks and then folded into the cream cheese mixture, it transforms what would otherwise be a dense cheesecake base into a filling that is luxuriously light and stable enough to hold between three full cake layers.
How to Make 4th of July Red Velvet Cheesecake Cake
- Preheat your oven to 350 degrees F. Generously butter three 7-inch round cake pans, dust with flour, tap out the excess, and line the bottoms with parchment circles.
- In a medium bowl, whisk together the cake flour, salt, and cocoa powder until evenly combined. Set aside.
- In the bowl of a stand mixer fitted with the paddle attachment, combine the sugar and canola oil. Beat on medium speed until the mixture is well blended and smooth.
- Add the eggs one at a time, beating well after each addition and scraping down the sides of the bowl between additions.
- Add the red gel food coloring and vanilla extract and beat until the color is fully and evenly incorporated throughout the batter.
- Reduce the mixer speed to low and add the flour mixture in three additions, alternating with the buttermilk, beginning and ending with the flour mixture. Scrape down the bowl as needed.
- In a small separate bowl, combine the baking soda and white vinegar — they will bubble and fizz. Add this mixture immediately to the batter and beat on medium speed for exactly ten seconds.
- Divide the batter evenly between the three prepared pans and bake for 25 to 30 minutes, until a toothpick inserted in the center of each layer comes out clean.
- Cool the cakes in the pans for ten minutes, then turn them out onto a wire rack and cool completely before filling.
- For the whipped cheesecake filling, place a clean mixing bowl and the heavy cream in the freezer for ten minutes to chill thoroughly. Whip the heavy cream using the whisk attachment until soft, pillowy peaks form and no liquid remains. Set aside.
- In a separate bowl with the paddle attachment, beat the cream cheese, sugar, and vanilla on medium-high speed until smooth, creamy, and completely free of any grittiness from the sugar.
- Using a rubber spatula, gently fold the whipped cream into the cream cheese mixture in two additions until fully blended and uniform. Do not stir or beat — fold only.
- Trim any domed tops from the cooled cake layers. Place the first layer on your cake board and pipe or spread a generous layer of whipped cheesecake filling across the top. Repeat with the second layer. Place the final cake layer on top and cover the entire exterior with the remaining filling, smoothing it with an offset spatula.
- For the garnish, melt half a cup of white chocolate, stir in three drops of blue gel food coloring, and spread onto parchment paper to a quarter-inch thickness. Scatter fireworks sprinkles across the surface and refrigerate for four minutes until set. Break into shards and arrange decoratively across the top of the cake.
- Refrigerate the finished cake, wrapped in plastic wrap, until fully chilled and set before slicing and serving.
Variations and Tips
If the blue white chocolate shard garnish feels like a step too far for your timeline, simply crumble the trimmed cake tops over the finished cake instead. The red velvet crumbs create a gorgeous rustic garnish that looks intentional and beautiful with almost no effort.
For a trifle-style presentation that skips the layering entirely, crumble the baked red velvet cake into large chunks and alternate layers of cake, whipped cheesecake filling, and fresh blueberries and sliced strawberries in a large clear trifle bowl. The red, white, and blue layers visible through the glass make it one of the most striking 4th of July food dessert displays imaginable.
To make individual portions for a crowd, assemble the layers in clear plastic cups. They’re portable, require no slicing, and look just as impressive as a full layered cake when lined up on a party table.
If the whipped cheesecake filling begins to soften during assembly — especially in a warm kitchen — simply refrigerate the entire cake for 15 minutes, give the filling a gentle stir, and continue. It recovers quickly and won’t compromise the final result.
FAQs
Can I make the cake layers ahead of time? Yes — bake the cake layers up to two days in advance. Once fully cooled, wrap each layer tightly in plastic wrap and store at room temperature. The whipped cheesecake filling is best made on the day of assembly for the freshest texture.
Why does this recipe use canola oil instead of butter? Oil-based cake batters produce a noticeably moister crumb than butter-based ones because oil stays liquid at room temperature while butter solidifies. This is what gives the red velvet layers their signature melt-in-your-mouth tenderness even straight from the fridge.
How do I store the finished cake? Wrap the assembled cake tightly in plastic wrap and refrigerate for up to three days. The plastic wrap is essential — it prevents the exposed cake surfaces from drying out in the fridge. Allow slices to sit at room temperature for 10 minutes before serving for the best flavor and texture.
Can I make this as a two-layer cake instead of three? Absolutely. Use two 9-inch round pans instead of three 7-inch pans, adjust the baking time slightly, and divide the filling evenly between the layers. The result is a slightly wider, shorter cake with the same incredible flavor in every bite.
4th of July Red Velvet Cheesecake Cake
Equipment
- three 7-inch cake pans
- stand mixer
- mixing bowls
- wire cooling rack
- offset spatula
Ingredients
- 3 3/4 cups cake flour
- 1 1/2 tbsp cocoa powder
- 1 tsp salt
- 1 1/2 cups granulated sugar
- 1 1/2 cups canola oil
- 3 large eggs
- 2 tsp red gel food coloring
- 2 tsp vanilla extract
- 1 1/2 cups buttermilk
- 1 tsp baking soda
- 1 tsp white vinegar
- 2 cups heavy whipping cream
- 16 oz cream cheese, softened
- 3/4 cup granulated sugar
- 1 tsp vanilla extract
- 1/2 cup white chocolate
- 3 drops blue gel food coloring
- 2 tbsp fireworks sprinkles
Instructions
- Preheat oven to 350°F. Prepare three 7-inch cake pans by buttering, flouring, and lining with parchment paper.
- Whisk together cake flour, salt, and cocoa powder in a medium bowl.
- Beat sugar and canola oil until smooth and blended.
- Add eggs one at a time, beating well after each addition.
- Add red gel coloring and vanilla extract and mix until evenly colored.
- Alternate adding dry ingredients and buttermilk, beginning and ending with flour mixture.
- Combine baking soda and vinegar, immediately add to batter, and mix for 10 seconds.
- Divide batter between pans and bake 25 to 30 minutes until a toothpick comes out clean.
- Cool cakes in pans for 10 minutes, then transfer to a wire rack and cool completely.
- Chill the mixing bowl and heavy cream for 10 minutes. Whip cream to soft peaks and set aside.
- Beat cream cheese, sugar, and vanilla until smooth and creamy.
- Fold whipped cream gently into cream cheese mixture until fully incorporated.
- Layer the cakes with whipped cheesecake filling and frost the exterior with remaining filling.
- Melt white chocolate, tint blue, spread on parchment, add sprinkles, chill briefly, then break into shards.
- Decorate cake with shards and refrigerate until fully chilled before serving.