
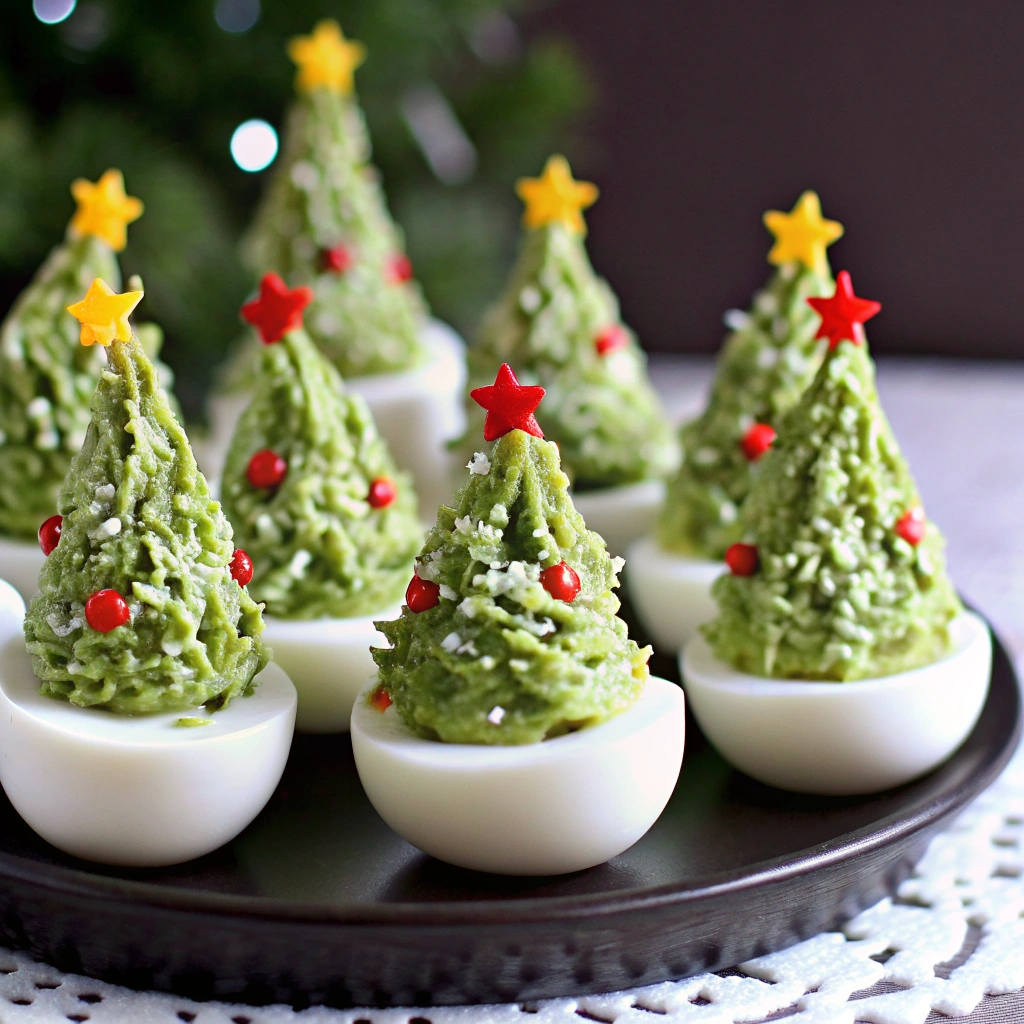
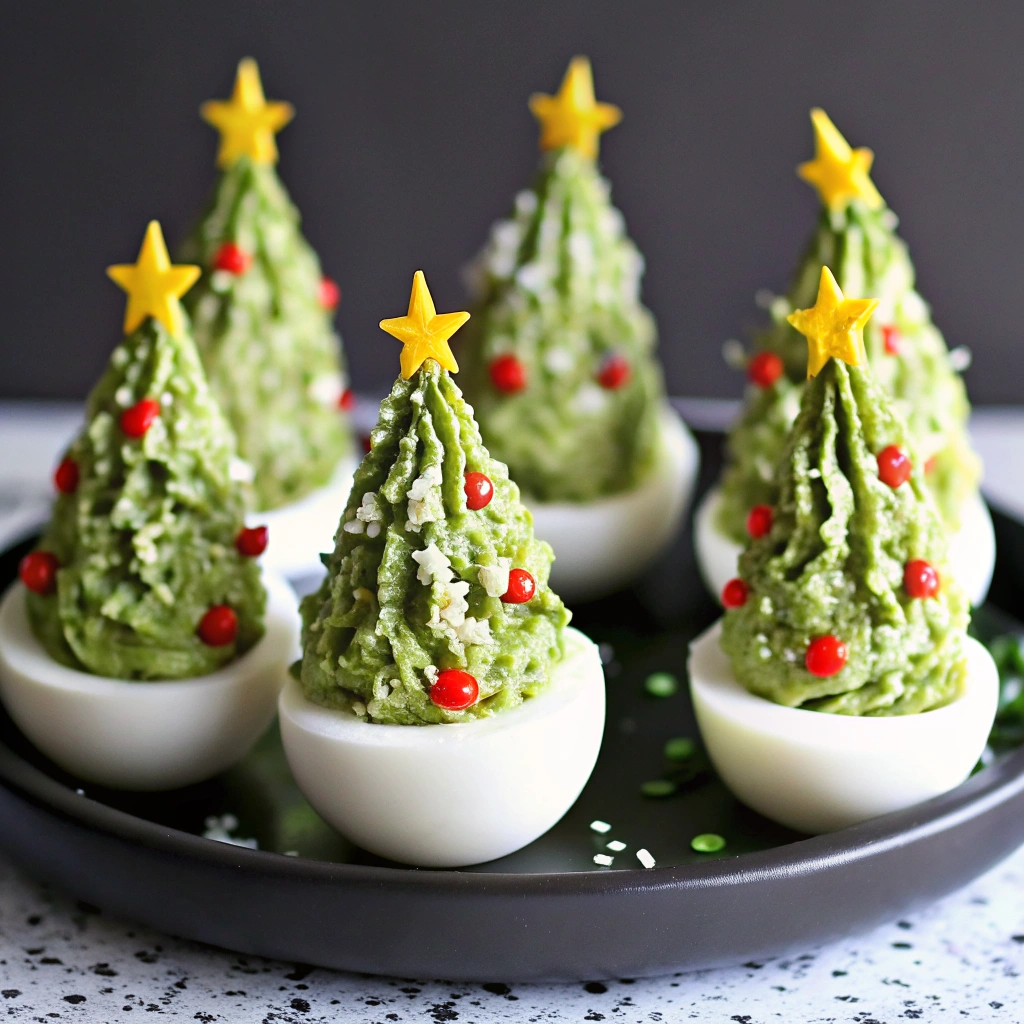
The holidays are the perfect time to add a little whimsy and festive flair to even the simplest recipes, and this Deviled Egg Christmas Trees recipe is the ultimate example. It takes the universally beloved, creamy classic—the deviled egg—and transforms it into a stunning, edible centerpiece shaped like a perfectly piped holiday tree. It’s a clever, low-carb, and absolutely delicious appetizer that is guaranteed to stop conversation and draw a crowd at any party.
Forget those simple halved eggs on a platter! This technique is easy to master and creates a striking visual using a bit of green food coloring and simple veggie “ornaments.” The rich, tangy egg yolk filling is piped high using a star tip, giving it the texture and shape of a miniature evergreen, complete with a colorful “star” on top. It’s light, satisfying, and looks like you spent hours on presentation, when in reality, the whole thing comes together in about 30 minutes.
If you are looking for an appetizer that is both nostalgic and modern, look no further. This Deviled Egg Christmas Trees recipe is your new secret weapon for holiday hosting.
Why Deviled Egg Christmas Trees Go Viral
This recipe is a Pinterest sensation for a reason. It hits every marker for a perfect, shareable holiday food post.
- Unrivaled Visual Appeal: The festive shape immediately captures attention. It’s not just food; it’s a decoration that complements your holiday theme perfectly.
- Low-Effort, High-Impact: The hardest part is boiling the eggs. The shaping is done quickly with a piping bag, giving the illusion of professional effort with very little actual work.
- Diet-Friendly Appetizer: Unlike heavy cheese balls or carb-laden baked appetizers, deviled eggs are naturally high in protein and low in carbohydrates, making them a welcome choice for guests watching their intake.
- Customizable Ornaments: The decoration stage is fun and easy. You can use almost any finely chopped red, green, or yellow ingredient (pimentos, peppers, chives) to create customizable “ornaments.”
- Make-Ahead Mastery: Deviled eggs are perfect for preparing ahead of time, reducing stress on the day of the party. The shells can be boiled days in advance, and the filling can be prepared a day ahead.
Ingredients
We start with a classic, creamy deviled egg base and add simple coloring and decorative elements.
For the Deviled Egg Filling
- 1 dozen large eggs
- 1/4 cup mayonnaise (full-fat for the best texture)
- 2 teaspoons Dijon mustard
- 1 teaspoon white vinegar or pickle juice
- 1/4 teaspoon Kosher salt
- 1/8 teaspoon black pepper
- Green gel food coloring (gel is essential for vibrant color)
For the Festive Garnishes (“Ornaments”)
- Tree Star: Small piece of yellow bell pepper or a tiny slice of star fruit.
- Red Ornaments: Finely diced red bell pepper or pimento.
- Green Garland/Needles: Finely chopped fresh chives or dill.
- Tree Stand/Stump: Small square of soft bread (optional).
- Dusting (Optional): Light sprinkle of paprika.
Step-by-Step Instructions: Boil, Fill, and Decorate
The secret to perfect, pipeable deviled eggs is using the freshest eggs possible and ensuring the filling is silky smooth.
Part 1: Perfect Hard-Boiled Eggs (15 Minutes)
- Boil the Eggs: Place eggs in a single layer in a large pot. Cover with 1 inch of cold water. Bring the water to a rapid, rolling boil over high heat.
- Turn Off Heat and Steep: Immediately turn off the heat, cover the pot tightly with a lid, and let the eggs sit in the hot water for 12 minutes.
- Ice Bath: Immediately transfer the eggs to a large bowl of ice water and let them chill for at least 5 minutes. This stops the cooking process and prevents that unsightly grey-green ring around the yolk.
- Peel and Halve: Gently crack and peel the eggs. Slice the eggs lengthwise and carefully scoop the yolks into a medium mixing bowl. Set the egg white halves aside. Note: We only use the yolks and filling for the tree shapes, so the white halves are technically leftovers!
Part 2: Preparing the Green Filling (10 Minutes)
- Mash Yolks: Use a fork to mash the yolks until they are mostly smooth. There should be no large chunks left.
- Mix Filling Base: Add the mayonnaise, Dijon mustard, vinegar (or pickle juice), salt, and pepper to the mashed yolks. Mix well until the filling is perfectly smooth and creamy.
- Add Color: Dip a toothpick into the green gel food coloring and transfer a small amount to the filling. Mix until fully incorporated. Continue adding the green coloring in tiny amounts until you reach a vibrant, deep green shade. (Gel coloring is key; liquid food coloring will thin the filling too much.)
- Test for Pipeability: The filling should be firm enough to hold its shape when piped. If it seems too soft, refrigerate it for 10 minutes to firm up the cream cheese slightly.
Part 3: Piping and Decorating the Trees (10 Minutes)
- Prepare the Piping Bag: Fit a piping bag (or a large zip-top bag with the corner snipped off) with a large closed star tip (like Wilton 1M or similar). This tip is essential for creating the ruffled, conical tree shape.
- Fill the Bag: Scoop all the green filling into the piping bag. Twist the top to secure the filling.
- Pipe the Trees: On a serving platter, hold the piping bag straight up. Starting at the base, pipe the filling in a steady circular motion, building the shape upwards, slightly decreasing the circle size with each layer to create a cone or tree shape. Stop when you have a neat point at the top. The large star tip will create the textured “pine needle” effect.
- Add the Stump (Optional): If using, gently press a small, 1-inch square of bread or a crouton into the bottom of the piped tree base to mimic a stump.
- Decorate! Place a tiny piece of yellow pepper or star fruit (the star) on the very tip. Use tweezers or a toothpick to carefully place tiny pieces of diced red pepper and chopped chives (ornaments and garland) onto the sides of the piped filling.
- Serve: Chill until ready to serve.
Pro Tips for the Ultimate Deviled Egg Trees
Making the perfect Deviled Egg Christmas Trees involves attention to detail, especially regarding texture and color.
- The No-Green-Ring Secret: To ensure your egg yolks are a beautiful, vibrant yellow (or in this case, a clean base for your green color), the instant ice bath is non-negotiable. The sudden temperature drop prevents the reaction that forms the gray ring.
- Gel Coloring Over Liquid: Always use gel food coloring when coloring something with a high-fat content like deviled egg filling. Liquid coloring introduces too much extra moisture, which will make the filling soft and unable to hold its tree shape when piped. Gel coloring is concentrated and maintains the filling’s firmness.
- The Right Piping Tip: A closed star tip (Wilton 1M or 4B) is your best friend here. It creates the beautiful, textured ruffles that make the filling look like pine tree branches. Don’t use a round tip; the texture won’t be the same.
- Stabilize the Filling: If, after mixing, your filling is too runny to hold a stiff peak (a piped point), add a teaspoon of softened, plain cream cheese or powdered sugar (not granulated) and mix again. This extra binder will firm it up. Alternatively, chilling the filling for 10-15 minutes helps tremendously.
- Decorate with Precision: Use kitchen tweezers or a small toothpick dipped in water to gently place your tiny pepper and chive “ornaments.” The filling is sticky enough to hold them without trouble.
Serving Suggestions and Festive Variations
While the classic recipe is divine, a few simple tweaks can customize your Deviled Egg Christmas Trees for different tastes.
Pairing and Presentation
- The Wreath Platter: Arrange your piped trees on a round platter, surrounding them with a wreath made of sprigs of fresh rosemary and parsley for extra green contrast.
- Snowy Base: Dust the entire platter surface with a light coating of finely grated Parmesan cheese or powdered sugar (if sweet variation) to mimic “snow” around the tree base.
- Serving Utensil: Serve with a small cocktail fork or appetizer tongs for guests who don’t want to use their hands, though the piped trees are sturdy enough to be picked up directly.
- Pair with Pickles: The tangy, rich flavor of deviled eggs pairs perfectly with acidic accompaniments. Serve them next to a bowl of miniature dill pickles or pickled onions.
Creative Flavor Variations
- Smoky Maple Bacon Tree: Stir in 2 tablespoons of finely crumbled, cooked bacon and 1/2 teaspoon of smoked paprika into the filling. Garnish with a tiny piece of crispy bacon on top instead of a pepper star.
- Curry Christmas Tree: For a unique twist, omit the vinegar and add 1/2 teaspoon of mild curry powder and a pinch of ground ginger to the filling. Garnish with tiny pieces of mango chutney.
- Spicy Jalapeño Cheddar Tree: Add 1 tablespoon of finely minced, deseeded jalapeño and 1 tablespoon of shredded sharp cheddar cheese to the filling. Garnish with a sliver of jalapeño.
- Dill and Chive Tree: For an herbaceous, classic flavor, replace the vinegar with pickle juice and add 1 tablespoon of fresh, chopped dill to the filling. Garnish only with chives for the “needles.”
Frequently Asked Questions
- Can I make Deviled Egg Christmas Trees ahead of time? Yes, but only in phases. Do not fully assemble them more than 4 hours ahead. The piped filling will start to lose its crisp edge and weep slightly.
- Make-Ahead Option 1 (2 Days): Hard-boil and peel the eggs up to 3 days ahead. Store in the refrigerator.
- Make-Ahead Option 2 (1 Day): Prepare the green filling completely and store it in an airtight container in the refrigerator. On the day of the party, scoop the filling into the piping bag (allow it to warm up for 10 minutes so it’s pipeable), and then pipe and decorate.
- Why did my filling come out too runny to hold a tree shape? There are three common culprits:
- Too Much Liquid: You added too much mayonnaise or used liquid food coloring instead of gel.
- Not Enough Yolk: Ensure you are using at least 12 yolks for this amount of filling.
- Temperature: The filling may be too warm. Pop the bowl (or the entire piping bag) into the freezer for 10 minutes. The slight chill will firm up the fats and allow the filling to hold its shape perfectly.
- My eggs peel terribly! What is the secret? The biggest secret to easy-peel eggs is age and temperature shock. Use eggs that are at least a week old, not farm-fresh. Always start your eggs in cold water and immediately transfer them to an ice bath after cooking. This rapid temperature change separates the egg membrane from the shell, making peeling effortless.
- How do I store the leftovers? Store any leftover piped trees in an airtight container in the refrigerator for up to 2 days. The filling will likely lose its crisp piped edges overnight, but the flavor will still be great! It’s best to scrape the leftovers into a bowl and serve as a dip with chips or crackers.
- Is it safe to use food coloring? Yes, using a few drops of FDA-approved food coloring is perfectly safe. Gel food coloring provides the most saturated color with the least amount of liquid, ensuring the consistency of your dip remains perfect for piping.
This Deviled Egg Christmas Trees recipe is your simple ticket to a show-stopping holiday presentation. Enjoy the gasps of delight from your guests!
Don’t forget to Pin this recipe for later and share your favorite deviled egg “ornament” ideas in the comments below!
Deviled Egg Christmas Trees
Ingredients
Equipment
Method
- Place eggs in a saucepan and cover with cold water. Bring to a boil, then reduce heat and simmer for 10 minutes. Cool in ice water and peel.
- Cut eggs in half lengthwise and remove yolks. Place yolks in a bowl and mash until smooth.
- Mix yolks with mayonnaise, mustard, salt, pepper, and garlic powder until creamy. Add green coloring and mix well.
- Pipe filling into egg whites in a tall swirl shape to resemble Christmas trees.
- Sprinkle with paprika and garnish with diced red bell pepper pieces as ornaments.
- Refrigerate until ready to serve.