
When you need St Patrick’s Day treats that deliver maximum festive fun with minimum kitchen effort, Leprechaun Bark is your absolute answer. This is the kind of no-bake, no-stress recipe that makes you look like a creative genius while requiring roughly the same skill level as melting butter.
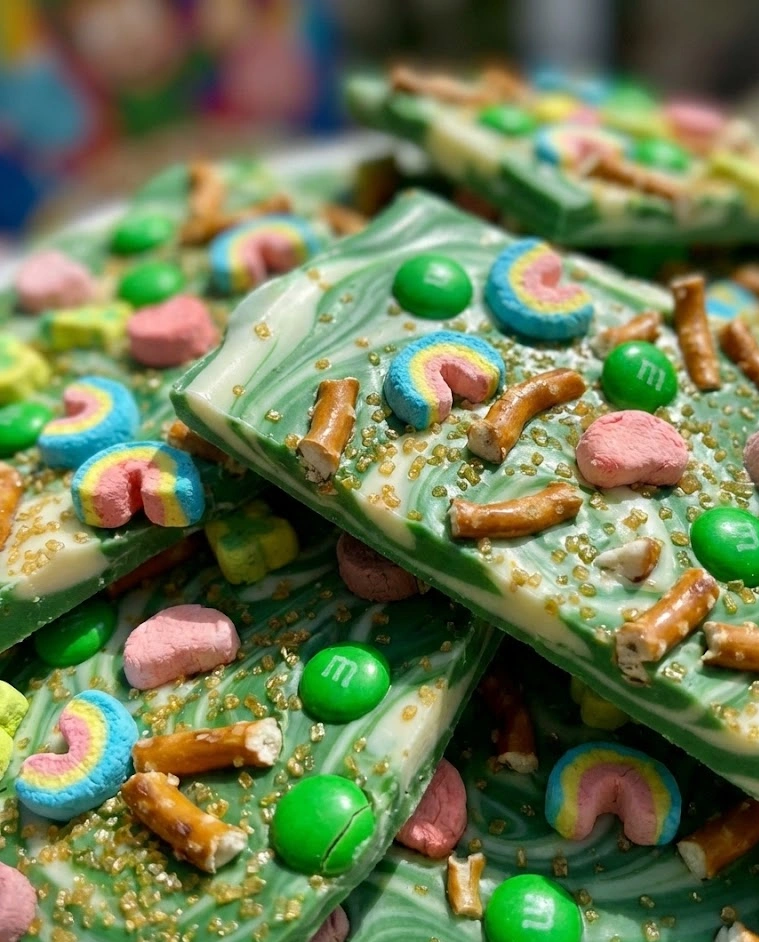
Imagine a canvas of smooth, creamy white chocolate swirled with vibrant emerald green, absolutely loaded with colorful Lucky Charms marshmallows, rainbow sprinkles, gold chocolate coins, and maybe a few shamrock-shaped candies for good measure. It’s like a leprechaun’s treasure chest exploded in the most delicious way possible, creating edible magic that disappears faster than gold at the end of a rainbow.
The brilliance of chocolate bark as St Patrick’s Day treats lies in its complete flexibility. You can customize it endlessly based on what’s in your pantry, what you find at the store, or what your kids are begging to add. There’s no wrong way to make it, no precise measurements required, and absolutely no way to mess it up as long as you can melt chocolate without burning it.
Why You’ll Love This Leprechaun Bark
This recipe exists in that perfect sweet spot where impressive results meet embarrassingly simple execution. Ten minutes of active work, a couple hours of hands-off chilling time, and you’ve got a stunning dessert that looks like it took genuine effort and skill. Your secret about how easy it actually was is completely safe.
The no-bake factor is genuinely liberating, especially during a season when your oven might already be working overtime with corned beef or Irish soda bread. Everything happens on your stovetop or in your microwave, your kitchen stays cool, and there’s zero risk of burning anything in the oven while you’re distracted by St Patrick’s Day festivities.
Kids can help make this from start to finish, which makes it perfect for family bonding time or classroom cooking projects. Even toddlers can sprinkle toppings onto melted chocolate with minimal mess and maximum joy. Older kids can handle the melting and stirring with supervision, learning basic cooking skills while creating something they’re genuinely proud to share.
The customization possibilities are truly endless. Use different chocolate colors, swap the Lucky Charms for other cereals, change up the candy mix-ins, or create an entirely different flavor profile while keeping the basic technique. Once you master this simple method, you can create custom bark for every holiday and celebration.
Budget-conscious bakers will appreciate that chocolate bark stretches a small amount of chocolate into a large batch of treats. A pound of chocolate creates enough bark to feed a crowd, and you can use whatever mix-ins are on sale or already hiding in your pantry rather than buying expensive specialty ingredients.
Key Ingredients
White Chocolate Chips or Melting Wafers form the creamy, sweet canvas for all your colorful toppings and create that smooth, melt-in-your-mouth texture that makes chocolate bark so addictive. Use high-quality white chocolate chips like Ghirardelli for the best flavor, or white candy melts (like Wilton or CandiQuik) for easier melting and more stable results. You’ll need about 24 ounces (1.5 pounds) for a standard batch. Avoid “almond bark” or white coating chocolate, which tastes waxy and artificial compared to real white chocolate.
Green Candy Melts or Green Chocolate creates the swirled leprechaun-green color that makes this bark unmistakably festive. Green candy melts are the easiest option and come in various shades – look for a vibrant kelly green or emerald shade. You’ll need about 8 ounces of green chocolate. Alternatively, you can melt white chocolate and tint it with green oil-based candy coloring, though pre-colored candy melts save time and guarantee consistent color.
Lucky Charms Cereal is the signature topping that screams “leprechaun magic” and adds that nostalgic, whimsical element that makes these St Patrick’s Day treats so fun. You can use the whole cereal, or do what many people prefer – pick out just the marshmallow pieces for maximum color and sweetness. One cup of Lucky Charms marshmallows is perfect for a batch, though you can certainly add more if you’re marshmallow-obsessed.
Rainbow Sprinkles add pops of bright color and a slight textural crunch that makes every bite visually interesting. Rainbow jimmies (the long, thin sprinkles) work best because they’re easier to see and create more dramatic visual impact than tiny nonpareils. Look for vibrant, multi-colored mixes with red, orange, yellow, green, blue, and purple. About 1/4 cup of sprinkles covers the bark beautifully without overwhelming it.
Gold Chocolate Coins or gold-wrapped candies tie into the “pot of gold” theme and add an extra element of treasure-hunting fun that kids especially love. Unwrap the coins and either press them whole into the soft chocolate or chop them roughly and scatter the pieces throughout. The gold foil doesn’t need to be removed if you’re using them whole – it adds to the festive appearance.
Mini Chocolate Chips (optional) add small bursts of chocolate flavor throughout the white chocolate base and create beautiful contrast against the lighter background. Rainbow mini chips are especially festive for St Patrick’s Day treats, adding even more color to an already vibrant dessert. Semi-sweet or milk chocolate mini chips both work beautifully.
Shamrock Candies or Decorations (optional) are available in stores during March and add an unmistakable St Patrick’s Day stamp to your bark. Look for shamrock-shaped sugar decorations, green M&Ms, Sixlets, or any candy in shamrock shapes. These turn generic rainbow bark into specifically leprechaun-themed treats.
Sea Salt (optional) is the gourmet touch that elevates sweet bark into something more sophisticated and crave-worthy. A light sprinkle of flaky sea salt over the soft chocolate before it sets creates a sweet-salty contrast that’s absolutely addictive. Use a light hand – you want just a hint of salt, not a noticeable salty taste.
How to Make Leprechaun Bark
Step 1: Line a large baking sheet (about 13×18 inches) with parchment paper or a silicone baking mat. Make sure the parchment extends up the sides slightly so you can lift the finished bark out easily once it’s set. If your parchment wants to curl up, use a tiny dab of melted chocolate or butter in each corner to stick it down flat.
Step 2: Place 24 ounces of white chocolate chips or melting wafers in a large microwave-safe bowl. Microwave on 50% power in 30-second intervals, stirring thoroughly between each interval, until the chocolate is about 90% melted. Remove from the microwave and stir vigorously – the residual heat will melt the remaining chunks. This gradual method prevents the chocolate from seizing or burning.
Step 3: If using a double boiler instead of a microwave, place the white chocolate in a heatproof bowl set over a pot of barely simmering water, making sure the bottom of the bowl doesn’t touch the water. Stir constantly until the chocolate is smooth and completely melted. This method takes longer but gives you more control and is harder to mess up.
Step 4: Pour the melted white chocolate onto your prepared baking sheet. Use an offset spatula or the back of a spoon to spread it into an even layer about 1/4 inch thick. Don’t spread it too thin or it will be fragile and difficult to break into pieces. Don’t make it too thick or it will be hard to bite through. Quarter-inch thickness is the sweet spot.
Step 5: In a separate microwave-safe bowl, melt 8 ounces of green candy melts or green chocolate using the same gentle method – 30-second intervals at 50% power, stirring between each, until smooth and completely melted.
Step 6: Drizzle the melted green chocolate over the white chocolate base in random zigzag or spiral patterns. Don’t overthink this – messy, random drizzles look more natural and leprechaun-like than perfectly controlled lines. Use a spoon, a fork, or transfer the green chocolate to a zip-top bag with a tiny corner snipped off for more control.
Step 7: While both chocolates are still wet and soft, use a butter knife, skewer, or toothpick to gently swirl the green chocolate into the white, creating marbled patterns. Don’t overmix – you want distinct swirls of green and white, not a muddy mixture. Three or four swirling motions through the chocolate creates beautiful marbling.
Step 8: Working quickly before the chocolate starts to set, scatter your toppings generously over the entire surface. Start with the Lucky Charms marshmallows, pressing them gently into the soft chocolate so they stick securely. Then add rainbow sprinkles, unwrapped or chopped gold coins, mini chocolate chips, and any other candies you’re using.
Step 9: For the toppings to stick properly, you must add them while the chocolate is still completely soft and wet. Once chocolate starts to set, toppings won’t adhere and will simply fall off when you break the bark into pieces. Work quickly and don’t second-guess your decorating choices – imperfect looks more charming anyway.
Step 10: If using flaky sea salt, sprinkle just a tiny pinch over the decorated bark now, distributing it evenly across the surface. The salt should be barely noticeable visually but will make a significant impact on flavor.
Step 11: Once fully decorated, carefully transfer the baking sheet to the refrigerator without jostling or tilting, which would cause the toppings to slide. Refrigerate for at least 2 hours, or until the chocolate is completely firm and set. For faster setting, you can place it in the freezer for 30-45 minutes instead.
Step 12: Once the bark is completely hard and set, remove it from the refrigerator and let it sit at room temperature for about 5 minutes. Use the parchment paper overhang to lift the entire sheet of bark out of the pan and onto a cutting board.
Step 13: Break the bark into irregular pieces by hand, or use a large knife to cut it into more uniform squares or rectangles if you prefer a neater presentation. The hand-broken method creates rustic, organic-looking pieces that feel more artisanal. Store the broken pieces immediately or arrange them on a serving platter.

Variations & Tips
Mint Chocolate Version: Add 1/4 teaspoon of peppermint extract to the melted white chocolate before spreading for a refreshing mint chocolate bark that tastes like Thin Mints meets Lucky Charms. The mint flavor pairs beautifully with the sweetness and adds sophistication.
Dark Chocolate Base: Swap the white chocolate for dark or milk chocolate for a less sweet version that appeals to adults. Use green candy melts for the swirl and the same colorful toppings – the contrast of dark chocolate with bright toppings is stunning.
Peanut Butter Swirl: Melt 1/2 cup of peanut butter and drizzle it over the white chocolate along with the green chocolate. Swirl all three together for a peanut butter cup meets leprechaun flavor combination that’s incredibly addictive.
Cookie Crunch Addition: Crush 10-12 Oreos or shortbread cookies and sprinkle them over the bark along with the other toppings. The cookie pieces add textural interest and make the bark even more substantial and filling.
Gluten-Free Version: Use certified gluten-free chocolate chips and verify that all your toppings (cereals, candies, sprinkles) are labeled gluten-free. Many mainstream chocolate chips and candies are naturally gluten-free, but always check labels to be certain.
Pretzel Magic: Press small pretzel twists or broken pretzel pieces into the soft chocolate along with the other toppings. The salty crunch of pretzels against sweet chocolate is a classic combination that elevates any bark recipe dramatically.
Adult Irish Cream: Add 2 tablespoons of Bailey’s Irish Cream or Irish whiskey to the melted white chocolate and stir thoroughly before spreading. The alcohol adds sophisticated depth without making the bark taste overtly boozy. This version is perfect for adult celebrations.
Layered Rainbow: Instead of swirling, create distinct horizontal stripes of different colored chocolates – white, then green, then yellow, then orange – layering and letting each color set slightly before adding the next. The cross-section reveals a beautiful rainbow when broken.
Pro Tip – Chocolate Seizing: The enemy of smooth melted chocolate is water in any form. Even a single drop of water can cause chocolate to “seize” into a grainy, unusable mess. Make absolutely sure all your bowls and utensils are completely dry before melting chocolate. If your chocolate does seize, you can sometimes save it by vigorously stirring in a tablespoon of vegetable oil or coconut oil until smooth again.
Temperature Control: If your kitchen is very warm, the chocolate may not set properly at room temperature even after hours. Always refrigerate bark to set it, and store finished bark in a cool place or even refrigerated if your home is above 75°F. Heat-softened bark loses its satisfying snap and becomes sticky.
Leftovers & Storage
Leprechaun Bark stores exceptionally well and actually improves slightly over the first day or two as the flavors meld and the toppings settle into the chocolate. Proper storage keeps it fresh, crisp, and beautiful for well over a week.
Store broken bark pieces in an airtight container at room temperature for up to 2 weeks. Layer the pieces with parchment or wax paper between each level if stacking to prevent them from sticking together. Keep the container in a cool, dry place away from direct sunlight and heat sources, which can cause the chocolate to soften or develop a white “bloom.”
Refrigeration extends the shelf life even further, up to 3-4 weeks, and is recommended if your kitchen is warm or humid. However, bring refrigerated bark to room temperature for 10-15 minutes before serving for the best texture and flavor. Cold chocolate bark tastes muted and the texture is harder and less pleasant than room-temperature bark.
Never freeze chocolate bark with cereal or cookie toppings, as these components will become soggy and lose their crunch when thawed. Plain chocolate bark without mix-ins freezes beautifully for up to 3 months, but anything with porous toppings like Lucky Charms or sprinkles won’t maintain quality through freezing.
For gifting these St Patrick’s Day treats, arrange bark pieces in clear cellophane bags tied with green and gold ribbons, or layer them in decorative tins with parchment paper between layers. Add a festive gift tag that says “Leprechaun’s Treasure” or “Pot of Gold Bark” for a charming homemade gift.
Transport bark to parties in the container it’s stored in, keeping it as cool as possible during travel. On warm days, place the container in a cooler with ice packs (not directly touching the container) to prevent melting. Bark that melts even slightly during transport will lose its beautiful appearance and develop a sticky texture.
Create a stunning party presentation by arranging bark pieces on a platter lined with green tissue paper or a shamrock-patterned napkin. Add chocolate gold coins scattered around the bark, small pots made from black paper cups filled with yellow candies, or even a rainbow arch made from colored paper or fruit leather spanning over the platter.
If the bark develops white streaks or spots (called “bloom”), it’s still perfectly safe to eat – this is just cocoa butter or sugar crystals rising to the surface due to temperature fluctuations. The bloom is purely cosmetic and doesn’t affect flavor, though it does look less appetizing. Prevent bloom by storing bark at consistent temperatures.
Leftover bark pieces can be chopped and used as ice cream toppings, stirred into brownie batter for extra color and crunch, or crumbled over frosted cupcakes for a festive finishing touch. Small broken pieces that aren’t presentable as bark can be melted back down and used in other recipes rather than wasted.
For classroom or office treats, break the bark into approximately uniform pieces and package individually in small cellophane bags or place each piece in a cupcake liner arranged in a large box or basket. Individual packaging makes distribution easier and keeps sticky fingers away from the remaining treats.
These Leprechaun Bark proves once and for all that the very best St Patrick’s Day treats don’t require baking expertise, expensive ingredients, or hours of your precious time. They just require chocolate, toppings, and the willingness to embrace the joy of messy, colorful, whimsical desserts that capture the pure magic of leprechauns, rainbows, and pots of gold. Make this once and it will become your go-to recipe for every March celebration, requested year after year by everyone lucky enough to snag a piece before it vanishes!
Leprechaun Bark
Ingredients
Equipment
Method
- Line a 13×18-inch baking sheet with parchment paper.
- Melt white chocolate in a microwave-safe bowl at 50% power in 30-second intervals, stirring between each, until smooth.
- Spread melted white chocolate evenly onto prepared baking sheet about 1/4 inch thick.
- Melt green candy melts using the same method until smooth.
- Drizzle green chocolate over white chocolate in zigzag patterns.
- Swirl gently with a knife or skewer to create a marbled effect without overmixing.
- Immediately sprinkle Lucky Charms marshmallows, rainbow sprinkles, gold candies, and mini chocolate chips over the surface. Press lightly to adhere.
- Sprinkle a light pinch of flaky sea salt over the top if using.
- Refrigerate for at least 2 hours until completely firm.
- Lift bark from pan using parchment and break into pieces. Serve or store.