Chili and Noodles Recipe
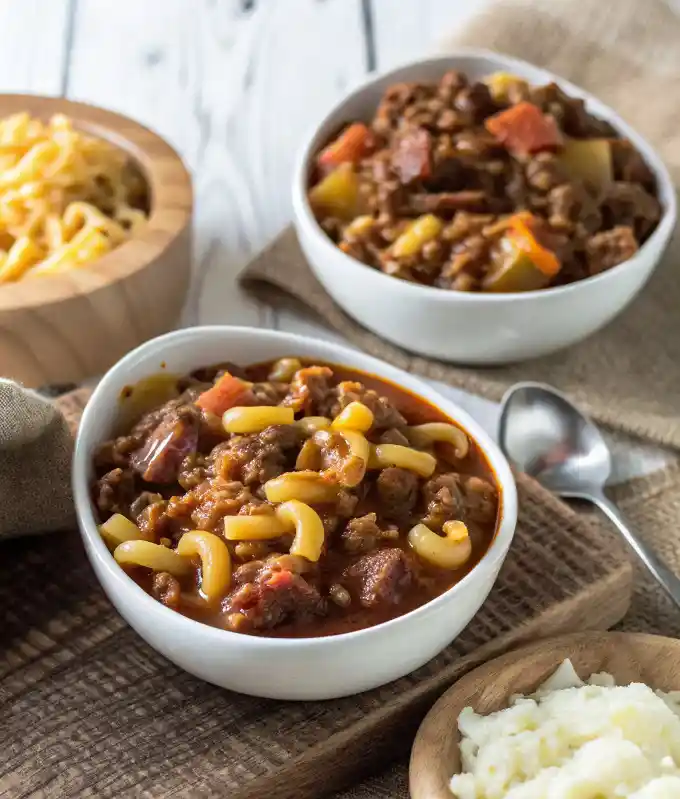
If you’ve ever found yourself staring at the fridge, tired after a marathon workday and craving comfort food (yeah, I’ve been there too) — the classic chili and noodles recipe seriously saves the evening. You know that moment when you’re so hungry you might just chew on plain bread? Why not treat yourself to a bowl packed with hearty chili AND cozy noodles? It’s filling, it warms you from the inside, and honestly, it might just beat takeout on a cold night. Not kidding. Plus, there are a million ways to make it your own. What Noodles for Chili Alright, let’s just get the big noodle question out of the way, because I’ve tried dozens. Every family’s got their favorite, but here’s the scoop: egg noodles are what most folks toss in their chili and noodles recipe. They’re sturdy, cozy, and soak up the flavor like nobody’s business. Sometimes I’ll go rogue and toss in spaghetti or elbow macaroni if that’s all I’ve got. Use what’s in your pantry, honestly. The key thing is you want a noodle that won’t turn to complete mush — we’ve all had sad, soggy pasta and it’s a disaster. Quick tip: cook noodles in a separate pot, drain, then ladle chili right over. Keeps the noodles from soaking up all the broth and going gluey. (I learned the hard way, trust me.) If you want the “comfort food of my Midwest childhood” vibe, always egg noodles. Feeling wild? Add broken-up lasagna sheets — makes it so homey. And hey, gluten-free, whole wheat, whatever you dig, it all works here. What Meat for Chili Let me be blunt. The meat MAKES the chili and noodles recipe, if you ask me. Ground beef is the go-to; it browns up quick and gives you that deep, savory flavor everybody expects. Sometimes I’ll mix it up and use ground turkey or even a little leftover steak chopped up (leftovers, for the win). If you wanna keep things lean, turkey or chicken are top picks. Pork? Sure, why not! Occasionally I’ll grab a combo pack — half beef, half pork — just to shake it up. Vegetarian? Canned lentils or crumbled tofu step in and hold their own, but the classic has to be beef. Don’t forget, whatever you use, make sure to brown it well for big flavor. This isn’t the time to skimp — let the edges get crispy for that five-star restaurant flavor at home. Will Chili Thicken as it Cooks? Honestly, this surprised me the first time I made it (I totally forgot to add extra liquid and ended up with chili “goop”). Yup, chili thickens as it cooks, especially if you’re simmering with the lid off. The longer it bubbles, the thicker — and richer — it gets. Some people love it super chunky, others like a soupier vibe. Just keep an eye on the pot. Too thick? Splash in a little broth. Too thin? Let it simmer a little longer (no need to overthink it). If you add noodles to the chili, remember they’ll soak up moisture, so sometimes I cook mine with a bit of extra tomato juice. Oh, and don’t stress if it isn’t perfect. Perfection is overrated for chili and noodles recipe nights. What Goes in Chili? Ingredients Most Commonly Used for Chili Recipes Everyone’s grandma has a secret ingredient, but some things are classic. Here’s what almost always ends up in my chili and noodles recipe: Seriously, you can riff on this like a jazz solo. Sweet corn, carrots, even cocoa powder or cinnamon if you wanna go wild. Use what you love, skip what you don’t. Serving Suggestions Ingredient Why It Works Ground Beef Adds rich depth and heartiness Kidney Beans For classic texture and protein Egg Noodles Soaks up all the chili flavor Diced Tomatoes Keeps it juicy and bright “This chili and noodles recipe was so easy, even my picky kids went back for seconds. I loved that I could use whatever I already had at home!” — Jenny L. Storing & Reheating Leftovers If you’ve managed NOT to eat it all in one go (my partner always sneaks extra bowls), storing is easy. Just pop leftover chili and noodles in an airtight container and stick it in the fridge. Honestly, I think it’s even better the next day. To reheat, you can microwave it (cover it, or you’ll get a chili splatter explosion — again, learned the hard way). Or just warm it in a pot on the stove, low and slow with a splash of water or broth to loosen things back up. Keeps for 3-4 days, easy. Just don’t try freezing the noodles; they get weirdly squishy. Chili freezes okay, but always make fresh noodles for round two. Trust me, noodle weirdness is real. Common Questions Can I use leftover pasta for chili and noodles recipe nights? Absolutely. As long as it isn’t a soggy mess, it’ll work fine. Just warm it up first. …